<?xml version="1.0" encoding="utf-8"?>
<feed xml:lang="en-us" xmlns="http://www.w3.org/2005/Atom"><title>The Notepad</title><link rel="self" href="https://thenotepad.org/feed.xml"/><generator uri="http://pollenpub.com/">Pollen (custom feed)</generator><id>https://thenotepad.org/</id><updated>2020-03-15T12:32:35-05:00</updated><author><name>Joel Dueck</name><email>&#106;&#111;&#101;&#108;&#64;&#106;&#100;&#117;&#101;&#99;&#107;&#46;&#110;&#101;&#116;</email></author><entry><author><name>Joel Dueck</name></author><published>2019-07-10T00:00:00-05:00</published><updated>2019-07-10T00:00:00-05:00</updated><title>Racket School 2019</title><link rel="alternate" href="https://thenotepad.org/posts/racket-school-2019.html"/><id>https://thenotepad.org/posts/racket-school-2019.html</id><summary type="html"><![CDATA[I’m in Salt Lake City this week attending Racket School and RacketCon. I’ve created <a href="https://thenotepad.org/repos/rs2019">a Fossil repository for my code and notes</a> in case anyone is interested.]]></summary></entry><entry><author><name>Joel Dueck</name></author><published>2018-07-07T00:00:00-05:00</published><updated>2018-07-07T00:00:00-05:00</updated><title>A Quick Macro for Pollen</title><link rel="alternate" href="https://thenotepad.org/posts/a-quick-pollen-macro.html"/><id>https://thenotepad.org/posts/a-quick-pollen-macro.html</id><summary type="html"><![CDATA[<p>One of Pollen’s <a href="https://groups.google.com/d/msg/pollenpub/FdWdGgL9jSk/1VWpX_nsAAAJ">somewhat recent</a> additions is the <a href="http://docs.racket-lang.org/pollen/Core.html#%28form._%28%28lib._pollen%2Fcore..rkt%29._for%2Fsplice%29%29"><code>for/splice</code></a> function, which lets you loop through one or more lists and inject the results into a surrounding expression.</p><p>Here’s an example from the code for the home page on this blog:</p><div class="listing-filename">&#128196; index.html.pp</div><pre class="code">...
◊for/splice[[(post (in-list (latest-posts 10)))]]{
   &lt;article&gt;
   ◊(hash-ref post 'header_html)
   ◊(hash-ref post 'html)
   &lt;/article&gt;
   &lt;hr&gt;
}
...</pre><p>It’s very useful, but I’m sure you’ve noticed something about this code: <em>many many parentheses</em> in the arguments list for <code>for/splice</code>. Well, it is the way it is, because the <code>for/splice</code> function is a direct analogue of Racket’s <a href="https://docs.racket-lang.org/reference/for.html?q=for%2Flist#%28form._%28%28lib._racket%2Fprivate%2Fbase..rkt%29._for%2Flist%29%29"><code>for/list</code> function</a>, which supports looping through multiple lists at the same time. It’s nice to have the flexibility. But there’s no denying the readability of the code suffers in the most common use cases.</p><p>If, like me, you usually only need to loop through a single list, you can put a macro like the one below in your <code>pollen.rkt</code>:</p><div class="listing-filename">&#128196; pollen.rkt</div><pre class="code">(require pollen/core)

...

(provide for/s)
(define-syntax (for/s stx)
  (syntax-case stx ()
    [(_ thing listofthings result-expr ...)
     #'(for/splice ([thing (in-list listofthings)]) result-expr ...)]))</pre><p>This cuts down on the parentheses quite a bit:</p><div class="listing-filename">&#128196; index.html.pp</div><pre class="code">...
◊for/s[post (latest-posts 10)]{
   &lt;article&gt;
   ◊(hash-ref post 'header_html)
   ◊(hash-ref post 'html)
   &lt;/article&gt;
   &lt;hr&gt;
}
...</pre>]]></summary></entry><entry><author><name>Joel Dueck</name></author><published>2018-06-21T00:00:00-05:00</published><updated>2018-07-09T00:00:00-05:00</updated><title>Using SQLite to Speed Up Pollen Renders</title><link rel="alternate" href="https://thenotepad.org/posts/pollen-and-sqlite.html"/><id>https://thenotepad.org/posts/pollen-and-sqlite.html</id><summary type="html"><![CDATA[<p>I use a system written in <a href="http://pollenpub.com">Pollen and Racket</a><label for="78625c" class="margin-toggle">&#8853;</label><input type="checkbox" id="78625c" class="margin-toggle"/><span class="marginnote">This post assumes some familiarity with Pollen and SQL.</span> to generate this blog. It renders the HTML file for most individual pages in less than half a second per page —not blazing, certainly, but serviceable. However, when rendering pages that combine multiple posts, my code has been interminably slow—40 seconds to render the home page, for example, and 50 seconds to render the RSS feed.</p><p>By creating my own cache system using a SQLite database, I was able to drop those times to less than a second each.</p><p>My old approach, which used only Pollen’s functions for retrieving docs and metas, had some pretty glaring inefficiencies<label for="d84580" class="margin-toggle sidenote-number"></label><input type="checkbox" id="d84580" class="margin-toggle"/><span class="sidenote">For example, in the code for my RSS feed, I was fetching the docs and metas from every document in the entire pagetree (that is, every post I had ever written) into a list of <code>struct</code>s, even though I would only use the five most recent posts in the feed itself.</span>—so glaring, in fact, that I probably could have cut my render times for these “problem pages” down to 3–6 seconds just by addressing them. But I thought I could get even further by making my own cache system.</p><p>Pollen’s <a href="http://docs.racket-lang.org/pollen/Cache.html">cache system</a> is optimized for fetching individual docs and metas one by one, not for grabbing and dynamically sorting a whole bunch of them at once. Also, Pollen’s cache doesn’t store the rendered HTML of each page. There are good reasons for both of these things; Pollen is optimized for making books, not blogs, and the content of a book doesn’t often change. But Pollen was also designed to be infinitely flexible, which allows us to extend it with whatever facilities we need.</p><p>Here is the gist of the new approach:</p><ol><li>Create an<label for="166c6d" class="margin-toggle sidenote-number"></label><input type="checkbox" id="166c6d" class="margin-toggle"/><span class="sidenote">After hearing SQLite’s author on <a href="https://changelog.com/podcast/201">this podcast</a> I fell into the habit of pronouncing it the way he does: S-Q-L-ite, as though it were a mineral. Hence, “an”.</span> SQLite database</li><li>In the template code for individual posts (i.e. at the same time the post is being rendered to HTML) save the post’s title, date and a copy of the rendered HTML in the database.</li><li>In the “combination pages” (such as <code>index.html</code> and <code>feed.xml</code>), query the SQLite database for the HTML and spit that out.</li></ol><p>By doing this, I was able to make the renders 50–80 times faster. To illustrate, here are some typical render times using <a href="https://github.com/otherjoel/thenotepad/blob/2fd5c69b126f8695929a2c12b68b437afdc48416/index.html.pp">my old approach</a>:</p><pre class="code">joel@macbook$ raco pollen render feed.xml
rendering feed.xml
rendering: /feed.xml.pp as /feed.xml
cpu time: 51819 real time: 52189 gc time: 13419

joel@macbook$ raco pollen render index.html
rendering index.html
rendering: /index.html.pp as /index.html
cpu time: 39621 real time: 39695 gc time: 7960</pre><p>And here are the render times for the same pages after adding the SQLite cache:</p><pre class="code">joel@macbook$ raco pollen render feed.xml
rendering feed.xml
rendering: /feed.xml.pp as /feed.xml
cpu time: 659 real time: 660 gc time: 132

joel@macbook$ raco pollen render index.html
rendering index.html
rendering: /index.html.pp as /index.html
cpu time: 824 real time: 825 gc time: 188</pre><p>This still isn’t nearly as fast as some static site generators<label for="40b0c3" class="margin-toggle sidenote-number"></label><input type="checkbox" id="40b0c3" class="margin-toggle"/><span class="sidenote"><a href="https://gohugo.io">Hugo</a> has been <a href="https://youtu.be/CdiDYZ51a2o">benchmarked</a> building a complete 5,000 post site in less than six seconds total.</span>. But it’s plenty good enough for my needs.</p><h2>Creating the cache</h2><p>I made a new file, <code>util-db.rkt</code><label for="5bfb1f" class="margin-toggle">&#8853;</label><input type="checkbox" id="5bfb1f" class="margin-toggle"/><span class="marginnote">You can browse <a href="https://github.com/otherjoel/thenotepad">the source code for this blog</a> on its public repository.</span> to hold all the database functionality and to provide functions that save and retrieve posts. My <code>pollen.rkt</code> re-provides all these functions, which ensures that they are available for use in my templates and <code>.pp</code> files.</p><p>The database itself is created and maintained by the <code>template.html.p</code> file used to render the HTML for indivdual posts. Here is the top portion of that file:</p><div class="listing-filename">&#128196; template.html.p</div><pre class="code">...
◊(init-db)
◊(define-values (doc-body comments) (split-body-comments doc))
◊(define doc-body-html (-&gt;html (cdr doc-body)))
◊(define doc-header (-&gt;html (post-header here metas)))
◊(save-post here metas doc-header doc-body-html)
&lt;!DOCTYPE html&gt;
&lt;html lang="en"&gt; ...</pre><p>The expression <code>init-db</code> ensures the database file exists, and runs some <code>CREATE TABLE IF NOT EXISTS</code> queries to ensure the tables are set up correctly. The <code>save-post</code> expression saves the post’s metas and rendered HTML into the database.</p><p>Some more notes on the code above: The <code>split-body-comments</code> and <code>post-header</code> functions come from another module I wrote, <code>util-template.rkt</code>. The first separates any comments (that is, any <code>◊comment</code> tags in the Pollen source) from the body of the post, which lets me save just the body HTML in the database. The second provides an X-expression for the post’s header, which includes or omits various things depending on the post’s metas.</p><h2>Database design</h2><p>Internally, <code>util-db.rkt</code> has some very basic functions that generate and execute the SQL queries I need.</p><p>If you watch the console while rendering a single post, you’ll see these queries being logged (indented for clarity):</p><pre class="code">CREATE TABLE IF NOT EXISTS `posts`
  (`pagenode`,
   `published`,
   `updated`,
   `title`,
   `header_html`,
   `html`,
   PRIMARY KEY (`pagenode`))

CREATE TABLE IF NOT EXISTS `posts-topics`
  (`pagenode`,
   `topic`,
   PRIMARY KEY (`pagenode`, `topic`))

INSERT OR REPLACE INTO `posts`
  (`rowid`, `pagenode`, `published`, `updated`, `title`, `header_html`, `html`)
  values ((SELECT `rowid` FROM `posts` WHERE `pagenode`= ?1), ?1, ?2, ?3, ?4, ?5, ?6)

DELETE FROM `posts-topics` WHERE `pagenode`=?1
INSERT INTO `posts-topics` (`pagenode`, `topic`)
  VALUES ("posts/pollen-and-sqlite.html", "SQLite"),
         ("posts/pollen-and-sqlite.html", "Pollen"),
         ("posts/pollen-and-sqlite.html", "Racket"),
         ("posts/pollen-and-sqlite.html", "programming")</pre><p>The schema and queries are designed to be <i>idempotent</i>, meaning I can safely run them over and over again and end up with same set of records every time. So, no matter what state things are in, I don’t have to worry about ending up with duplicate records or other out-of-whacknesses when I render the site.</p><p>The database is also designed to need as few queries as possible, both when saving and when fetching data: for example, using a single query to either create something if it doesn’t exist, or to replace it if it does exist. Also, where applicable, creating multiple records in a single query (as in the last example above).</p><p>Finally, in the interests of keeping things “simple”, I have tried to keep the database <em>disposable</em>: that is, no part of the site’s content has its origin or permanent residence in the database itself. I can delete it at any point and quickly rebuild it. That way my use of it remains limited to my original plan for it: a speed enhancement, and nothing more.</p><h2>Building the site: order of operations</h2><p>Since home page, RSS feed, and other aggregation pages are now getting all their content from the SQLite database, it’s important that the database be up to date before those pages are rendered.</p><p>I already use a <a href="https://en.wikipedia.org/wiki/Makefile">makefile</a> to make sure that when things change, only the parts that need updating are rebuilt, and only in a certain order. I won’t go into detail about how the makefile works (a topic for another post, perhaps), but, in short, when I run <code>make all</code>, it does things in roughly the following order:</p><ol><li>If any of the “core files” have changed, force a re-render of <em>all</em> individual posts.</li><li>If any individual posts have been changed or added, render just those to HTML. (This step is automatically skipped if step 1 was run, because that step will already have brought all the posts up to date.)</li><li>If any posts <em>or</em> core files have been changed or added, force a re-render of the “aggregation pages”, such as the home page, the Topics page, and the RSS feed.</li></ol><p>This way, the pages that update the cache database are rendered before the pages that draw from the database, and everything is hunky-dory.</p><h2>The Topics system</h2><p>This blog makes use of “topics”, which are basically like tags. A post can have zero or more topics, and a topic can have or more posts.</p><p>This many-to-many relationship is another good fit for the database. You’ll have noticed above that I store the topic/post relationships in a separate table. With each topic-post pair stored in its own row, it is fast and easy to fetch them all out of the database at once. The <code>util-db.rkt</code> module provides a function, <code>topic-list</code>, which does this. Here’s what you see if you call it from DrRacket:</p><pre class="code">&gt; (topic-list)
"SELECT `topic`, p.pagenode, p.title FROM `posts-topics` t INNER JOIN `posts` p ON t.pagenode = p.pagenode ORDER BY `topic` ASC"
'(("Active Directory" ("posts/laptop-user-not-authenticating-in-nt.html" "Laptop User Not Authenticating in an NT Domain After Changing Password"))
  ("Apple" ("posts/siri-slow-unreliable-and-maybe-not.html" "Siri: Slow, unreliable, and maybe not a priority at Apple"))
  ("audio"
   ("posts/how-to-convert-mp3-files-for-use-as-on-hold-music.html" "How to convert mp3 files for use as on-hold music")
   ("posts/how-to-record-with-a-yeti.html" "How to Record With a Yeti and Audacity (and eliminate background noise)"))
...</pre><p>The SQL query uses <code>INNER  JOIN</code> to link the posts in the <code>posts-topics</code> table with their titles in the <code>posts</code> table, resulting in a list of rows with three columns each: topic, pagenode (the relative path to the HTML file), and title. The <code>topic-list</code> function then groups these rows by the topic name and returns the resulting list.</p><p>The <code>topics.html.pp</code> file can make use of this nested list with some help from Pollen’s new <a href="/posts/a-quick-pollen-macro.html"><code>for/splice</code> function</a> (Thanks Matthew!):</p><div class="listing-filename">&#128196; topics.html.pp</div><pre class="code">...
&lt;table&gt;
◊for/s[topic (topic-list)]{
  &lt;tr&gt;
    &lt;td&gt;&lt;a name="#◊(car topic)"&gt;◊(car topic)&lt;/a&gt;&lt;/td&gt;
    &lt;td&gt;&lt;ul&gt;
     ◊for/s[post (cdr topic)]{
      &lt;li&gt;&lt;a href="/◊(list-ref post 0)"&gt;◊(list-ref post 1)&lt;/a&gt;&lt;/li&gt;
     }&lt;/ul&gt;&lt;/td&gt;
   &lt;/tr&gt;
}
&lt;/table&gt; ...</pre><h2>Removing a post</h2><p>One last consideration: <em>removing</em> a post is no longer as simple as deleting its Pollen source document. I have to remove it from the SQLite database as well, otherwise it will continue to appear on the home page, RSS feed, etc.</p><p>There are a few ways I could do this. The simplest would be to delete the database file and rebuild the site from scratch. Or I could open the database in a program like <a href="http://sqlitebrowser.org">DB Browser for SQLite</a> and delete the rows manually. Or I could write a script to automate this. I don’t often need to delete posts, so I’ll probably put off writing any scripts for now.</p>]]></summary></entry><entry><author><name>Joel Dueck</name></author><published>2018-04-18T00:00:00-05:00</published><updated>2018-04-18T00:00:00-05:00</updated><title>Publishing the Dice Word List book</title><link rel="alternate" href="https://thenotepad.org/posts/publishing-dicewordbook.html"/><id>https://thenotepad.org/posts/publishing-dicewordbook.html</id><summary type="html"><![CDATA[<p>I recently published a small book, the <a href="https://dicewordbook.com">Dice Word List</a>, and I wanted to write down some of the technical details and approaches I took in getting that little thing out the door. Parts of this post assume some familiarity with <a href="http://docs.racket-lang.org/pollen/index.html">Pollen</a> and <a href="https://www.latex-project.org/"><span class="latex">L<span class="latex-sup">a</span>T<span class="latex-sub">e</span>X</span></a>.</p><p class="pause-before"><span class="newthought">Although the</span> book’s cover is not very complex or impressive, creating it was the biggest detour I took. I didn’t just want a cover, I wanted better tools for making covers for future books as well.</p><p>I’ve made a few books for fun over the years, and creating the cover was always my least favorite part of the process. I had to fire up a graphics program, calculate the size of everything, and click around until I had what I wanted. If my page count changed, I’d have to recalculate everything and manually futz with it some more. This kind of activity always felt wrong in the context of the rest of the project, the whole point of which which was to <em>automate</em> book production with code, not clicks.</p><p>So for this project, I created <a href="http://docs.racket-lang.org/bookcover/index.html">bookcover</a>: a Racket language for writing book covers as programs. Check out <a href="http://docs.racket-lang.org/bookcover/Overview.html#%28part._.Quick_start%29">the examples</a> in the documentation to get a feel for how it works.</p><p>Writing and packaging <code>bookcover</code> was a fun publishing exercise in its own right, and it deserves its own blog post. I learned a lot about Racket in the process.<label for="4806e4" class="margin-toggle">&#8853;</label><input type="checkbox" id="4806e4" class="margin-toggle"/><span class="marginnote">The web book <a href="https://beautifulracket.com"><i>Beautiful Racket</i></a>, and the post <a href="http://blog.racket-lang.org/2017/03/languages-as-dotfiles.html"><i>Languages as Dotfiles</i></a> from the Racket blog, were a huge help in learning and understanding the concepts I needed to write this package.</span> Also, I’m a documentation nerd; I love that Racket’s documentation system is itself a full-powered Racket language, and I love the fact that they have such well-considered and accessible style guides for <a href="http://docs.racket-lang.org/style/Units_of_Code.html">code</a> and <a href="http://docs.racket-lang.org/style/reference-style.html">prose</a>. It was great to have an excuse to use these tools and to contribute to the Racket ecosystem in some small way.</p><p>But the best part is that I now have a way to crank out book covers for future books.<label for="b74686" class="margin-toggle">&#8853;</label><input type="checkbox" id="b74686" class="margin-toggle"/><span class="marginnote">I have wanted to have this kind of tool ever since I read about <a href="https://web.archive.org/web/20081015005111/http://postspectacular.com/process/20080711_faberfindslaunch"><i>Faber Finds</i> generative book covers</a>.</span>  And, if you use Racket, you do too.</p><p class="pause-before"><span class="newthought">As with</span> previous projects, I used <span class="latex">L<span class="latex-sup">a</span>T<span class="latex-sub">e</span>X</span> to produce the book’s PDF. <span class="latex">L<span class="latex-sup">a</span>T<span class="latex-sub">e</span>X</span> is itself a programming language, but, like most people, I find its syntax grotesque and arbitrary (kind of like its name). So for just about all the interesting bits I used <a href="http://docs.racket-lang.org/pollen/index.html">Pollen</a> as a preprocessor.</p><p>For example, here’s the part of my <span class="latex">L<span class="latex-sup">a</span>T<span class="latex-sub">e</span>X</span> template that sets the book’s measurements:</p><div class="listing-filename">&#128196; book.tex.pp</div><pre class="code">% Here is where we configure our paper size and margins.
◊(define UNITS "mm")
◊(define STOCKHEIGHT 152.4)
◊(define STOCKWIDTH 105.0)
◊(define TEXTBLOCKHEIGHT (* (/ 7.0 9.0) STOCKHEIGHT))
◊(define TEXTBLOCKWIDTH (* (/ 7.0 9.0) STOCKWIDTH))
◊(define SPINEMARGIN (/ STOCKWIDTH 8.0))
◊(define UPPERMARGIN (/ STOCKHEIGHT 9.0))
◊(define (c num) (format "~a~a" (real-&gt;decimal-string num 3) UNITS))

\setstocksize{◊c[STOCKHEIGHT]}{◊c[STOCKWIDTH]}
\settrimmedsize{◊c[STOCKHEIGHT]}{◊c[STOCKWIDTH]}{*}
\settypeblocksize{◊c[TEXTBLOCKHEIGHT]}{◊c[TEXTBLOCKWIDTH]}{*}
\setlrmargins{◊c[SPINEMARGIN]}{*}{*}
\setulmargins{◊c[UPPERMARGIN]}{*}{*}
\setheadfoot{13pt}{2\onelineskip}  % first was originally \onelineskip
\setheaderspaces{*}{\onelineskip}{*}
\checkandfixthelayout</pre><p>The first part of that is sensible Pollen code, the second part is <span class="latex">L<span class="latex-sup">a</span>T<span class="latex-sub">e</span>X</span> with Pollen functions wedged in.</p><p>I can’t tell you how many times I had to read the <span class="latex">L<span class="latex-sup">a</span>T<span class="latex-sub">e</span>X</span> documentation and scratch my head in order to understand how to code that second half. Looking at it now, I’ve already forgotten how it works exactly. But thanks to the crystalline little safe space of Pollen written above it, it’s easy for me to come back to it, understand what is happening, and how to change it if I want to.</p><p>Further down, there is also Pollen code that slurps up the  raw <a href="https://www.eff.org/files/2016/07/18/eff_large_wordlist.txt">raw word list text file</a> from the EFF’s website, cooks up <span class="latex">L<span class="latex-sup">a</span>T<span class="latex-sub">e</span>X</span> code for each line, and inserts it all into the book’s middle. This means that in future I could simply substitute a different word list and easily generate a book for it.</p><p class="pause-before"><span class="newthought">I wrote</span> a short preface to the book with some (I hope) fun and useful information in it: how to use Diceware, how secure is it really, all that sort of thing. But security and word list design are really deep topics, and I wanted some good way of referring the interested reader to more informative reads on these topics.</p><p>The problem is, if you put a URL in a printed book, sooner or later it will break: the web page it links to is going to disappear, or the information in it is going to go out of date. Plus, some URLs are really long. Who’s going to bother typing in a long web address?</p><p>The gods of the internet have provided the solution to the broken link problem in the form of <strong>PURL</strong>: the <b>P</b>ersistent <b>URL</b>, a <a href="https://archive.org/services/purl/">service of the Internet Archive</a>. PURL works like a URL shortener such as <code>bit.ly</code> or <code>goo.gl</code>: it lets you create a short URL, and say, in effect, “make this short URL redirect to this other, long URL.” But unlike other URL shorteners, PURL isn’t a profit center or a marketing tool: it’s a service of the Internet Archive, a nonprofit whose whole <i>raison d’être</i> is preserving the Internet, and who will (likely, hopefully) be around for many more decades.</p><p>So I made some PURLs of the links I wanted and put them on the last page of the preface as QR codes.</p><figure><img src="/posts/img/dwb-qr1.jpg" alt="Page of QR codes from the first version of the book" style="width: 1512.0px;"/><figcaption>Page of QR codes from the first version of the book</figcaption></figure><p>
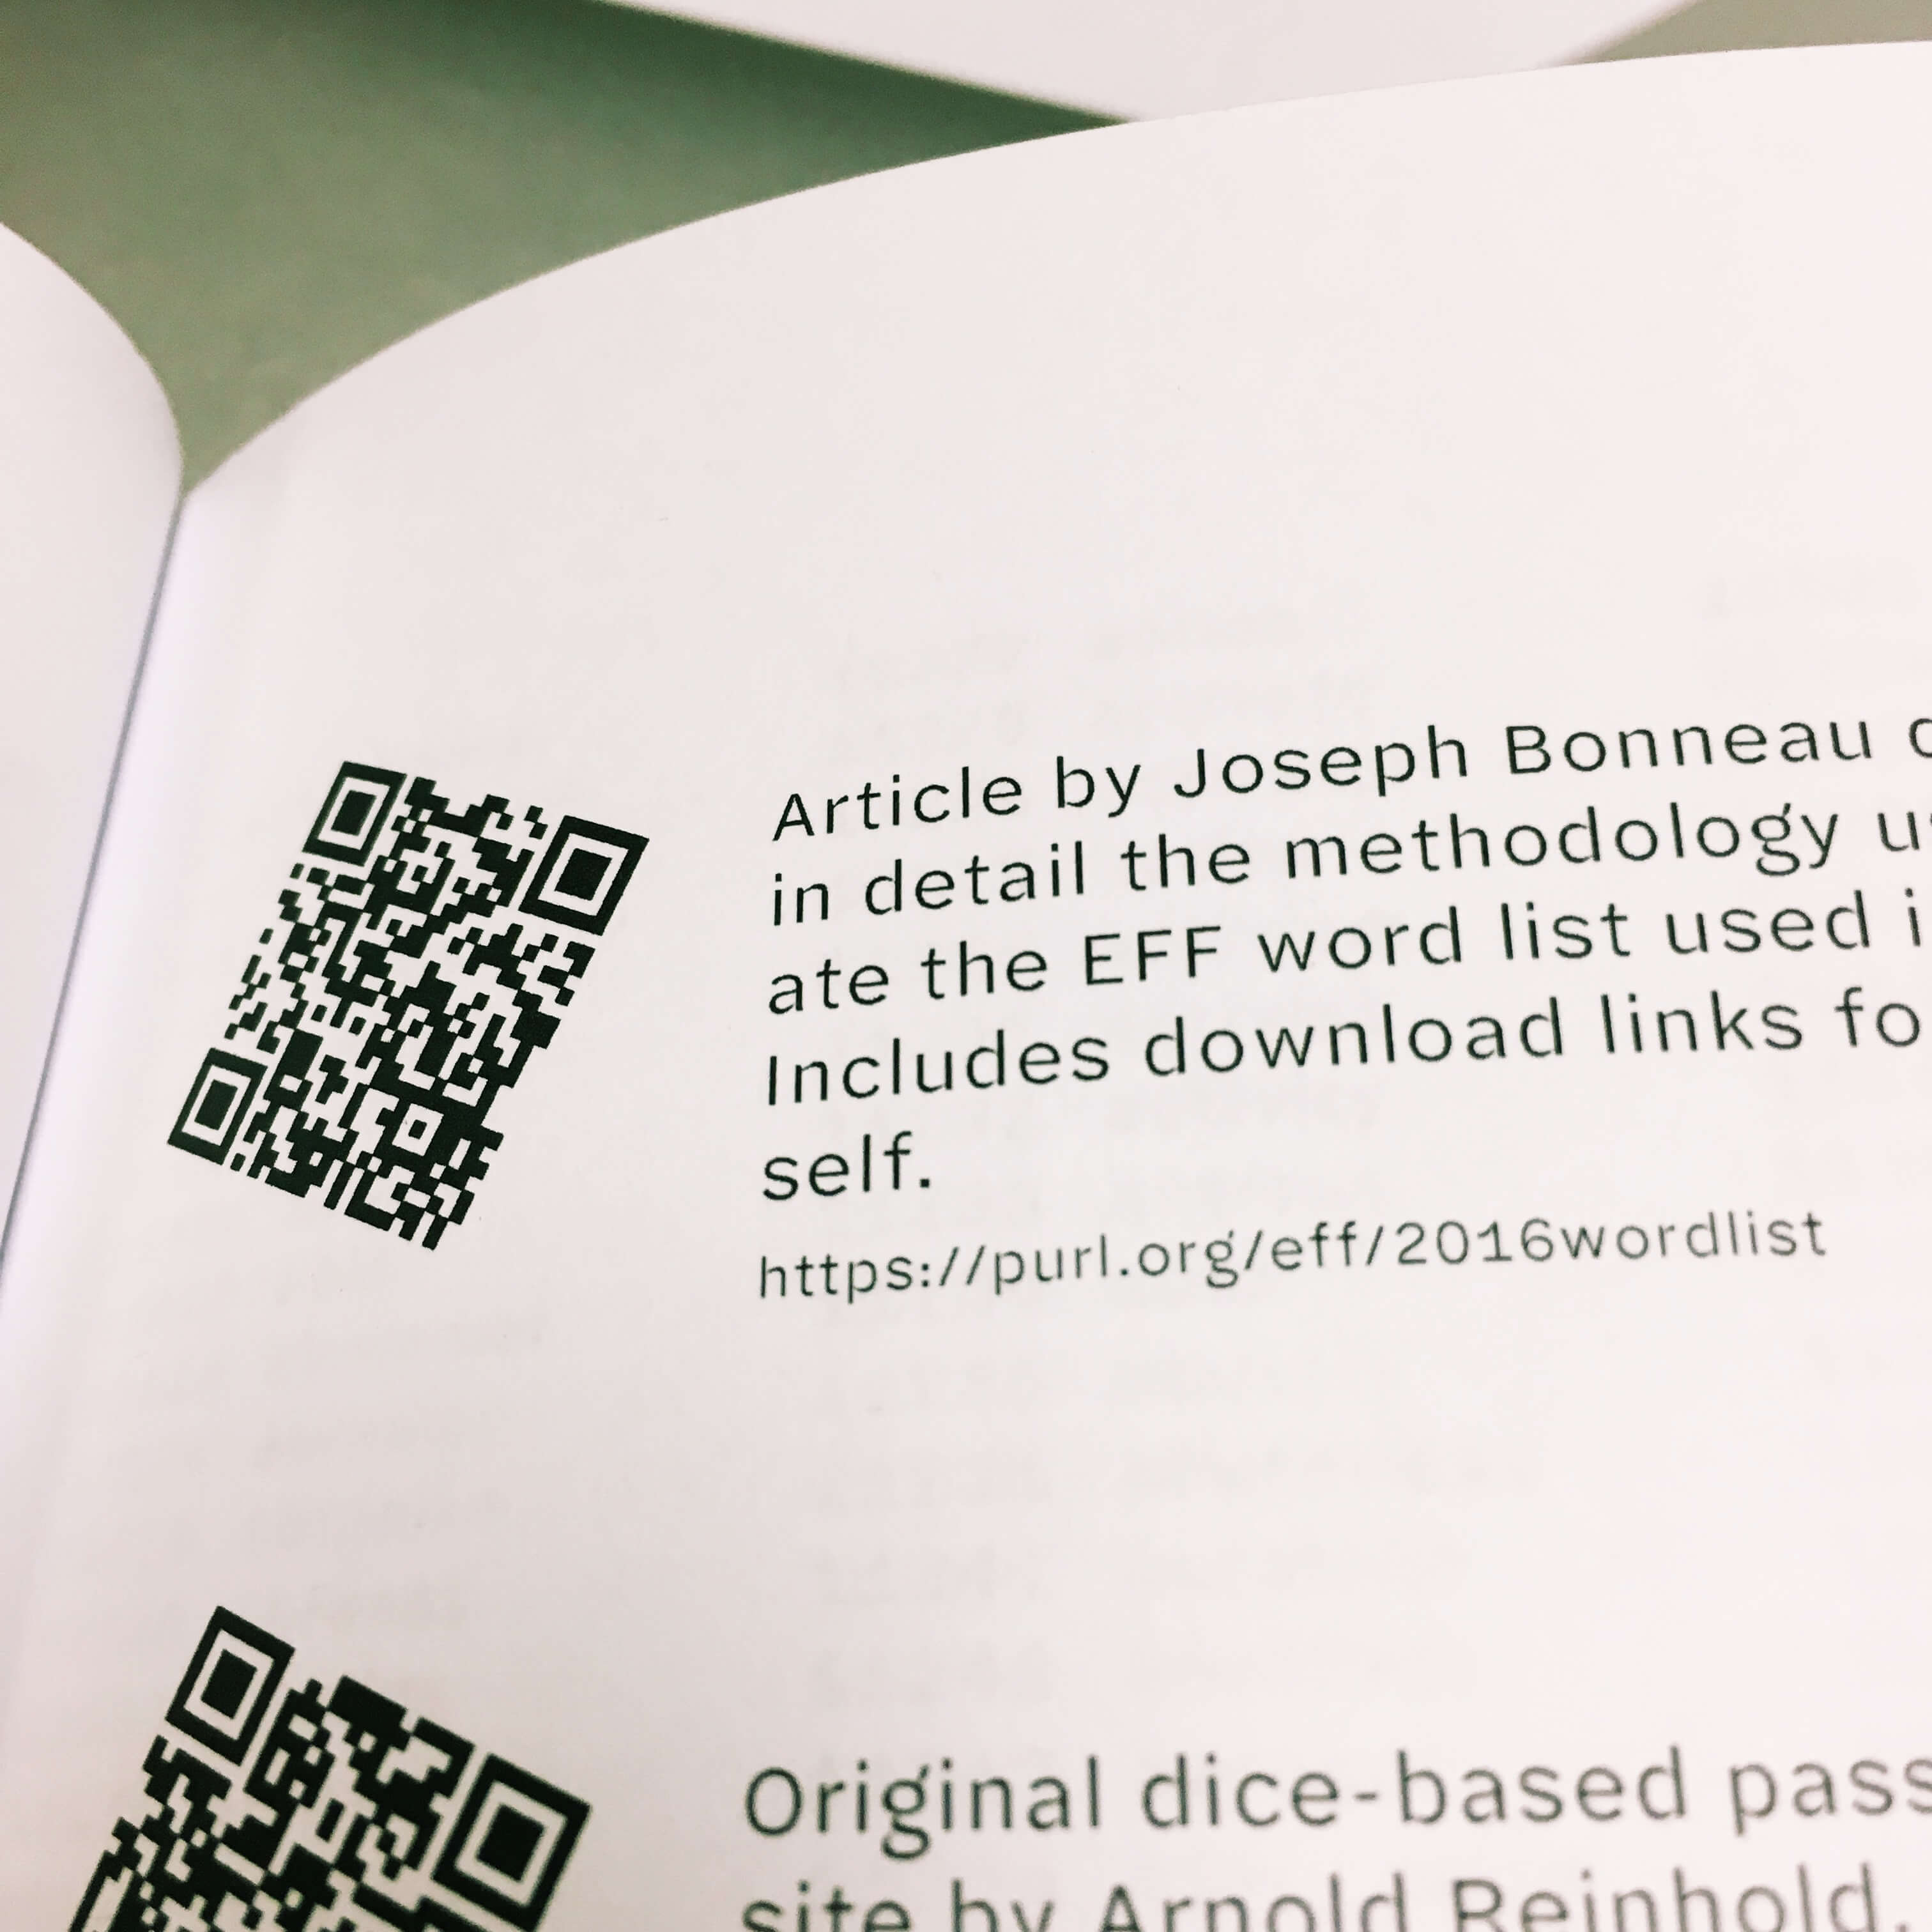
Open the camera app on your phone and point it at one of the codes: it’ll take you right to the web page. If any of those pages ever disappear, I can redirect the PURL to a snapshot of it on the Internet Archive, or to another page. This way the links will be good for at least as long as I’m alive, which is more than can be said for the URLs in 99% of the other books in the world.</p><p>I’m kind of shocked that more people don’t know about and use PURLs. They could, for example, be used as your main “web presence” address, since they are more permanent than even domain names.</p><p><strong>There is also surprisingly little guidance from the service itself about how it should be used.</strong> The “top-level directory” portion of a PURL (the <code>jd/</code> part in the last two PURLs shown above) is called a “domain”. PURL domains seem like they should be an incredibly important, protected resource, since they are permanently tied to the account that created them (once you claim a domain, no one else can create PURLs in that domain)—and, once created <em>can never be deleted!</em> Despite this, creating a PURL domain is easy, too easy. Almost the first thing you see when you log in is a prompt and a form for creating new domains in one click, with no confirmation, no indication that you are doing something permanent. It’s like PURL’s design is begging you to mindlessly create as many domains as you can think of.</p><p>Before I realized this, I had created two PURL domains, one each for the two sites I was linking to: <code>purl.org/eff</code> and <code>purl.org/stdcom</code>. I’m somewhat embarrassed that I now apparently have permanent irrevocable ownership of these “domains”, and am still trying to find out who to contact to remedy this. Meanwhile, I did claim the <code>jd</code> domain and will probably be using solely that domain for all the PURLs I create for my own use, for the rest of my life.</p><p>Back to the book: here’s the <span class="latex">L<span class="latex-sup">a</span>T<span class="latex-sub">e</span>X</span> code I used to generate and place the QR codes:</p><div class="listing-filename">&#128196; book.tex.pp</div><pre class="code">% In the header:
\usepackage{pst-barcode}
\usepackage{tabularx}

% …

\newcommand\qrlink[2]{%
    \begin{pspicture}(0.6in,0.6in)%
        \psbarcode[rotate=-25]{#1}{width=0.6 height=0.6}{qrcode}%
    \end{pspicture}%
    &amp; #2 \par {\tiny \url{#1}} \\[0.55cm]%
}

% … and in the document body:

\begin{tabularx}{\textwidth}{m{0.8in} X}
    \qrlink{https://purl.org/eff/2016wordlist}{Article by Joseph Bonneau etc etc.}
    % … etc …
\end{tabularx}</pre><p>I have no wish to explain this in detail, but if you are attempting to do something similar and are already poring over the manuals for the <code>pst-barcode</code> and <code>tabularx</code> packages, hopefully this will give you something to go on.</p><p class="pause-before"><span class="newthought">I licensed</span> two weights of the <a href="http://halyard.dardenstudio.com/">Halyard Micro</a> typeface for the book, and wanted very much to use it for the headings on the website as well. But this one-page website has only three headings total—not enough to justify the overhead (both technical and <a href="http://dardenstudio.com/license/web-addendum">financial</a>) of an embedded webfont.</p><p>This is where Pollen came in handy again. <label for="fecd90" class="margin-toggle">&#8853;</label><input type="checkbox" id="fecd90" class="margin-toggle"/><span class="marginnote">I used Pollen as a static site generator for <a href="https://dicewordbook.com">the book’s website</a> as well as for the pre-processing of the book itself.</span> The fonts’ standard EULA says it’s fine to use <em>images</em> of the font on a website; so I wrote a function that takes a string, sets it in Halyard Micro, and saves it as an SVG. I then wrote some tag functions that make use of that function. In case it can be of use to anyone, here’s all the relevant code:</p><div class="listing-filename">&#128196; pollen.rkt</div><pre class="code">(define heading-font (make-parameter "Halyard Micro"))
(define heading-size (make-parameter 20))
(define heading-color (make-parameter "orangered"))
(define heading-sizes '(42 30 24))

(define (normalize-string str)
  (let ([str-nopunct (regexp-replace* #rx"[^0-9a-zA-Z ]" str "")])
    (string-join (string-split (string-foldcase str-nopunct)) "-")))

(define (make-heading-svg level txt)
  (define heading-filename
    (format "img/h~a-~a.svg" level (normalize-string txt)))
  (define heading-pict
    (colorize (text txt (heading-font) (heading-size)) (heading-color)))
  (define the-svg (new svg-dc%
                       [width (pict-width heading-pict)]
                       [height (pict-height heading-pict)]
                       [output heading-filename]
                       [exists 'replace]))

  (send* the-svg
    (start-doc "useless string")
    (start-page))

  (draw-pict heading-pict the-svg 0 0)

  (send* the-svg
    (end-page)
    (end-doc))

  heading-filename)

(define (make-heading level attrs elems)
  (define h-size (list-ref heading-sizes (sub1 level)))
  (define h-str (apply string-append (filter string? (flatten elems))))
  (define h-tag (format-symbol "h~a" level))
  (parameterize ([heading-size h-size])
    `(,h-tag ,attrs (img [[src ,(make-heading-svg level h-str)]
                          [class "heading-svg"]
                          [alt ,h-str]]))))

(define-tag-function (h1 attrs elems) (make-heading 1 attrs elems))
(define-tag-function (h2 attrs elems) (make-heading 2 attrs elems))
</pre><p>Let’s get into the weeds for a bit here:</p><p>The first section sets up some parameters<label for="046793" class="margin-toggle">&#8853;</label><input type="checkbox" id="046793" class="margin-toggle"/><span class="marginnote"><a href="https://docs.racket-lang.org/reference/eval-model.html#(part._parameter-model)">Parameters</a> are kind of like Racket’s thread-safe equivalent of a global variable, although they work a little differently. You can use <code>parameterize</code> to change their value temporarily for a given scope; at the end of that scope the parameter automatically reverts to its previous value.</span> to use as defaults.</p><p>The <code>normalize</code> function transforms <code>"My Heading!"</code> into a string like <code>"my-heading"</code>, making it ready to use as the base part of a filename—just tack <code>.svg</code> at the end.</p><p>The <code>make-heading-svg</code> function creates the SVG file and saves it in the <code>img/</code> subfolder.</p><p>This in turn is used by the next function, <code>make-heading</code>, as it generates what becomes the <code>&lt;h1&gt;</code> or <code>&lt;h2&gt;</code> tag.</p><p>Finally, Pollen’s <code>define—tag—function</code> sets up the <code>h1</code> and <code>h2</code> tags to call <code>make-heading</code> with the appropriate heading level.</p><p>The upshot is that when, in my source markup, I write:</p><pre class="code">◊h2{Need Dice? Get the Good Dice.}</pre><p>…it becomes, in the output:</p><pre class="code">&lt;h2&gt;&lt;img src="img/h2-need-dice-get-the-good-dice.svg" class="heading-svg" alt="Need Dice? Get the Good Dice."&gt;&lt;/h2&gt;</pre><p>…and of course, when the site is generated, the <code>.svg</code> file magically appears in the <code>img</code> folder, and everything looks awesome.</p><p>Maybe this seems like a lot of code for three headings.<label for="65b377" class="margin-toggle">&#8853;</label><input type="checkbox" id="65b377" class="margin-toggle"/><span class="marginnote">The basic technique of using <em>an image of text</em> instead of just the text is basically how we used to use non-standard fonts on the web before <code>@font-face</code>. It’s bad and dumb in most cases. Don’t do it.</span> As with the book’s cover, I could have just made the images by hand in a graphics editor like Pixelmator. But, as with the book cover, since I did it with code rather than by farting around with a mouse, it’s very easy to change the headings or make new ones if I ever want to.</p><p>There you have it! A little book produced entirely with code. If you have an idea for another one, <a href="mailto:comments@thenotepad.org">let me know</a>.</p>]]></summary></entry><entry><author><name>Joel Dueck</name></author><published>2018-01-21T00:00:00-06:00</published><updated>2018-01-25T00:00:00-06:00</updated><title>Pollen Footnotes: An Approach</title><link rel="alternate" href="https://thenotepad.org/posts/pollen-footnotes-approach.html"/><id>https://thenotepad.org/posts/pollen-footnotes-approach.html</id><summary type="html"><![CDATA[<p><label for="0a924c" class="margin-toggle">&#8853;</label><input type="checkbox" id="0a924c" class="margin-toggle"/><span class="marginnote">This article assumes you are familiar with <a href="http://pollenpub.com">Pollen</a> and the concept of tagged X-expressions.</span> One of the things you get for free with Markdown that you have to cook from scratch with Pollen (or HTML for that matter) is footnotes. But this is fine, since it gives you more control over the results. Here is what I cooked up for use on the upcoming redesign of <i>The Local Yarn</i> weblog/book project.</p><div class="updateBox"><p><b><span class="smallcaps">Update, 2018-01-25</span></b></p><p>The Pollen discussion group has <a href="https://groups.google.com/forum/#!topic/pollenpub/laWL4SWx0Zc">a thread on this post</a> that is well worth reading. Matthew Butterick showed you can get mostly the same results with clearer and more concise code using normal tag functions as opposed to doing everything top-down starting with <code>root</code>.</p></div><p>An aside: on the web, footnotes are something of an oddity. HTML doesn’t have any semantic notion of a footnote, so we typically make them up using superscripted links to an ordered list at the end of the article. I’m sympathetic to arguments that this makes for a poor reading experience, and am convinced that they are probably overused. Nonetheless, I’m converting a lot of old content that uses footnotes, and I know I’ll be resorting to them in the future. Some <a href="https://edwardtufte.github.io/tufte-css/#sidenotes">newer treatments</a> of web footnotes use clever CSS to sprinkle them in the margins, which is nice, but comes with downsides: it isn’t accessible, it’s not intuitive to use and read on a phone, it renders the footnotes inline with the text in CSS-less environments (Lynx, e.g.) and the markup is screwy<label for="9cc0f1" class="margin-toggle sidenote-number"></label><input type="checkbox" id="9cc0f1" class="margin-toggle"/><span class="sidenote">These reasons are listed in decreasing order of importance for the particular application I have in mind.</span>. So I’m sticking with the old ordered-list-at-the-end approach (for this project, and for now, at least).</p><p>So I get to design my own footnote markup. Here’s what’s on my wishlist:</p><ol><li>I want each footnote’s <em>contents</em> to be defined in a separate place from the footnote <em>references</em>. This will keep the prose from getting too cluttered.</li><li>I want to be able to define the footnote contents anywhere in the document, in any order, and have them properly collected and ordered at the end.</li><li>I want to be able to use any mix of strings, symbols or numbers to reference footnotes, and have these all be converted to ordinal reference numbers.</li><li>I want to be able to refer to the same footnote more than once.<label for="86d011" class="margin-toggle sidenote-number"></label><input type="checkbox" id="86d011" class="margin-toggle"/><span class="sidenote">It was this requirement in particular that steered me away from using the otherwise-excellent <a href="https://github.com/malcolmstill/pollen-count">pollen-count</a> package.</span> (Rare, but useful in some cases).</li><li>If I should happen to refer to a footnote that is never defined, I want a blank footnote to appear in the list in its place. (On the other hand if I define a footnote that isn’t referenced anywhere, I’m content to let it disappear from the output.)</li><li>I want the footnote links not to interfere with each other when more than one footnote-using article is displayed on the same page. In other words, the URL for footnote #3 on article (A) should never be the same as the URL for footnote #3 on article (B).</li></ol><p>In other words, I want to be able to do this:</p><pre class="code">Here is some text◊fn[1]. Later on the paragraph continues.

In another paragraph, I may◊fn[2] refer to another footnote.

◊fndef[1]{Here’s the contents of the first footnote.}
◊fndef[2]{And here are the contents of the second one.}</pre><p>But I also want to be able to do this:</p><pre class="code">◊fndef["doodle"]{And here are the contents of the second one.}

Here is some text◊fn["wipers"]. Later on the paragraph continues.
◊fndef["wipers"]{Here’s the contents of the first footnote.}

In another paragraph, I may◊fn["doodle"] refer to another footnote.</pre><p>And both of these should render identically to:</p><pre class="code">&lt;p&gt;Here is some text&lt;sup&gt;&lt;a href="#550b35-1" id="550b35-1_1"&gt;1&lt;/a&gt;&lt;/sup&gt;. Later on the paragraph continues.&lt;/p&gt;

&lt;p&gt;In another paragraph, I may &lt;sup&gt;&lt;a href="#550b35-2" id="550b35_1"&gt;2&lt;/a&gt;&lt;/sup&gt; refer to another footnote.&lt;/p&gt;

&lt;section class="footnotes"&gt;&lt;hr /&gt;
&lt;ol&gt;
  &lt;li id="550b35-1"&gt;Here’s the contents of the first footnote. &lt;a href="#550b35-1_1"&gt;↩&lt;/a&gt;&lt;/li&gt;
  &lt;li id="550b35-2"&gt;And here are the contents of the second one. &lt;a href="#550b35-2_1"&gt;↩&lt;/a&gt;&lt;/li&gt;
&lt;/ol&gt;
&lt;/section&gt;</pre><p><label for="64e95a" class="margin-toggle">&#8853;</label><input type="checkbox" id="64e95a" class="margin-toggle"/><span class="marginnote">You may be wondering, where did the <code>550b35</code> come from? Well, it’s an automatically generated identifier that’s (mostly, usually) unique to the current article. By using it as a prefix on our footnote links and backlinks, we prevent collisions with other footnote-using articles that may be visible on the same page. I’ll explain where it comes from at the end of this article.</span></p><p>This style of markup is a little more work to code in <code>pollen.rkt</code>, but it lets me be flexible and even a bit careless when writing the prose.</p><p><s>The output for footnotes (given my requirements) can’t very well be handled within individual tag functions; it demands a top-down approach.</s> [Again, this turns out not to be true! see <a href="https://groups.google.com/forum/#!topic/pollenpub/laWL4SWx0Zc">the Pollen group discussion</a>.]  So I will be leaving my <code>◊fn</code> and <code>◊fndef</code> tag functions undefined, and instead create a single function <code>do-footnotes</code> (and several helper functions nested inside it) that will transform everything at once. I’ll call it from my <code>root</code> tag like so:</p><div class="listing-filename">&#128196; pollen.rkt</div><pre class="code">(require txexpr
         sugar/coerce
         openssl/md5
         pollen/decode
         pollen/template) ; That’s everything we need for this project

(define (root . elements)
  (define footnoted
    (do-footnotes `(root ,@elements)
                  (fingerprint (first elements)))))</pre><p>The <code>do-footnotes</code> function takes a tagged X-expression (the body of the article) and a prefix to use in all the relative links and backlinks. <label for="e08edc" class="margin-toggle">&#8853;</label><input type="checkbox" id="e08edc" class="margin-toggle"/><span class="marginnote">You may have surmised that the <code>fingerprint</code> function call above is where the <code>550b35</code> prefix came from. Again, more on that later.</span> Here are the general stages we’ll go through inside this function:</p><ol><li>Go through the footnote <em>references</em>. Transform them into <em>reference links</em>, giving each an incrementally higher <em>reference number</em> (or, if the footnote has been referenced before, using the existing number). For later use, keep a list of all references and in the order in which they’re found.</li><li>Split out all the footnote <em>definitions</em> from the rest of the article. Get rid of the ones that aren’t referenced anywhere. Add empty ones to stand in for footnotes that are referenced but not defined.</li><li>Sort the footnote definitions according to the order that they are first referenced in the article.</li><li>Transform the footnote definitions into an ordered list with backlinks, and append them back on to the end of the article.</li></ol><p>Here is the code for <code>do-footnotes</code> that implements the first stage:</p><div class="listing-filename">&#128196; pollen.rkt</div><pre class="code">(define (do-footnotes tx prefix)
  (define fnrefs '())

  (define (fn-reference tx)
    (cond
      [(and (eq? 'fn (get-tag tx))
            (not (empty? (get-elements tx))))
       (define ref (-&gt;string (first (get-elements tx))))
       (set! fnrefs (append fnrefs (list ref)))
       (let* ([ref-uri (string-append "#" prefix "-" ref)]
              [ref-sequence (number-&gt;string (count (curry string=? ref) fnrefs))]
              [ref-backlink-id (string-append prefix "-" ref "_" ref-sequence)]
              [ref-ordinal (number-&gt;string (+ 1 (index-of fnrefs ref)))]
              [ref-str (string-append "(" ref-ordinal ")")])
         `(sup (a [[href ,ref-uri] [id ,ref-backlink-id]] ,ref-str)))]
      [else tx]))

  (define tx-with-fnrefs (decode tx #:txexpr-proc fn-reference))
  …)</pre><p>Looking at the last line in this example will help you understand the flow of control here: we can call <a href="http://docs.racket-lang.org/pollen/Decode.html"><code>decode</code></a> and, using the <code>#:txexpr-proc</code> keyword argument, pass it a function to apply to every X-expression tag in the article. In this case, it’s a helper function we’ve just defined, <code>fn-reference</code>. The upshot: the body of <code>fn-reference</code> is going to be executed once for each <code>◊fn</code> tag in the article.</p><p>By defining <code>fn-reference</code> <em>inside</em> the <code>do-foonotes</code> function, it has access to identifiers outside its scope, such as the <code>prefix</code> string but most importantly the <code>fnrefs</code> list. This means that every call to <code>fn-reference</code> will be able to check up on the results of all the other times it’s been called so far. And other helper functions we’ll be creating inside <code>do-footnotes</code> later on will also have easy access to the results of those calls.</p><p>So let’s examine the steps taken by <code>fn-definition</code> in more detail.</p><ol><li>First, using <code>cond</code> it checks to see if the current X-expression <code>tx</code> is a <code>fn</code> tag and has at least one element (the reference ID). This is necessary because <code>decode</code> is going to call <code>fn-reference</code> for <em>every X-expression in the article</em>, and we only want to operate on the <code>◊fn</code> tags.</li><li>Every time <code>fn-reference</code> finds a footnote reference, it has the side-effect of appending its reference ID (in string form) to the <code>fnrefs</code> list (the <code>set!</code> function call). Again, that list is the crucial piece that allows all the function calls happening inside <code>do-footnotes</code> to coordinate with each other.</li><li><p>The function uses <code>let*</code> to set up a bunch of values for use in outputting the footnote reference link:</p><ol><li><code>ref-uri</code>, the relative link to the footnote at the end of the article.</li><li><code>ref-sequence</code>, will be <code>"1"</code> if this is the first reference to this footnote, <code>"2"</code> if the second reference, etc. We get this by simply counting how many times <code>ref</code> appears in the <code>fnrefs</code> list so far.</li><li><code>ref-backlink-id</code> uses <code>ref-sequence</code> to make an id that will be the target of a ↩ back-link in the footnote definition.</li><li><code>ref-ordinal</code> is the footnote number as it will appear to the reader. To find it, we remove all duplicates from the <code>fnrefs</code> list, find the index of the current <code>ref</code> in that list, and add one (since we want footnote numbers to start with 1, not 0).</li><li><code>ref-str</code> is the text of the footnoote reference that the reader sees. It’s only used because I wanted to put parentheses around the footnote number.</li></ol></li><li>Then, in the body of the <code>let*</code> expression, the function outputs the new footnote reference link as an X-expression that will transform neatly to HTML when the document is rendered.</li></ol><p>So after the call to <code>decode</code>, we have an X-expression, <code>tx-with-fnrefs</code>, that has all the footnote references (<code>◊fn</code> tags) properly transformed, and a list <code>fnrefs</code> containing all the footnote reference IDs in the order in which they are found in the text.</p><p>Let’s take a closer look at that list. In our first simple example above, it would end up looking like this: <code>'("1" "2")</code>. In the second example, it would end up as <code>'("wipers" "doodle")</code>. In a very complicated and sloppy document, it could end up looking like <code>'("foo" "1" "7" "foo" "cite1" "1")</code>. So when processing <code>◊fndef["foo"]</code>, for example, we can see by looking at that list that this should be the first footnote in the list, and that there are two references to it in the article.</p><p>All that said, we’re ready to move on to phase two through four.</p><div class="listing-filename">&#128196; pollen.rkt</div><pre class="code">(define (do-footnotes tx)
  ; … stage 1 above …

  (define (is-fndef? x) (and (txexpr? x) (equal? 'fndef (get-tag x))))

  ; Collect ◊fndef tags, filter out any that aren’t actually referenced
  (define-values (body fn-defs) (splitf-txexpr tx-with-fnrefs is-fndef?))
  (define fn-defs-filtered
    (filter (λ(f)
              (cond
                [(member (-&gt;string (first (get-elements f))) fnrefs) #t]
                [else #f]))
            fn-defs))

  ; Get a list of all the IDs of the footnote *definitions*
  (define fn-def-ids
    (for/list ([f (in-list fn-defs-filtered)]) (-&gt;string (first (get-elements f)))))

  ; Pad the footnote definitions to include empty ones for any that weren’t defined
  (define fn-defs-padded
    (cond [(set=? fnrefs fn-def-ids) fn-defs-filtered]
          [else (append fn-defs-filtered
                        (map (λ (x) `(fndef ,x (i "Missing footnote definition")))
                             (set-subtract fnrefs fn-def-ids)))]))
  ; … stage 3 and 4 …
)</pre><p>We define a helper function <code>is-fndef?</code> and use it with <code>splitf-txexpr</code> to extract all the <code>◊fndef</code> tags out of the article and put them in a separate list. Then we use <code>filter</code>, passing it an anonymous function that returns <code>#f</code> for any <code>fndef</code> whose ID doesn’t appear in <code>fndefs</code>.</p><p>Now we need to deal with the case where the <code>◊fn</code> tags in a document reference a footnote that is never defined with an <code>◊fndef</code> tag. To test for this, we just need a list of the reference IDs used by the footnote definitions. The definition of <code>fn-def-ids</code> provides this for us, using <code>for/list</code> to loop through all the footnote definitions and grab out a stringified copy of the first element of each. We can then check if <code>(set=? fnrefs fn-def-ids)</code>—that is, do these two lists contain all the same elements (regardless of duplicates)? If not, we use <code>set-subtract</code> to get a list of which IDs are missing from <code>fn-def-ids</code> and for each one, append another <code>fndef</code> to the filtered list of footnote definitions.</p><div class="listing-filename">&#128196; pollen.rkt</div><pre class="code">(define (do-footnotes tx)
  ; … stages 1 and 2 above …

  (define (footnote&lt;? a b)
    (&lt; (index-of (remove-duplicates fnrefs) (-&gt;string (first (get-elements a))))
       (index-of (remove-duplicates fnrefs) (-&gt;string (first (get-elements b))))))

  (define fn-defs-sorted (sort fn-defs-padded footnote&lt;?))

  ; … stage 4 …</pre><p>The helper function <code>footnote&lt;?</code> compares two footnote definitions to see which one should come first in the footnote list: it compares them to see which one has the ID that appears first in <code>fndefs</code>. We pass that function to <code>sort</code>, which uses it to sort the whole list of footnote definitions.</p><p>We are almost done. We just have to transform the now-ordered list of footnote definitions and append it back onto the end of the article:</p><div class="listing-filename">&#128196; pollen.rkt</div><pre class="code">(define (do-footnotes tx)
  ; … stages 1 to 3 above …

  (define (fn-definition tx)
    (let* ([ref (-&gt;string (first (get-elements tx)))]
           [fn-id (string-append "#" prefix "-" ref)]
           [fn-elems (rest (get-elements tx))]
           [fn-backlinks
             (for/list ([r-seq (in-range (count (curry string=? ref) fnrefs))])
               `(a [[href ,(string-append "#" prefix "-" ref "_"
                                          (number-&gt;string (+ 1 r-seq)))]] "↩"))])
      `(li [[id ,fn-id]] ,@fn-elems ,@fn-backlinks)))

  (define footnotes-section
    `(section [[class "footnotes"]] (hr) (ol ,@(map fn-definition fn-defs-sorted))))

  (txexpr (get-tag body)
          (get-attrs body)
          (append (get-elements body)
                  (list footnotes-section)))
  ; Finis!
)</pre><p>We need one more helper function, <code>fn-definition</code>, to transform an individual <code>◊fndef</code> tag into a list item with the footnote’s contents and backlinks to its references. This helper uses <code>let*</code> in a way similar to <code>fn-reference</code> above, constructing each part of the list item and then pulling them all together at the end. Of these parts, <code>fn-backlinks</code> is worth examining. The expression <code>(curry string=? ref)</code> returns a function that compares any string to whater <code>ref</code> currently is.<label for="1ad911" class="margin-toggle">&#8853;</label><input type="checkbox" id="1ad911" class="margin-toggle"/><span class="marginnote"><code>curry</code> is basically a clever way of temporarily “pre-filling” some of a function’s arguments.</span> That function gets passed to <code>count</code> to count how many times the current footnote is found in <code>fnrefs</code>. The list comprehension <code>for/list</code> can then use that range to make a <code>↩</code> backlink for each of them.</p><p>In defining the <code>footnotes-section</code> we <code>map</code> the helper function <code>fn-definition</code> onto each <code>◊fndef</code> tag in our sorted list, and drop them inside an X-expression matching the HTML markup we want for the footnotes section. The last statement adds this section to the end of <code>body</code> (which was the other value given to us by <code>splitf-txexpr</code> way up in stage 2), and we’re done.</p><p>All that remains now is to show you where I got that <code>550b35</code> prefix from.</p><h2>Ensuring unique footnote IDs</h2><p>As mentioned before, I wanted to be able to give all the footnotes in an article some unique marker for use in their <code>id</code> attribute, to make sure the links for footnotes in different articles never collide with each other.</p><p>When the topic of “ensuring uniqueness” comes up it’s not long before we start talking about hashes.</p><p>I could generate a random hash once for each article, but then the footnote’s URI would change every time I rebuild the article, which would break any deep links people may have made to those footnotes. How often will people be deep-linking into my footnotes? Possibly never. But I would say, if you’re going to put a link to some text on the web, don’t make it fundamentally unstable.</p><p>So we need something unique (and stable) from each article that I can use to deterministically create a unique hash for that article. An obvious candidate would be the article’s title, but many of the articles on the site I’m making will not have titles.</p><p>Instead I decided to use an MD5 hash of the text of the article’s first element (in practice, this will usually mean its first paragraph):</p><div class="listing-filename">&#128196; pollen.rkt</div><pre class="code">; Concatentate all the elements of a tagged x-expression into a single string
; (ignores attributes)
(define (txexpr-&gt;elements-string tx)
  (cond [(string? tx) tx]
        [(stringish? tx) (-&gt;string tx)]
        [(txexpr? tx)
         (apply string-append (map txexpr-&gt;elements-string (get-elements tx)))]))

(define (fingerprint tx)
  (let ([hash-str (md5 (open-input-string (txexpr-&gt;elements-string tx)))])
    (substring hash-str (- (string-length hash-str) 6))))</pre><p>The helper function <code>txexpr-&gt;elements-string</code> will recursively drill through all the nested expressions in an X-expression, pulling out all the strings found in the <em>elements</em> of each and appending them into a single string. The <code>fingerprint</code> function then takes the MD5 hash of this string and returns just the last six characters, which are unique enough for our purposes.</p><p>If you paste the above into DrRacket (along with the <code>require</code>s at the beginnning of this post) and then run it as below, you’ll see</p><pre class="code">&gt; (fingerprint (txexpr-&gt;elements-string '(p "Here is some text" (fn 1) ". Later on the paragraph continues.")))
"550b35"</pre><p>This now explains where we were getting the <code>prefix</code> argument in <code>do-footnotes</code>:</p><div class="listing-filename">&#128196; pollen.rkt</div><pre class="code">(define (root . elements)
  (define footnoted
    (do-footnotes `(root ,@elements)
                  (fingerprint (first elements)))))</pre><p>Under this scheme, things could still break if I have two articles with exactly the same text in the first element. Also, if I ever edit the text in the first element in an article, the prefix will change (breaking any deep links that may have been made by other people). But I figure that’s the place where I’m least likely to make any edits. This approach brings the risk of footnote link collision and breakage down to a very low level, wasn’t difficult to implement and won’t be any work to maintain.</p><h2>Summary and parting thoughts</h2><p>When designing the markup you’ll be using, Pollen gives you unlimited flexibility. You can decide to adhere pretty closely to HTML structures in your markup (allowing your underlying code to remain simple), or you can write clever code to enable your markup do more work for you later on.</p><p>One area where I could have gotten more clever would have been error checking. For instance, I could throw an error if a footnote is defined but never referenced. I could also do more work to validate the contents of my <code>◊fn</code> and <code>◊fndef</code> tags. If I were especially error-prone and forgetful, this could save me a bit of time when adding new content to my site. For now, on this project, I’ve opted instead for marginally faster code…and more cryptic error messages.</p><p>I will probably use a similar approach to allow URLs in hyperlinks to be specified separately from the links themselves. Something like this:</p><div class="listing-filename">&#128196; chapter.html.pm</div><pre class="code">#lang pollen

For more information, see ◊a[1]{About the Author}. You can also
see ◊a[2]{his current favorite TV show}.

◊hrefs{
[1]: http://joeldueck.com
[2]: http://www.imdb.com/title/tt5834198/
}</pre>]]></summary></entry><entry><author><name>Joel Dueck</name></author><published>2017-08-13T00:00:00-05:00</published><updated>2017-08-13T00:00:00-05:00</updated><title>Home IT Overhaul, Phase Zero: A Screen</title><link rel="alternate" href="https://thenotepad.org/posts/it-overhaul-phase-zero-a-screen.html"/><id>https://thenotepad.org/posts/it-overhaul-phase-zero-a-screen.html</id><summary type="html"><![CDATA[<p>My home network has had a pretty basic setup for the last six years. My wife and I each have a laptop, connected to the internet with an Asus wifi router and a cable modem. And we have a wifi B&amp;W laser printer. That’s it.</p><p>Since we finished the basement and installed a 55″ TV, however, I’ve had my eye on some drastic improvements and additions to our home’s IT capabilities. I will outline the overall plan in another post, however, to get things rolling I thought I’d just write about the first small step in that plan, which I took today: I bought a monitor.</p><figure><img src="/posts/img/coby-monitor.jpg" alt="A Coby TFTV1525 15″ monitor/TV, purchased used, missing remote" style="width: 1024.0px;"/><figcaption>A Coby TFTV1525 15″ monitor/TV, purchased used, missing remote</figcaption></figure><p>I have almost zero spare computer parts lying around my house, which is surely strange for an IT manager. I’ve made a point of getting rid of stuff I don’t need, which means I get to start from scratch.</p><p>This tiny used monitor will sit on my new IT “rack” when I need a direct-attached display for setting up or troubleshooting servers. It’s perfect for my setup for several reasons:</p><ol><li>It’s small</li><li>It’s cheap ($20 on Craigslist)</li><li>It has both HDMI and VGA inputs, so it will work with any computer, old or new, without any converters</li><li>It also has a TV tuner, so I can use it to watch broadcast television on the rare occasions where that might come in handy (weather emergencies, etc)</li></ol>]]></summary></entry><entry><author><name>Joel Dueck</name></author><published>2017-05-03T00:00:00-05:00</published><updated>2017-05-03T00:00:00-05:00</updated><title>Safari Speedbumps</title><link rel="alternate" href="https://thenotepad.org/posts/safari-speedbumps.html"/><id>https://thenotepad.org/posts/safari-speedbumps.html</id><summary type="html"><![CDATA[<p>For a long time now, I’ve had a problem with Safari taking a long time to load a website when I first navigate to it: there will be a long pause (5–10 sec) with no visible progress or network traffic. Then there will be a burst of traffic, the site will load fully inside of a second, and every page I visit within that site afterwards will be lightning fast.</p><p>The same thing happens whether I’m at work, at home, or on public wifi (using a VPN of course). I’ve tried disabling all extensions and I’ve also tried using Chrome. So this was mystifying to me.</p><p>But I think I might have finally found the source of the problem. I was in Safari’s preferences window and noticed this little warning on the Security tab:</p><figure><img src="/posts/img/safari-fraud.png" alt="Safari preferences pane showing a problem with the 'Safe Browsing Service'" style="width: 776.0px;"/><figcaption>Safari preferences pane showing a problem with the ‘Safe Browsing Service’</figcaption></figure><p>I unchecked that box, and the problem seems to have disappeared.</p><p>Now, I haven’t yet been able to find any official information on exactly how Safe Browsing Service works, but it’s not hard to make an educated guess. If it’s turned on, the first time you browse to a website, the name of that website would first get sent, in a separate request, to Apple’s servers, which would return a thumbs up/thumbs down type of response. A problem on Apple’s end would cause these requests to time out, making any website’s first load terribly slow. And as the screenshot shows, clearly there <em>is</em> a problem on Apple’s end, because the Safe Browsing Service is said to be “unavailable”. (It says it’s only been unavailable for 1 day but I have reason to believe that number just resets every day.)</p><p>The fact that disabling the setting on Safari fixed the problem in Chrome too leads me to believe that this is in fact an OS-level setting, enforced on all outgoing HTTP requests, not just a Safari preference.</p><p>Anyway, if you are having this problem, see if disabling Safe Browsing Service solves it for you.</p>]]></summary></entry><entry><author><name>Joel Dueck</name></author><published>2017-02-04T00:00:00-06:00</published><updated>2017-02-04T00:00:00-06:00</updated><title>Site Incident Report</title><link rel="alternate" href="https://thenotepad.org/posts/personal-site-incident-report.html"/><id>https://thenotepad.org/posts/personal-site-incident-report.html</id><summary type="html"><![CDATA[<p>Important notice: last Tuesday night all my sites went offline. In the interests of extreme transparency, I present this complete incident report and postmortem.</p><h2>Impact</h2><ol><li>All of my websites that still use Textpattern were broken from 11pm Jan 31 until about lunchtime the next day. (<em>The Notepad</em> does not use Textpattern and was mostly unaffected, except for #2 below.)</li><li>All the traffic logged on all sites during that time was lost. So I have no record of how many people used my websites during the time that my websites were unusable.</li></ol><h2>Timeline</h2><p>(All times are my time zone.)</p><ol><li><strong>Tuesday Jan 31, late evening:</strong> I logged into my web server and and noticed a message about an updated version of my Ubuntu distribution being available. I was in a good mood and ran the <code>do-release-upgrade</code> command, even knowing it would probably cause problems. Because breaking your personal web server’s legs every once in a while is a good way to learn stuff. If I’d noticed that this “update” proposed to take my server from version 14.04 all the way to 16.04, I’d have said <em>Hell no</em>.</li><li>In about half an hour the process was complete and sure enough, all my DB-driven sites were serving up ugly PHP errors.</li></ol><h2>Recovery</h2><ol><li>Soon determined that my Apache config referred to non-existant PHP5 plugin. Installed PHP7 because why the hell not.</li><li>More errors. The version of Textpattern I was using on all these sites <a href="http://forum.textpattern.com/viewtopic.php?id=46223">doesn’t work with PHP7</a>. Installed the latest version of Textpattern on one of the sites.</li><li>Textpattern site still throwing errors because a few of my plugins didn’t like PHP7 either. Logged into the MySQL cli and manually disabled them in the database.</li><li>Textpattern’s DB upgrade script kept failing because it <a href="https://github.com/textpattern/textpattern/issues/694">doesn’t like something about my databases</a>. I began the process of hand-editing each of the tables in one of the affected websites.</li><li>Sometime around midnight my brother texted asking me to drive over and take him in to the emergency room. I judged it best to get over there in a hurry so I closed up my laptop and did that. His situation is a little dicey right now; it was possible that when I got there I’d find him bleeding or dying. That wasn’t it, thankfully. By four in the morning they had him stabilized and I was able to drive home.</li><li><strong>Morning of Feb 1st:</strong> I got out of bed at around eight on the morning of Feb 1st, made myself some coffee and emailed my boss to tell him I wouldn’t be in the office until nine-thirty.</li><li>After driving in to work, I remembered almost all of my websites were still busted. I started to think about the ramifications. I wondered if anyone had noticed. I opened Twitter for the first time since before the election and closed it again, appalled.</li><li>At lunchtime I drove to the coffee shop for some more caffeine and a sandwich. I remember it got up to 30º F that day so I almost didn’t need a coat. After I ate my sandwich I pulled out my laptop and resumed poking around the same database and trying to swap in all the mental state from before the hospital trip.</li><li>Towards the end of my lunch hour I decided that this wasn’t fun anymore. Maybe I could poke this one database until Textpattern would stop whining about it, but there was still the matter of the broken plugins, and then I’d have to go through the same rigmarole for the other three sites.</li><li>Sometime between noon and 1pm I logged into my DigitalOcean dashboard and clicked a button to restore the automatic backup from 18 hours ago. In two minutes it was done and all the sites were running normally.</li></ol><h2>Problems Encountered</h2><ol><li>In-place OS upgrades across major releases will always break your stack</li><li>Textpattern 4.5.7 doesn’t support PHP7</li><li>Textpattern 4.6.0 needs a bunch of hacks to work with newer versions of MySQL</li><li>Emergency rooms always have so much waiting time in between tests and stuff</li></ol><h2>Post-Recovery Followup Tasks</h2><ol><li>Leave the goddamn server alone</li><li>Revisit shelved projects that involve getting rid of Textpattern and MySQL.</li></ol>]]></summary></entry><entry><author><name>Joel Dueck</name></author><published>2016-12-03T00:00:00-06:00</published><updated>2016-12-03T00:00:00-06:00</updated><title>Advent of Code 2016</title><link rel="alternate" href="https://thenotepad.org/posts/advent-of-code-2016.html"/><id>https://thenotepad.org/posts/advent-of-code-2016.html</id><summary type="html"><![CDATA[<p>I’m giving this year’s <a href="http://adventofcode.com">Advent of Code</a> event a shot.</p><p>Since I’m also using this as a way of learning a little about <a href="http://adventofcode.com">literate programming</a>, the programs I write are also web pages describing themselves. I’m uploading those web pages to <a href="/projects/aoc2016">a subsection of this site</a>, where you can read my solutions and watch my progress.</p>]]></summary></entry><entry><author><name>Joel Dueck</name></author><published>2016-11-11T00:00:00-06:00</published><updated>2016-11-11T00:00:00-06:00</updated><title>Flattening a Site: From Database to Static Files</title><link rel="alternate" href="https://thenotepad.org/posts/flattening-to-html.html"/><id>https://thenotepad.org/posts/flattening-to-html.html</id><summary type="html"><![CDATA[<p>I just finished converting <a href="https://howellcreekradio.com">a site</a> from running on a database-driven CMS (Textpattern in this case) to a bunch of static HTML files. No, I don’t mean I switched to a static site generator like Jekyll or Octopress, I mean it’s just plain HTML files and nothing else. I call this “flattening” a site.<label for="926d0f" class="margin-toggle">&#8853;</label><input type="checkbox" id="926d0f" class="margin-toggle"/><span class="marginnote">I wanted a way to refer to this process that would distinguish it from “archiving”, which to me also connotes taking the site offline. I passed on “embalming” and “mummifying” for similar reasons.</span></p><p>In this form, a web site can run for decades with almost no maintenance or cost. It will be very tedious if you ever want to change it, but that is fine because the whole point is long-term preservation. It’s a considerate, responsible thing to do with a website when you’re pretty much done updating it forever. Keeping the site online prevents link rot, and you never know what use someone will make of it.</p><h2>How to Flatpack</h2><p>Before getting rid of your site’s CMS and its database, make use of it to simplify the site as much as possible. It’s going to be incredibly tedious to fix or change anything later on so now’s the time to do it. In particular you want to edit any templates that affect the content of multiple pages:</p><ul><li>Strip out all external dependencies, such as TypeKit and any script-based analytics. In place of Typekit I used a self-hosted font for the headings and just switched to Georgia for the body text.</li><li>Removed unneeded sections and internal links from the page templates. For example, on my site I eliminated any reference to the privacy policy and the “different ways to subscribe” guide. I also made the “episodes” page one giant list of all the episodes instead of being broken up into 20 pages.</li><li>Finally, wherever appropriate, edited text in the page templates to make the site’s “archival status” clear. Remove anything that could give the impression that this place is still a going concern.</li></ul><p>Next, on your web server, make a temp directory (outside the site’s own directory) and download static copies of all the site’s pages into it with the <code>wget</code> command:</p><pre class="code">wget --recursive --domains howellcreekradio.com --html-extension howellcreekradio.com/</pre><p>This will download every page on the site and every file linked to on those pages. In my case it included images and MP3 files which I didn’t need. I deleted those until I had only the <code>.html</code> files left.</p><h3>Digression: Mass-editing links and filenames from the command line</h3><p>This bit is pretty specific to my own situation but perhaps some will find it instructive. At this point I was almost done, but there was a bit of updating to do that couldn’t be done from within my CMS. My home page on this site had “Older” and “Newer” links at the bottom in order to browse through the episodes, and I wanted to keep it this way. These older/newer links were generated by the CMS with POST-style URLS: <code>http://site.com/?pg=2</code> and so on. When <code>wget</code> downloads these links (and when the <code>--html-extension</code> option is invoked), it saves them as files of the form <code>index.html?pg=2.html</code>. These all needed to be renamed, and the pagination links that refer to them needed to be updated.</p><p>I happen to use ZSH, which comes with an alternative to the standard <code>mv</code> command called <code>zmv</code> that recognizes patterns:</p><pre class="code">zmv 'index.html\?pg=([0-9]).html' 'page$1.html'
zmv 'index.html\?pg=([0-9][0-9]).html' 'page$1.html'</pre><p>So now these files were all named <code>page01.html</code> through <code>page20.html</code> but they still <em>contained</em> links in the old <code>?pg=</code> format. I was able to update these in one fell swoop with a one-liner:</p><pre class="code">grep -rl \?pg= . | xargs sed -i -E 's/\?pg=([0-9]+)/page\1.html/g'</pre><p>To dissect this a bit:</p><ul><li><code>grep -rl \?pg= .</code> lists all files containing the links I want to change. I pass this list to the next command with the pipe <code>|</code> character.</li><li>The <code>xargs</code> command takes the list produced by <code>grep</code> and feeds them one by one to the <code>sed</code> command.</li><li>The <code>sed</code> command has the <code>-i</code> option to edit the files in-place, and the <code>-E</code> option to enable regular expressions. For every file in its list, it uses <code>s/\?pg=([0-9]+)/page\1.html/g</code> as a regex-style search-and-replace pattern. You can learn more about <a href="https://regex101.com/r/rXuSJB/1">the details of this search pattern</a> if you are new to regular expressions.</li></ul><p>OK, digression over.</p><h3>Back up the CMS and Database</h3><p>Before actually switching, it’s a good idea to freeze-dry a copy of the old site, so to speak, in case you ever needed it again.</p><p>Export the database to a plain-text backup:</p><pre class="code">mysqldump -u username -pPASSWORD db_name &gt; dbbackup.sql</pre><p>Then save a gzip of that <code>.sql</code> file and the whole site directory before proceeding.</p><h3>Shutting down the CMS and swapping in the static files</h3><p>Final steps:</p><ol><li>Move the HTML files you downloaded and modified above into the site’s public folder.</li><li>Add redirects or rewrite rules for every page on your site. For example, if your server uses  Apache, you would edit the site’s <code>.htaccess</code> file so that URLs on your site like <code>site.com/about/</code> would be internally <a href="http://httpd.apache.org/docs/2.0/misc/rewriteguide.html">rewritten</a> as <code>site.com/about.html</code>. This is going to be different depending on what CMS was being used, but <strong>essentially you want to be sure that any URL that anyone might have used as a link to your site continues to work</strong>.</li><li>Delete all CMS-related files from your site’s public folder (you saved that backup, right?) In my case I deleted <code>index.php</code>, <code>css.php</code>, and the whole <code>textpattern/</code> directory.</li></ol><h3>Once you’re done</h3><p>Watch your site’s logs for 404 errors for a couple of weeks to make sure you didn’t miss anything.</p><p>What to do now? You could leave your site running where it is. Or, long term, consider having it served from a place like <a href="https://www.nearlyfreespeech.net">NearlyFreeSpeech</a> for pennies a month.</p>]]></summary></entry><entry><author><name>Joel Dueck</name></author><published>2016-11-09T00:00:00-06:00</published><updated>2016-11-09T00:00:00-06:00</updated><title>Splitting Pollen tags with Racket macros</title><link rel="alternate" href="https://thenotepad.org/posts/splitting-pollen-tags-with-racket-macros.html"/><id>https://thenotepad.org/posts/splitting-pollen-tags-with-racket-macros.html</id><summary type="html"><![CDATA[<p>This may be one of the nerdiest things I have ever written, but I know there may be three or five people who will find it useful. This post is specifically for people who are using <a href="http://pollenpub.com">Pollen</a> to generate content in <a href="https://docs.racket-lang.org/pollen/fourth-tutorial.html">multiple output formats</a>, and who may also be using a separate build system like <a href="https://www.gnu.org/software/make/manual/html_node/Overview.html#Overview">make</a>.</p><p>Normally when targeting multiple output formats in <a href="http://pollenpub.com">Pollen</a>, you’d write a tag function something like this:</p><div class="listing-filename">&#128196; pollen.rkt</div><pre class="code">; …

(define (strong . xs)
  (case (current-poly-target)
    [ltx (string-append "\\textbf{" ,@xs "}")]
    [else `(strong ,@xs)]))

; …</pre><p>Here, everything for the <code>strong</code> tag is contained in a single tidy function that produces different output depending on the current output format. This is fine for simple projects, but not ideal for more complex ones, for a couple of reasons.</p><p>First there’s the issue of tracking dependencies. Let’s say every Pollen file in your project gets rendered as an HTML file <em>and</em> as part of a PDF file. Then one day you make a small change in your <code>pollen.rkt</code> file. Does this edit affect just the HTML files? Or the PDF files? Or both? Which ones now need to be rebuilt? If you’re doing things as shown above, there’s no straightforward way for Pollen (or <code>make</code>) to determine this; you’ll have to rebuild all the output files every time.</p><p>Then there’s the issue of readability. Even with two possible output formats, <code>pollen.rkt</code> gets much more difficult to read. I didn’t even want to think about how hairy it would get at three or four.</p><p>I decided to address this by having each output format get its own separate <code>.rkt</code> file, containing its own definitions for each tag function, prefixed by the output format:</p><div class="listing-filename">&#128196; html-tags.rkt</div><pre class="code">(define (html-strong attrs elements)
  `(strong ,attrs ,@elements))</pre><div class="listing-filename">&#128196; pdf-tags.rkt</div><pre class="code">(define (pdf-strong attrs elements)
  (string-append "\\textbf{" ,@xs "}"))</pre><p>That part is simple enough. But you also need a way for <code>pollen.rkt</code> to branch to one tag or the other depending on the current poly target.</p><p>To handle this part, I wrote a macro, <code>poly-branch-tag</code>, which allows you to define a tag that will automatically call a different tag function depending on the current output format. The macro is rather long, but you can view it in the <a href="https://github.com/otherjoel/thenotepad/blob/master/pollen-local/polytag.rkt"><code>polytag.rkt</code></a> file of this blog’s source code at Github.</p><h2>Defining tag functions with <code>poly-branch-tag</code></h2><p>To use this macro, first copy the <a href="https://github.com/otherjoel/thenotepad/blob/master/pollen-local/polytag.rkt"><code>polytag.rkt</code> file</a> from this blog’s source code into your project.</p><p>You then include <code>polytag.rkt</code> and declare your Pollen tags using the macro. The first argument is the tag name, optionally followed by a single required attribute and/or as any number of optional attributes with default values:</p><div class="listing-filename">&#128196; pollen.rkt</div><pre class="code">#lang racket
(require pollen/setup)
(require "polytag.rkt")
(require "html-tags.rkt" "pdf-tags.rkt")

; Define our poly targets as usual
(module setup racket/base
    (provide (all-defined-out))
    (define poly-targets '(html pdf)))

; Simple tag with no required or default attributes
(poly-branch-tag strong)

; Tag with a single required attribute
(poly-branch-tag link url)

; Tag with required attribute + some optional attrs w/defaults
(poly-branch-tag figure src (fullwidth #f) (link-url ""))</pre><p>For every tag function declared this way, write the additional functions needed for each output type in your <code>(setup:poly-targets)</code>. E.g., for <code>strong</code> above, we would define <code>html-strong</code> and <code>pdf-strong</code> inside their respective <code>.rkt</code> files.</p><p>These tag functions should always accept exactly two arguments: a list of attributes and a list of elements. The macro will ensure that any required attribute is present and any default values are applied. Here’s an example:</p><div class="listing-filename">&#128196; html-tags.rkt</div><pre class="code">(define (html-figure attrs elems)     ; Important! Tag name must have html- prefix
  (define src (attr-val 'src attrs))  ; You can grab what you need from attrs
  (if (attr-val 'fullwidth attrs)     ; (I made (attr-val) to accept boolean values in attributes)
      (make-fullwidth)))              ; [dummy example]</pre><h2>The benefits, reiterated</h2><p>If you use a dependency system like <code>make</code> in your Pollen project, you now have a clear separation between output files in a particular format and the code that produces output in that format. An edit to <code>html-tags.rkt</code> will only affect HTML files. An edit to <code>pdf-tags.rkt</code> will only affect PDF files. You can see <a href="https://github.com/otherjoel/thenotepad/blob/master/makefile">this blog’s makefile</a> for a detailed example.</p><p>It’s also easier to add output formats without losing your sanity. Each output format gets its own <code>.rkt</code> file where you can define your tag functions all the way up to <code>root</code>, and the logic for each output format is much easier to follow than if they were all jammed in together in one file.</p><p>Finally, I found that there’s a third benefit, delightful and unintended, that comes with this approach as well: <code>pollen.rkt</code>, stripped of all function definition code, becomes essentially a very readable, self-updating cheatsheet of your project’s tags. See what I mean in <a href="https://github.com/otherjoel/thenotepad/blob/master/pollen.rkt">this blog’s <code>pollen.rkt</code></a>. This alone might almost tempt me to use <code>poly-branch-tag</code> even in projects where HTML is the only format being targeted.</p>]]></summary></entry><entry><author><name>Joel Dueck</name></author><published>2016-08-22T00:00:00-05:00</published><updated>2016-08-22T00:00:00-05:00</updated><title>Testing network switches</title><link rel="alternate" href="https://thenotepad.org/posts/post-mortem-on-a-failed-switch.html"/><id>https://thenotepad.org/posts/post-mortem-on-a-failed-switch.html</id><summary type="html"><![CDATA[<p>A couple of weeks ago, one of the two Netgear GS748T network switches in our main office failed. The lights were still blinking, but nothing connected to it was able to talk to anything else. We were able to plug almost everyone in to the other switch, the rest we put on a temporary 8-port switch until we could get a replacement.</p><p>We ordered two more of these switches off eBay (a replacement plus a spare), and those arrived today. After testing both of them, I was able to swap out the bad one and figure out exactly what had happened to it.</p><h2>How I test a switch</h2><p>This is pretty basic and generic, but maybe someone will find it useful.</p><ol><li>Grab the reference manual and hard-reset the switch to factory defaults.</li><li>Connect directly to the switch with an ethernet cable. Does the port light up?</li><li>Manually set your computer’s IP address to correspond to the switch’s defaults. In this case, the Netgear’s default IP is <code>192.168.0.239</code> with a subnet mask of <code>255.255.255.0</code>, so I set my computer to <code>192.168.0.20</code> and the same subnet.</li><li>Try to ping the switch at its default address. Does it respond? If not, plug in another computer and set its IP address manually as well. Can you ping it? Try it across several ports.</li><li>From your browser, try to log in to the switch’s web interface. In this case I browsed to <code>http://192.168.0.239</code> and was greeted with the login screen.</li><li>Try transferring data between two computers connected through the switch. In my case I was testing with two Windows machines, so I used <a href="http://www.netchain.com/netcps">NetCPS</a> to benchmark these transfers. Again, use several different ports. If the ports are visibly divided between “banks” of 4 or 8 ports, test each bank. (Testing each individual port is overkill in most cases.)</li><li>Managed switches<label for="1fc76b" class="margin-toggle">&#8853;</label><input type="checkbox" id="1fc76b" class="margin-toggle"/><span class="marginnote">The GS748T doesn’t have a separate console port or a CLI, so this point wasn’t applicable in this particular case. On another occasion though, when I had an HP ProCurve switch that was acting up, connecting via the console port revealed a barrage of error messages and an endless cycle of rebooting. Having a saved copy of this output was very helpful when I was on the phone with the manufacturer demanding a warranty replacement.</span>  usually have their own OS with a command-line interface that you can open by connecting through a separate “console” port (either RJ-45 or serial DB-9). Try to log in through this interface and poke around. Refer to the switch’s manual for details.</li></ol><h2>So what happened here?</h2><p>In the case of our failing Netgear GS748T, after I pulled it out I found it was still “working”: I could connect to its web interface, and even send data between a couple of computers connected via the switch, but several things indicated something was wrong.</p><p>First of all, pinging the switch itself while plugged into it directly was yielding response times of 7–14ms. This may seem pretty fast, but an acceptable response time is more like 1ms, <em>max</em>.</p><p>Second, by looking at the error counters in the switch’s web interface, I noticed Rx errors piling up after only a few minutes:</p><figure><img src="/posts/img/rx-errors.png" alt="Rx errors piling up after only a few minutes of traffic" style="width: 326.5px;"/><figcaption>Rx errors piling up after only a few minutes of traffic</figcaption></figure><p>An acceptable number of errors is <em>zero</em>, assuming there is no problem with the cables themselves.</p><p>All of this points towards some degradation that destroys performance when traffic increases past a certain point.</p><p>Finally, just for the heck of it, we opened up the switch’s casing and took a look at its innards.</p><figure><img src="/posts/img/switch-caps.jpg" alt="The inside of the Netgear GS748T" style="width: 1024.0px;"/><figcaption>The inside of the Netgear GS748T</figcaption></figure><p>The capacitors with flat tops (such as the group of four on the left) are in good shape, but the ones with bulging, rounded tops (there are three in this pic) have definitely gone bad. Hardware companies often try to save money by getting cheap, low-quality capacitors, and when they fail, they start to bulge like this.</p><p>The failed capacitors definitely seem to explain our problem. Personally, I would not have bothered unscrewing the casing on the failed switch<label for="14dee1" class="margin-toggle">&#8853;</label><input type="checkbox" id="14dee1" class="margin-toggle"/><span class="marginnote">Nor would I have ordered the same make/model as a replacement. The “new” switches are a later revision than the originals, though (GS748Tv3H1 vs GS748Tv1H3) so hopefully that represents some improvement.</span>, but it was a good way to confirm that we were in fact dealing with a hardware failure. You might also want to do this if you ever order used network gear; if any of the capacitors are bulging like this you know to return the item immediately.</p>]]></summary></entry><entry><author><name>Joel Dueck</name></author><published>2016-06-29T00:00:00-05:00</published><updated>2016-06-29T00:00:00-05:00</updated><title>Shot in the Patoot</title><link rel="alternate" href="https://thenotepad.org/posts/shot-in-the-patoot.html"/><id>https://thenotepad.org/posts/shot-in-the-patoot.html</id><summary type="html"><![CDATA[<blockquote id="t535187560411447296" class="tweet"><div class="twContent">happy birthday to former President James Garfield, mortally shot in the patoot <img src="/posts/img/tweet-535187560411447296.jpg" alt=""/></div><footer class="twMeta"><span class="twDecoration">—</span><span class="twRealName">Dollars Horton</span><span class="twDecoration"> (</span><span class="twScreenName"><a href="https://twitter.com/crushingbort">@crushingbort</a></span><span class="twDecoration">) </span><span class="twTimeStamp"><a href="https://twitter.com/crushingbort/status/535187560411447296">Nov 19 2014 3:47 PM</a></span></footer></blockquote><blockquote id="t535188461901582336" class="tweet"><div class="twContent">reminder that one time we shoved whiskey and beef bouillon up a president’s butt until he died <a href="http://www.nytimes.com/2006/07/25/health/25garf.html?pagewanted=all">nytimes.com/2006/07/25/hea…</a> <img src="/posts/img/tweet-535188461901582336.png" alt=""/></div><footer class="twMeta"><span class="twDecoration">—</span><span class="twRealName">Dollars Horton</span><span class="twDecoration"> (</span><span class="twScreenName"><a href="https://twitter.com/crushingbort">@crushingbort</a></span><span class="twDecoration">) </span><span class="twTimeStamp"><a href="https://twitter.com/crushingbort/status/535188461901582336">Nov 19 2014 3:50 PM</a></span></footer></blockquote>]]></summary></entry><entry><author><name>Joel Dueck</name></author><published>2015-05-15T00:00:00-05:00</published><updated>2015-05-15T00:00:00-05:00</updated><title>(Solved) DNS_PROBE_FINISHED error, degraded internet performance</title><link rel="alternate" href="https://thenotepad.org/posts/solved-dns-probe-finished.html"/><id>https://thenotepad.org/posts/solved-dns-probe-finished.html</id><summary type="html"><![CDATA[<p>Recently at the office we started having major network issues:</p><ul><li>On my own computer, the problem surfaced as a <code>DNS_PROBE_FINISHED</code> error when I tried to load any websites in Chrome (sometimes instead the error would be <code>DNS_PROBE_STARTED</code> or <code>DNS_PROBE_NXDOMAIN</code>).</li><li>I would then open up my command prompt and attempt to <code>ping google.com</code>—sometimes this would result in <code>unable to find google.com</code> and sometimes it would find a specific IP address to try but none of the pings would go through.</li><li>I also tried <code>ping 8.8.8.8</code> (Google’s DNS servers) or <code>ping 75.75.75.75</code> (Comcast DNS)—interestingly, the first 4-6 pings would fail, and then the rest would go through reliably at about 10ms every time thereafter.</li><li>Ping traffic between any two points within the LAN (including the firewall) was completely unaffected.</li></ul><h2>Troubleshooting</h2><p>Google searches for the <code>DNS_PROBE_FINISHED</code> error invariably lead you to advice suggesting that you perform a <code>netsh winsock reset</code> and restart your computer. However this didn’t work in our case, unsurprisingly. The problem began affecting everyone at once, so unless there had been a bad Windows update or something (our IT support agency hadn’t heard of any) this would be unlikely to help.</p><p>We also ruled out the ISP as the cause. We have two WAN connections–one fiber and one cable–and switching to one or the other exclusively did not resolve the issue. Support tickets with ISPs confirmed there were no upstream connection or network problems.</p><h3>Examining Switches</h3><p>We had just that day moved a bunch of desks around one part of the office. Our IT support agency suggested we had some kind of switch-level <a href="http://www.networkworld.com/article/2223757/cisco-subnet/9-common-spanning-tree-mistakes.html">spanning tree problem</a>–a switch plugged into itself, perhaps, in some roundabout way. I tried rebooting the main switch used for non-VoIP traffic, and the problem immediately cleared up–for about ten minutes, and then it returned. We also tried disconnecting all the jacks for each person who had been affected by the move to rule out any subtle looping issues created (even though only one or two jacks had been affected); no dice.</p><p>I opened a support ticket with the switch company (Extreme Networks). They had me telnet into the switch and capture the output of a bunch of commands and send it to them, which allowed them to rule out any configuration or looping issues on the switch.</p><p>We upgraded the firmware, which dated from 2011, and restarted the switch. Again the problem cleared up and did not recur for the rest of the day. But by this point most people had gone home or to find somewhere else to work. I was curious if the problem would recur on Monday when everyone came back; sure enough, with 10 people in the office at 8:00 am Monday everything was fine, but by 8:30 we were having the same problem again.</p><p>At this point we were ready to try unplugging every person, port by port, waiting 5 seconds, and pinging google, to see if we could narrow the problem down to a particular network jack/user. Thankfully it didn’t come to that.</p><h2>The culprit</h2><p>This time on our firewall I noticed that the “connection count” was hovering close to or even above the stated maximum of 10,000. Occasionally the connection utilization would drop to 5–6% and then the problem would go away. I used the firewall’s “packet capture” interface to look at a few seconds’ worth of network traffic and noticed a high number of UDP packets coming from a particular LAN IP address, with sequential foreign destination IPs.</p><p>I was able to track down the computer with this IP address, it happened to be one of our sales people. The laptop was a Lenovo running Windows 8. In Task Manager I saw that it was sending 1.5 MBps over the wired Ethernet interface and 800–900 Kbps over the wireless interface, even with no apps running. (Task Manager did not show which process was casuing this.) Upon disconnecting the CAT5e cable the connection utilization on the firewall dropped to 40%. Disconnecting the wifi dropped it further to 7%.</p><p>By looking at the CPU usage it appears that the process <code>discovery.exe</code> was abnormally high. A Google search finally turned up this article: <a href="https://forums.lenovo.com/t5/LenovoEMC-Network-Desktop/Excessive-network-traffic-and-wifi-drops-linked-to-LenovoEMC/ta-p/1513962">Excessive network traffic and wifi drops linked to LenovoEMC Storage connector</a>, which stated:</p><blockquote><p>Corporate networks or ISPs may detect an excessive amount of unusual network traffic coming from ThinkPad systems preloaded with Microsoft Windows 8.1. The network traffic may be interpreted as a network flood or denial-of-service attack. As a result, the system may become restricted on the network or the network may stop functioning normally.</p><p>“LenovoEMC Storage Connector” is preloaded on some ThinkPad models to help customers discover and connect to LenovoEMC storage devices on their network. The process causing the network flood is <code>discovery.exe</code>, which is a component of “LenovoEMC Storage Connector”.</p></blockquote><p>Uninstalling the Lenovo EMC Storage Connector from the offending laptop finally fixed the issue.</p>]]></summary></entry><entry><author><name>Joel Dueck</name></author><published>2015-03-03T00:00:00-06:00</published><updated>2015-03-03T00:00:00-06:00</updated><title>Marked 2 Previews of Scrivener Files Coming Up Blank</title><link rel="alternate" href="https://thenotepad.org/posts/marked-blank-previews-scrivener.html"/><id>https://thenotepad.org/posts/marked-blank-previews-scrivener.html</id><summary type="html"><![CDATA[<p>You’re <em>supposed</em> to be able to drag and drop a <a href="http://www.literatureandlatte.com/scrivener.php">Scrivener</a> file onto the <a href="http://marked2app.com">Marked</a> app icon in the dock and have Marked open a preview for you.</p><p>However, when I did this on <em>one particular Scrivener file</em>, the Marked preview came up blank–even though I had plenty of Markdown-formatted content project.</p><p>I finally found the solution, after checking other things<label for="c8f450" class="margin-toggle sidenote-number"></label><input type="checkbox" id="c8f450" class="margin-toggle"/><span class="sidenote">Including whether “Include in compile” was turned on for each document within each document in the Scrivener project—if it’s unchecked, Marked <em>does</em> exclude it from the preview, even though no “compile” is actually taking place from Scrivener’s perspective.</span>. When you create a new “blank” Scrivener project, it gives you a couple of default folders; one of those is named <span class="noun">Drafts</span> and contains a blank text document. That Drafts folder, it seems, is actually supposed to be the root folder of all your project’s content.</p><p>What I had done was create a folder outside the Drafts folder and create all of my content there. Marked will not preview content located outside the Drafts folder.</p><p>The solution is to rename the original <span class="noun">Drafts</span> to something else like <span class="noun">Content</span>, and create a separate Drafts folder under it. Then make sure everything you might want to preview in Marked is located under that Content folder.</p><p>I’m using the latest version of Marked 2 (2.4.10) and Scrivener (2.6)</p>]]></summary></entry><entry><author><name>Joel Dueck</name></author><published>2015-02-06T00:00:00-06:00</published><updated>2015-02-06T00:00:00-06:00</updated><title>How to embed and subset your own webfonts</title><link rel="alternate" href="https://thenotepad.org/posts/how-to-encode-webfonts.html"/><id>https://thenotepad.org/posts/how-to-encode-webfonts.html</id><summary type="html"><![CDATA[<p>These days many of us use <a href="http://typekit.com">Typekit</a> for serving web fonts; and should you need to create and serve them yourself, most of the advice out there will point you to use FontSquirrel’s well-known <a href="http://www.fontsquirrel.com/tools/webfont-generator">Webfont Generator</a>. However, I’m a big fan of not relying on third-party sites and services if you can avoid it. What happens in five years when those sites are no longer available? It’s best to know how to do get the same result yourself using basic tools, and the result will often get you better performance.</p><p>Webfonts have gotten much easier to implement. Because <a href="http://caniuse.com/#search=woff">nearly all browsers support WOFF</a>, you no longer need to supply four different file formats for each font in order to be sure it will be supported on all browsers. You can simply convert any binary font file into <a href="http://en.wikipedia.org/wiki/Base64">Base64 encoding</a> and embed the resulting text/data right into your CSS file. However, there are additional steps you should take in order to optimize the size and downloading of your webfonts.</p><h2>Base64 Encoding</h2><p>This part is easy. The command <code>base64 filename</code> will take any file and encode it. This works on Linux and Mac OS X.</p><p>With this info, we can create a quick shell script that will take any font file and convert it into a webfont embedded right in a snippet of CSS:</p><pre class="code">#!/bin/bash

fontName=$1
fontFace=$2

WOFF=`base64 $fontName`

echo @font-face {
echo font-family: \'$fontFace\'\;
echo font-weight: normal\;
echo font-style: normal\;
echo font-stretch: normal\;
echo src: url\(\'data:application/font-woff\;charset=utf-8\;base64,$WOFF\'\) format\(\'woff\'\)\;
echo }</pre><p>Save this to a file called <code>webfont-encode</code> and make it executable:</p><pre class="code">chmod u+x ./webfont-encode</pre><p>You can then use it to create the webfont from any font file and append it to your CSS file, like so:</p><pre class="code">./webfont-encode AlegreyaSans-Reg.otf alegreyasans-1 &gt;&gt; fonts.css</pre><p>On OS X, you can also copy the result to the clipboard if you wish:</p><pre class="code">./webfont-encode AlegreyaSans-Reg.otf alegreyasans-1 | pbcopy</pre><p>Most times you’ll need to do this four times for each typeface: once each for the regular, italic, bold, and bold italic versions of the font. For each one, edit the <code>font-weight</code> and <code>font-style</code> CSS attributes to reflect the actual attributes of that font.</p><p>Once you’ve done all that, you can include the above stylesheet in your HTML (make sure it comes before any other stylesheets) and reference the font in your other CSS styles.</p><p><strong>Note:</strong> The original font file needs to have its “embeddable” flag set to <code>0x0000</code> or the font loading will fail in Internet Explorer (at least in versions 9 through 11). Other browsers do not seem to check for this value. If your font license allows embedding, you can find some more Python code for modifying the flag here: <a href="http://www.typophile.com/node/102671">http://www.typophile.com/node/102671</a>.</p><h2>Subsetting your fonts</h2><p>If you create your own webfonts using only the above steps, your files will be huge–likely around 1 MB per typeface once you include bold and italic versions. This is because most typefaces (the good ones, at least) include characters for Russian, Greek, Hebrew, Arabic, and many other character sets. You can speed up your site a lot by whittling each font down to only the characters you’re likely to need.</p><p>For this part I’m assuming you’re on OS X. You’re going to need <a href="http://brew.sh">Homebrew</a> and Python installed.</p><p>First, install the fontforge python extensions with <code>brew install fontforge</code>. Then:</p><pre class="code">export PYTHONPATH=/usr/local/lib/python2.7/site-packages:$PYTHONPATH</pre><p>(You’ll need to do this every time you open a new terminal unless you permanently add Homebrew’s package folder to your Python path.)</p><p>Next, get yourself a copy of <a href="https://github.com/pettarin/glyphIgo">glyphIgo</a>. This lovely Python script can convert between TTF and OTF font formats, and subset fonts based on any character set. Alberto Pettarin has <a href="http://www.albertopettarin.it/blog/2014/09/16/subsetting-fonts-with-glyphigo.html">a great blog post</a> explaining more about its use.</p><p>If you have <code>git</code> installed (<code>brew install git</code>), the following command will download a copy into a <code>glyphIgo</code> folder:</p><pre class="code">git clone https://github.com/pettarin/glyphIgo.git</pre><p>Now we need to create the character set: a file containing each of the characters you want to include in your font. I wrote a quick Python script to assist with this, and have included codes several extra typographic symbols that I use often:</p><pre class="code">from __future__ import print_function

charsets = [
    [0x0020,0x007F],    # BASIC LATIN
    [0x00A1,0x00FF],    # PUNCTUATION, LATIN-1 SUPPLEMENT, COMMON SYMBOLS
    [0xFB00,0xFB04],    # STANDARD ENGLISH LIGATURES fi, fl, ffi, ffl
    [0x0100,0x017F],    # LATIN EXTENDED-A
    [0x0180,0x024F],    # LATIN EXTENDE0D-B
    [0x2010,0x2015],    # HYPHENS AND DASHES
    [0x2018,0x2019],    # LEFT/RIGHT SINGLE QUOTATION MARKS
    [0x201C,0x201D],    # LEFT/RIGHT DOUBLE QUOTATION MARKS
    [0x2026,0x2026],    # ELLIPSES
    [0x221E,0x221E],    # INFINITY SYMBOL
    [0x2190,0x2193],    # ARROWS
    [0x21A9,0x21A9],    # LEFTWARDS ARROW WITH HOOK
    [0x2761,0x2761],    # CURVED STEM PARAGRAPH SIGN ORNAMENT
    [0x2766,0x2767]     # FLORAL HEART, ROTATED FLORAL HEART
]

for charset in charsets:
    for x in range(charset[0],charset[1]+1):
        print(unichr(x).encode('utf-8'),end='')</pre><p>Some notes on customizing this script: If you want to include any additional character blocks in your font, simply add the hex ranges to the <code>charsets</code> list (see the complete <a href="http://www.fileformat.info/info/unicode/block/index.htm">list of Unicode blocks</a>). Single characters can be added by making the first and second numbers of the “range” identical.</p><p>Including the ligatures (if the font supports them) makes for a better result on some platforms. On Mac, for example, Safari will make use of the ligatures but Chrome doesn’t use them at all.</p><p>Save the above script as <code>makeset.py</code> and create your character set file like so:</p><pre class="code">python makeset.py &gt; latin.set</pre><p>Armed with our character set, you can now subset your font like so:</p><pre class="code">python glyphIgo.py subset -f AlegreyaSans-Regular.otf -p latin.set -o AS-R.otf</pre><p>Now encode the new “minimized” font using the script we created above:</p><pre class="code">./webfont-encode AS-R.otf alegreyasans-1 &gt;&gt; fonts.css</pre><h2>Results</h2><p>To get an idea of the size reduction, I used these methods to produce a single CSS file containing regular, italic, bold, and bold italic versions of two typefaces (a total of eight <code>@font-face</code>s).</p><p>Without subsetting the fonts, the resulting CSS file was 2.1 MB in size. When I subset the fonts before encoding them, the result was 611 KB in size, a 70% reduction.</p><p>For comparison, Typekit reports a size of 339K for a kit containing the same two typefaces, using the “Default” character set and without including OpenType features. However, I strongly suspect that this the <em>compressed</em> size of their kit. You can achieve the same result by enabling gzip compression on your web server. On my own server, according to <a href="http://checkgzipcompression.com">checkgzipcompression.com</a>, the 611 KB CSS file gets packed down to a 345 KB download—almost identical to the Typekit version.</p><p>I could probably save even more space by omitting the Latin Extended-A and Extended-B blocks in my character set.</p><h2>Speeding it up even more</h2><p>Once you have your fonts set the way you like them, you should do yourself a further favour and check out Adam Beres-Deak’s post <a href="http://bdadam.com/blog/loading-webfonts-with-high-performance.html">Loading webfonts with high performance on responsive websites</a>. Using the simple Javascript in his post, you can make your fonts load and perform <em>much</em> faster than they would if you were using Typekit or Google Fonts.</p>]]></summary></entry><entry><author><name>Joel Dueck</name></author><published>2014-12-05T00:00:00-06:00</published><updated>2014-12-05T00:00:00-06:00</updated><title>How to convert mp3 files for use as on-hold music</title><link rel="alternate" href="https://thenotepad.org/posts/how-to-convert-mp3-files-for-use-as-on-hold-music.html"/><id>https://thenotepad.org/posts/how-to-convert-mp3-files-for-use-as-on-hold-music.html</id><summary type="html"><![CDATA[<p>If you administer your company’s VoIP system, you probably want to change the default on-hold music. Our company just started using a new system this year and the hold music was awful; it sounded like a 2nd grade piano recital. And whatever you do, you don’t want to make your callers suffer through any more of <a href="https://www.youtube.com/watch?v=6g4dkBF5anU">this</a>.</p><p>Most phone systems don’t let you use plain-old MP3 files, but you can convert any song to the necessary format.</p><p>First, get yourself suitable music. Something instrumental, without any exotic highs and lows. Try <a href="http://www.amazon.com/gp/product/B004Y430YQ/ref=as_li_tl?ie=UTF8&amp;camp=1789&amp;creative=390957&amp;creativeASIN=B004Y430YQ&amp;linkCode=as2&amp;tag=thloya-20&amp;linkId=AYWBOT32QQYWLHPS">this instrumental version of <em>Save the Last Dance For Me</em></a>, for example.</p><p>Next, <a href="https://www.ffmpeg.org/download.html">get ffmpeg</a>, the classic command-line utility for converting audio files to other formats.</p><p>For simplicity’s sake, put your MP3 file of choice in the same folder as your extracted ffmpeg executable file, and make sure the filename doesn’t contain any spaces. Then, open a command line/terminal and run this command:</p><pre class="code">ffmpeg -i YOURFILE.mp3 -ar 8000 -ac 1 -ab 64 YOURFILE.wav -ar 8000 -ac 1 -ab 64 -f mulaw YOURFILE.pcm -map 0:0 -map 0:0</pre><p>This will create two files, a <code>.wav</code> file and a <code>.pcm</code> file. Try using the <code>.wav</code> file first, if not, the other one should do the job.</p><p>Final note: all music sounds like ass over a phone line.</p>]]></summary></entry><entry><author><name>Joel Dueck</name></author><published>2014-11-28T00:00:00-06:00</published><updated>2014-11-28T00:00:00-06:00</updated><title>How to Record With a Yeti and Audacity (and eliminate background noise)</title><link rel="alternate" href="https://thenotepad.org/posts/how-to-record-with-a-yeti.html"/><id>https://thenotepad.org/posts/how-to-record-with-a-yeti.html</id><summary type="html"><![CDATA[<p>Maybe you saw renowned podcaster Marco Arment’s tweet this morning:</p><blockquote id="t538351950866415617" class="tweet"><div class="twContent">But the Yeti is fine for most podcasters too. Just keep in mind that it picks up a lot of background noise no matter what pattern you set.</div><footer class="twMeta"><span class="twDecoration">—</span><span class="twRealName">Marco Arment</span><span class="twDecoration"> (</span><span class="twScreenName"><a href="https://twitter.com/marcoarment">@marcoarment</a></span><span class="twDecoration">) </span><span class="twTimeStamp"><a href="https://twitter.com/marcoarment/status/538351950866415617">Nov 28 2014 9:21 AM</a></span></footer></blockquote><p>I use/used a <a href="https://amzn.com/B002VA464S/?tag=thloya-20">Yeti</a> on <a href="http://howellcreekradio.com">my podcast</a> for a few years now. Many others do too (including <a href="https://twitter.com/jsnell/status/538351510296358912">Jason Snell</a> for what that’s worth)—it’s long been known as the sweet spot of bang-for-the-buck for intermediate-level podcasting. Marco’s probably right that it’s not ideal in some ways, but let me tell you how I eliminate background noise.</p><p>In my experience, you can get a very clean signal with very little background noise from just about any mic if you use the Right Technique. That technique is:</p><ol><li>Use a pop filter</li><li>Turn gain on the mic <em>way</em> down</li><li>Speak super close to the mic</li></ol><figure><img src="/posts/img/mymicsetup.jpg" alt="My super inexpensive, terrible mic setup." style="width: 512.0px;"/><figcaption>My super inexpensive, terrible mic setup.</figcaption></figure><p>Yes, the pop filter (the $10 <a href="https://amzn.com/B0002CZW0Y/?tag=thloya-20">Nady MPF-6</a>) is simply held in place with a heavy object. I own no booms or shock-mounts. Not to say I wouldn’t love to have them, but I’m just not about to buy them for now (see further notes below).</p><p>Using the above placement, I set the gain knob on my Yeti at 40-45%, and set the pattern to Cardioid (heart-shaped). Then I set Audacity’s input level for the mic to 50%. I speak at a normal volume <strong>with my mouth almost touching the pop filter</strong>.</p><p>Additionally, I run Chris’s Dynamic Compressor plugin on voice tracks after all other editing has been done:</p><figure><img src="/posts/img/audacity-compress.png" alt="My settings for Chris’s Dynamic Compressor" style="width: 475.5px;"/><figcaption>My settings for Chris’s Dynamic Compressor</figcaption></figure><ul><li>Compress Ratio: <code>0.7</code></li><li>Compression Hardness: <code>0.7</code></li><li>Floor: <code>-14.0</code></li><li>Noise gate falloff: <code>6.0</code></li><li>Maximum amplitude: <code>0.95</code></li></ul><p>I may normalize the track to -2db before or after running the compressor, or both.</p><p>You can hear the results on any of the later episodes of <a href="http://howellcreekradio.com">my podcast</a> (which I’ve currently not been keeping up with). Which brings me to standard disclaimers: my podcasting is of a different style than most podcasts. My episodes are relatively short (5-15 min), and almost everything I say is pre-written and edited, and I’m the only voice. All of which makes my primitive Yeti/pop filter setup that much more bearable. If I were co-hosting with anyone or doing longer episodes I can see where it would get kind of unworkable, but for what I do I don’t mind it at all.</p>]]></summary></entry><entry><author><name>Joel Dueck</name></author><published>2014-11-20T00:00:00-06:00</published><updated>2014-11-20T00:00:00-06:00</updated><title>How to move from Blogger to another CMS</title><link rel="alternate" href="https://thenotepad.org/posts/how-to-move-from-blogger-to-kirby.html"/><id>https://thenotepad.org/posts/how-to-move-from-blogger-to-kirby.html</id><summary type="html"><![CDATA[<p>When I started this blog it was at <a href="http://blogger.com">Blogger</a>. I eventually decided I wanted to move the blog into a system I owned and controlled. I chose <a href="http://getkirby.com/">Kirby</a> on a lark. It’s very simple; no database, just a collection of text files.</p><p>There are a lot of guides for moving from Blogger to Wordpress, but nothing about moving to any other type of blog. Nearly all of those guides are incomplete, but by adapting and adding to them I was able to achieve all my goals for the move:</p><ul><li>Automatically migrate posts with their metadata into Kirby’s text format</li><li>Make copies of all images in blog posts so they are included in the move</li><li>Retain each blog post’s comments</li><li>Automatically redirect posts at the old blog to the new one without loosing Google juice</li></ul><h2>1. Migrating Posts, Comments and Images</h2><p>First of all, download a copy of your Blogger blog: once logged in to Blogger, go to the dashboard for your blog, then click <span class="noun">Settings</span> → <span class="noun">Other</span>. There will be a link at the top to export your blog–this will allow you to download a <code>.xml</code> file containing your entire blog, including your template, all configuration settings, posts and comments.</p><p>The bulk of my work in this projects was in writing a script to get the data I wanted out of that big hairy file.</p><p>The <a href="https://github.com/otherjoel/blogger2kirby"><code>blogger2kirby</code> script is on Github</a>. To use it you will need Python3 and a number of libraries installed–there are simple instructions for this in the Readme file at Github.</p><p>Place the <code>.xml</code> file exported from Blogger in the same folder as the script, then open Terminal and run the script with the command <code>python3 blogger2kirby.py</code>.</p><p>The script will create a folder called <code>out</code> containing subfolders for each post. These subfolders are named using a straightforward pattern:</p><ul><li>Old Blogger URL: <code>myblog.blogspot.com/2010/03/my-trip-to-philly.html</code></li><li>blogger2kirby output folder: <code>20100317-my-trip-to-philly</code></li><li>Resulting New Kirby URL: <code>mysite.com/blog/my-trip-to-philly</code></li></ul><p>Upload all these folders to the relevant content folder on your Kirby site and they will be available immediately.</p><p>The folders include copies of any images referenced in the post, and all image links in each post are converted to Kirby’s own format.</p><h2>2. Redirecting From the Old Blog</h2><p>Create a folder <code>blogger</code> on the server for your <em>new</em> website, accessible at the URL <code>mysite.com/blogger</code>. Make a file in that folder called <code>index.php</code> and paste in this code:</p><pre class="code">&lt;?php
/* Make sure to replace mysite.com/blog below
   with your own blog address. /*

    $old_url = $_GET['q'];
    if ($old_url != "") {
        $tld_fix = preg_replace("/blogspot.[a-zA-Z0-9]+/", "blogspot.com", $old_url);
        $permalink = explode("blogspot.com", $tld_fix);

        $new_url = preg_replace('/.+?([^\/]+)\.html/', '$1', $permalink[1]);
        header ("HTTP/1.1 301 Moved Permanently");
        header("Location: http://mysite.com/blog/$new_url");
    } else {
        echo "&lt;!DOCTYPE html&gt;&lt;html&gt;&lt;head&gt;&lt;title&gt;BOO&lt;/title&gt;&lt;/head&gt;&lt;body&gt;&lt;h1&gt;BOO!&lt;/h1&gt;&lt;/body&gt;&lt;/html&gt;";
    }
?&gt;</pre><p>This creates a handler on your new blog that will take incoming requests from your old blog and point them to the correct location on the new blog:</p><pre class="code">Incoming request: mysite.com/blogger/?q=http://myblog.blogspot.com/2010/03/my-trip-to-philly.html
Redirected to: mysite.com/blog/my-trip-to-philly</pre><p>Now that your new blog is ready to receive incoming hits, we’ll start redirecting your old blog.</p><p>You will need to revert to “Classic templates” on your old blogspot site.</p><p>Edit the template and past in the following code just before the <code>&lt;/head&gt;</code> tag:</p><pre class="code">&lt;script&gt;
&lt;MainOrArchivePage&gt;
    window.location.href='http://mysite.org/'
 &lt;/MainOrArchivePage&gt;
&lt;Blogger&gt;&lt;ItemPage&gt;
    window.location.href='http://mysite.com/blogger/?q=&lt;$BlogItemPermalinkURL$&gt;'
&lt;/ItemPage&gt;&lt;/Blogger&gt;
&lt;/script&gt;
&lt;MainPage&gt;
    &lt;link rel="canonical" href="http://mysite.com/" /&gt;
&lt;/MainPage&gt;
&lt;Blogger&gt;&lt;ItemPage&gt;
    &lt;link rel="canonical" href="http://mysite.com/blogger/?q=&lt;$BlogItemPermalinkURL$&gt;" /&gt;
&lt;/ItemPage&gt;&lt;/Blogger&gt;</pre><p>This does two things.</p><ol><li>It sets a <code>link rel="canonical"</code> tag for each page on your blog listing the new URL for that page on your new site. Several search engines (<a href="https://support.google.com/webmasters/answer/139066?hl=en">including Google</a>) use this tag to update their search results with the new URL instead of the old one. <strong>This ensures you continue to get traffic from search engines at the new blog instead of the old one.</strong></li><li>It uses javascript to instantly redirect visitors to a page at your new blog.</li></ol><p>Once you’ve saved this template, any hit to any page on your old blog should magically land you at the new one.</p><p>I’d advise leaving the old blog in place for as long as possible (at least a year).</p><div class="updateBox"><p><b><span class="smallcaps">Update, 4 Feb 2016</span></b></p><ul><li>I didn’t stick with Kirby, but this code still came in handy.</li><li>Even with that redirect in place, my search traffic (and my ad clicks) <em>totally tanked</em>.</li></ul></div>]]></summary></entry><entry><author><name>Joel Dueck</name></author><published>2013-01-24T00:00:00-06:00</published><updated>2013-01-24T00:00:00-06:00</updated><title>How to go paperless the future-proof way (without using Evernote)</title><link rel="alternate" href="https://thenotepad.org/posts/how-to-do-paperless-future-proof-way.html"/><id>https://thenotepad.org/posts/how-to-do-paperless-future-proof-way.html</id><summary type="html"><![CDATA[<p>The short version:</p><ul><li><p>Get a <a href="https://amzn.com/B008ASBFM6/?tag=thloya-20">Doxie One scanner</a>. For (optional) convenience, get an <a href="https://amzn.com/B003DV4234/?tag=thloya-20">Eye-Fi SD card</a> for $35, which will send documents from the scanner to your computer wirelessly and automatically.</p><p><strong>Update:</strong> If you want to cut your scanning time by more than half, spend a few bucks more and get the <a href="https://amzn.com/B00671E4B2/?tag=thloya-20">Canon P-215 scanner</a> (as <a href="http://thewirecutter.com/reviews/the-best-portable-scanner-is-the-canon-p-215/">recommended</a> by The Wirecutter). It scans twice as fast, it scans both sides of the page at the same time, it has a document feeder, and it has built-in OCR.</p></li><li>Scan your documents to your hard drive. Put them all in one big folder. If you want, use the OCR option in Doxie’s software to make your PDFs searchable.</li><li>Date and tag the documents: use this format for filenames: <code>[year]-[month] name of document #tag1 #tag2 #tag3.pdf</code></li><li>Get an <a href="http://www.amazon.com/gp/bestsellers/office-products/1069596/?ie=UTF8&amp;camp=1789&amp;creative=390957&amp;linkCode=ur2&amp;tag=thloya-20">expanding file jacket</a>. Put all your important papers in there and out of the way, and scan them all once every quarter or so (I usually do my scans once a year just before I do my taxes).</li><li>Shred the original documents.</li><li>Keep backups.</li></ul><p>When you want to run a search, open your archive folder and run a search. Need all tax-related documents for last year? Search for <code>2012 #taxes</code>.</p><p>No subscriptions. No extra software. Guaranteed to be stay portable and useful for the next 20 years.</p><h2>Why the hashtags? What about folders?</h2><p>Using <code>#tags #like #this</code> in the filename is a universal tagging mechanism. It works on Mac OS and on Windows, and the searches on those systems will have no problem finding your files.</p><p>Sticking files in a folder hierarchy is a poor way of filing that is on its way out. For example, what do you do if a document is both medical and tax-related in nature? Do you create a <code>Taxes → Medical</code> folder structure, or <code>Medical → Taxes</code>?</p><p>Tags allow a document to live in more than one box at a time, are easy to add, and are easy to search for.</p><h2>Why Not Evernote? Reasons, that’s why.</h2><p>There have been a <a href="http://shawnblanc.net/2012/09/the-paperless-puzzel/">couple</a> of <a href="http://toolsandtoys.net/the-tools-and-toys-paperless-guide/">great</a> <a href="http://lifehacker.com/5973033/how-i-turned-three-years-of-paper-into-a-highly-organized-searchable-document-database-in-two-days">posts</a> by others lately about going paperless, and they’re definitely worth reading. But they all assume you need some kind of fancy software setup, including (most commonly) a subscription plan to Evernote.</p><p>I agree it must be nice to have someone else run OCR on my documents and host them for me. But let’s look at the drawbacks:</p><ul><li>I have to pay someone else $60 a year in case I need to perform occasional full-text searches on my own documents.</li><li>Long-term uncertainty. Will Evernote be around in 10 years? 20 years? How do I know I’ll be able to get my massive archive back out again when they go out of business?</li><li>Handing off responsibility for your sensitive documents to someone else’s computers—this is just asking for trouble. Data corruption, security breaches, warrantless searches. Over the next 10 years, it’s almost a given that your hosted service of choice will be hit by at least one of them.</li></ul>]]></summary></entry><entry><author><name>Joel Dueck</name></author><published>2012-07-29T00:00:00-05:00</published><updated>2012-07-29T00:00:00-05:00</updated><title>Accessing BBC Coverage from the U.S.</title><link rel="alternate" href="https://thenotepad.org/posts/accessing-bbc-coverage-from-us.html"/><id>https://thenotepad.org/posts/accessing-bbc-coverage-from-us.html</id><summary type="html"><![CDATA[<p>You live in the U.S., you don’t have a cable subscription but you want to watch the Olympics live? Here’s how to do it.</p><p>If you have a Mac, you can just <a href="http://bearsfightingbears.com/how-to-watch-the-olympics-live-from-the-united-states">follow these excellent instructions by Brad Gessler</a>.</p><p>If you’re a Windows user, follow the instructions below, which I’ve adapted from Brad’s post after a good bit of tinkering. I’m also including some details that he left out.</p><ol><li>Brad writes<label for="751abd" class="margin-toggle sidenote-number"></label><input type="checkbox" id="751abd" class="margin-toggle"/><span class="sidenote"><strong>Full disclosure:</strong> I’ve copied the Linode signup link from <a href="http://bearsfightingbears.com/how-to-watch-the-olympics-live-from-the-united-states">Brad’s original post</a>, which means it still includes Brad’s referral code. I thought this was fair since he was the one who first posted the basic solution. In his post he expresses a wish to find some way to use his referral code to donate to the EFF; I’ll keep an eye out, and if he finds a way to do that I’ll update this post’s link as well.</span>: “<a href="http://www.linode.com/?r=01cd5799b9a7520304c0bf19c17eff6b22f4f574">Signup up for a Linode account</a>. After you enter your credit card information and select a Linode server, you’ll be asked where you’d like to boot the server. <strong>It’s important that you select London, UK</strong> during this step so that you get an IP address from inside of London.” Note that the $20 (least-expensive) server option should be plenty for your needs.</li><li>When Linode asks which distribution you’d like to use, leave it at the default (Debian). You can also follow all the defaults for the other setup settings (disk space, swap, etc.). After configuration and setup are complete, follow the steps on the web interface to boot your server up.</li><li><a href="http://www.chiark.greenend.org.uk/~sgtatham/putty/download.html">Download PuTTY</a> (just download the <code>putty.exe</code> file listed first). This is the program you will use to connect to your Linode server in London.</li><li><p>Configure PuTTY:</p><ul><li>Main PuTTY screen: Under <span class="noun">Host Name</span> enter the IP address of your server, leave <span class="noun">Connection type</span> as SSH.</li><li>In the tree view at left, click <span class="noun">Connection</span> → <span class="noun">Data</span>. In the <span class="noun">auto-login username</span> field, enter the text <code>root</code></li><li>In the tree view at left, click <span class="noun">Connection</span> → <span class="noun">SSH</span>. Make sure <span class="noun">enable compression</span> is <strong>checked</strong>.</li><li>In the tree view at left, click <span class="noun">Connection</span> → <span class="noun">SSH</span> → <span class="noun">Tunnels</span>. Under <span class="noun">Source port</span>, type <code>8080</code>. Select the <span class="noun">Dynamic</span> option and leave the other settings as default, then click <span class="noun">Add</span>.</li><li>Return to the main PuTTY screen by clicking <span class="noun">Session</span> in the tree view at left. Type a name under <span class="noun">Saved Sessions</span> and click <span class="noun">Save</span> (so you won’t have to go through this whole rigamarole every time).</li></ul></li><li><p>Set up your proxy.</p><ul><li><p>If you use IE or Chrome, configure this by going to Network and Sharing Center, and clicking Internet Options. Go to <span class="noun">Connections</span> tab, click <span class="noun">LAN Settings</span> button. Make sure <span class="noun">Use a proxy server for your LAN</span> is checked, and click the “Advanced” button. Enter <code>127.0.0.1</code> next to the “Socks” field, and enter <code>8080</code> for the port. <strong>Leave the other fields blank</strong> as shown (HTTP, Secure, and FTP).</p><figure><img src="/posts/img/20120729proxysettings.png" alt=" " style="width: 160.0px;"/><figcaption> </figcaption></figure></li><li>If you use Firefox, go to “Connection Settings”, select “Manual proxy configuration” and follow the same procedure, entering <code>127.0.0.1</code> next to the “Socks host” field, and <code>8080</code> for the port, and ensure the other fields are blank.</li></ul></li></ol><p>Now every thing is set up.</p><p><strong>Whenever you want to watch Olympics on BBC:</strong></p><ol><li>Make sure the proxy is turned on as in step 5 above—these settings will be saved from last time, all you have to do is turn it on again.</li><li>Open PuTTY, double-click on your saved session, and enter your password when prompted. You can minimize the terminal window once you’re sure you’ve logged in.</li><li>Browse to <a href="http://www.bbc.co.uk/iplayer/tv/bbc_one_london/watchlive">http://www.bbc.co.uk/iplayer/tv/bbc_one_london/watchlive</a> to watch the Olympics live, <strong>or</strong> go to <a href="http://www.bbc.co.uk/sport/olympics/2012/live-video">http://www.bbc.co.uk/sport/olympics/2012/live-video</a> to pick and watch specific events.</li></ol><p><strong>When you’re done:</strong> Tunneling all your web traffic through a London server will make the rest of your browsing slower (and waste your Linode account’s bandwidth) so you should close PuTTY and turn off the proxy server setting from step 5 above when you’re not watching the Olympics.</p><p><em>Thanks to <a href="https://twitter.com/mja">@mja</a> for the original tip about Brad’s post, and the one about where to go directly to watch specific events.</em></p><h2>Other approaches</h2><p>I did attempt to use a VPN service to do essentially the same thing, but it was far too slow.</p><div class="updateBox"><p><b><span class="smallcaps">Update, July 30 2012</span></b></p><ul><li>If you use Chrome or Firefox, installing a “proxy switcher” extension for your browser will make between enabling and disabling the proxy setting much easier. Use <a href="https://chrome.google.com/webstore/detail/caehdcpeofiiigpdhbabniblemipncjj">Proxy Switchy</a> for Chrome, or <a href="https://addons.mozilla.org/en-us/firefox/addon/quickproxy/">QuickProxy</a> for Firefox.</li><li><p>A couple more good articles about this issue have popped up:</p><ul><li>A post by <a href="http://iamnotaprogrammer.com/Watch-olympics-streaming-free.html">Colin Nederkoorn</a>, in which he initially advocates the VPN method, but also mentions the <a href="http://unblock-us.com/">Unblock Us</a> service. He’s not sure how it works (and neither am I) but he says it works great.</li><li>Dan Parsons advocates <a href="https://gist.github.com/3195652">setting up OpenVPN on your Linode server</a>, but I haven’t seen any reason why one should go to the additional step of installing OpenVPN when a simple SOCKS proxy seems to work fine.</li></ul></li></ul></div>]]></summary></entry><entry><author><name>Joel Dueck</name></author><published>2012-07-10T00:00:00-05:00</published><updated>2012-07-10T00:00:00-05:00</updated><title>How To Get Inexpensive Data Roaming For International Travel on Verizon</title><link rel="alternate" href="https://thenotepad.org/posts/how-to-get-inexpensive-data-roaming-for.html"/><id>https://thenotepad.org/posts/how-to-get-inexpensive-data-roaming-for.html</id><summary type="html"><![CDATA[<p>If you’re a U.S. Verizon customer with a smartphone, here’s the lowdown on keeping data roaming charges to a minimum for any trips outside the country.</p><div class="updateBox"><p><b><span class="smallcaps">Update, Sep 2012</span></b></p><p> Also read this excellent article: <a href="http://duncandavidson.com/blog/2012/09/which_iphone5">Which iPhone 5 for a Global Traveller?</a></p></div><p>Keep in mind, it’s not uncommon for Verizon to alter the options they offer. If this article hasn’t been updated in more than 6 months, things may have changed; in that case, look around further online or call customer service and ask them how best to handle it.</p><p>Be sure to leave a comment with your findings!</p><h2>The penny-pincher method (for trips of less than three weeks)</h2><p>My wife is from Canada and we do this regularly during our visits to family there.</p><p>The way Verizon charges for data outside the U.S. is (currently) very simple: They charge for global data in chunks: $25 gets you a somewhat-measly 100MB. You can’t pay in any smaller increments.</p><p>Here’s what to do. Call customer service ahead of time<label for="af962c" class="margin-toggle">&#8853;</label><input type="checkbox" id="af962c" class="margin-toggle"/><span class="marginnote">From your Verizon phone, dial 611, or dial (800) 922-0204. Press 0 at the menu to just get right to a live person. You’ll be asked to state your reason for calling and told about higher-than-normal wait times, but this is just to deter you into trying the website instead; the wait usually isn’t very long.</span>, and ask them to add one 100mb block of Global Data, but only for the days you’ll be outside the US. Give them the days you want it to go on and off your account (i.e., the days that you’ll be crossing the border). This will pro-rate the cost by the number of days you are on the plan, but it will also pro-rate the amount of data you get.</p><p>For example, supposing you’ll be out of the country for 11 days. Here’s how the costs for this method would work out (for each line, remember):</p><ul><li>Cost: <code>($25 / 31) x 11 = $8.87</code></li><li>Data: <code>(100MB / 31) x 11 = 35MB</code> <em>(round down to nearest MB)</em></li></ul><p>Now (in this example) you’re only paying $9 extra per phone instead of $25. On a two-phone account, that would be a savings of $31.</p><p>The trick is staying under that low data ceiling (35MB in this example). If you use more than the chunk of prorated data you’ve already paid for, you’ll automatically get an additional 100MB—and charged the additional $25 as well, meaning you’ll probably pay more than you needed to.<label for="7cb146" class="margin-toggle">&#8853;</label><input type="checkbox" id="7cb146" class="margin-toggle"/><span class="marginnote">Supposing you did use up your “small” chunk and got hit with an additional 100MB chunk, but your total roaming data for the month was still under 100MB, you <em>should</em> be able to call customer service and at least get credited for the “small” chunk. I’ve had to do this once, with no problems.</span></p><p>If you’re going to be out of the country for more than 20 days, the savings from this method become too small to be worth the hassle; you might as well just get the 100MB.</p><p>Either way, here’s how to make sure you don’t use up your “cheap” data:</p><ul><li>Save your data usage for when you’re at a wifi hotspot (any data you use over wifi doesn’t count against you). This includes websites, email, Instagram, Facebook, etc.—pretty much app that communicates in any way. Some games don’t use data, but many do. Light usage of these things is ok, but the more you can save for wifi, the more likely you won’t break your data cap.</li><li>Don’t watch videos when not on wifi (Netflix, YouTube, Vimeo, etc.)</li><li>Don’t stream any music when not on wifi (Spotify, Pandora, iCloud, Amazon, etc.)</li><li>If you’ll need maps during the day, look them up ahead of time while on wifi, making sure to zoom in and out to download the tiles at various zoom levels</li><li>(For iPhone users) Turn off Push for email—instead set it to Fetch Hourly (or Fetch Manually). Go to <span class="noun">Settings</span>—<span class="noun">Mail, Contacts, Calendars</span>—<span class="noun">Fetch New Data</span>, turn off the Push option and set the frequency to Hourly or Manually.</li></ul><h2>What about the inconvenient and totally free method?</h2><p>Depending on your phone, it’s possible that you <em>may</em> be able to avoid any extra overseas data charges altogether by turning off cellular data.</p><p>When your phone is connected to a network of any kind, it is constantly “sipping” data. True, it’s a miniscule amount, but as soon as it sips even one kilobyte while you’re out of the country, you get that $25 charge for a block of 100MB of roaming data.</p><p>On an iPhone, you need to turn off cellular data under <span class="noun">Settings</span> → <span class="noun">General</span> → <span class="noun">Network</span>. (Turning off “Data Roaming” will <em>not</em> work—it’s notoriously unreliable.) Another option, if you want to avoid voice roaming charges as well, is to turn on Airplane Mode and then re-enable WiFi. Remember you can’t place or take any cellular calls in Airplane Mode, but you could use Skype or FaceTime to make calls while connected to WiFi.</p><p>The catch with this method is that it can never actually eliminate your risk. Unforeseen circumstances can very easily require you to grab an email or place a call when you’re not near wifi, and even if it’s technically possible to change your phone’s settings back and forth in just the right ways, you always risk slipping up even for a second and incurring that $25 charge. Personally I’d much rather be realistic and plan ahead so I can be flexible without breaking the bank. For short trips especially, I really don’t believe it’s worth the mental hassle, unless you want to take the challenge as sort of a game with yourself.</p><h2>What if I’ll be out of the country for more than three weeks?</h2><p>Then you really need to read this article: <a href="http://a.wholelottanothing.org/2012/02/world-travel-with-the-unlocked-us-verizon-iphone-4s.html">World travel with the unlocked US Verizon iPhone 4S</a>—check out the comments as well.</p>]]></summary></entry><entry><author><name>Joel Dueck</name></author><published>2012-06-01T00:00:00-05:00</published><updated>2012-06-01T00:00:00-05:00</updated><title>Fix severe delays when loading Excel 2003 files from network drives</title><link rel="alternate" href="https://thenotepad.org/posts/fix-severe-delays-when-loading-excel.html"/><id>https://thenotepad.org/posts/fix-severe-delays-when-loading-excel.html</id><summary type="html"><![CDATA[<p>I was recently made aware of a problem where Excel 2003 would take several minutes to load a spreadsheet from a network drive. What made it even worse was that several of these sheets were referenced inside a CAD drawing (meaning AutoCAD would open Excel in the background for each spreadsheet referenced), and the load delay for each individual spreadsheet made it was near-impossible for the drawing to <em>ever</em> finish loading.</p><p>I found three possible solutions to the problem.</p><p>The first (which I used) was to create or modify the following registry key using <code>regedit</code>:</p><pre class="code">[HKEY_CURRENT_USER\Software\Microsoft\Office\11.0\Excel\Security\FileValidation]
"EnableOnLoad"=dword:00000000</pre><p>The second option is to uninstall the Microsoft Office File Validation Add-in from the Control Panel.</p><p>The third is to upgrade to Excel 2007 or later.</p>]]></summary></entry><entry><author><name>Joel Dueck</name></author><published>2012-05-25T00:00:00-05:00</published><updated>2012-05-25T00:00:00-05:00</updated><title>The iPhone Hot Battery Drain, Fixed with a Lightweight Email Setup</title><link rel="alternate" href="https://thenotepad.org/posts/iphone-hot-battery-drain-fixed-with.html"/><id>https://thenotepad.org/posts/iphone-hot-battery-drain-fixed-with.html</id><summary type="html"><![CDATA[<p>Recently my iPhone 4S suddenly began exhibiting symptoms of the famous <a href="http://www.loopinsight.com/2011/11/02/apple-confirms-battery-life-issues-in-ios-5/">“hot battery drain” problem</a>, where the phone would become much warmer to the touch then normal, the battery would drain more quickly, and the phone would charge much more slowly than normal.</p><p>It’s been known for some time now that this is often an iOS 5 bug caused by a contact sync process that gets out of hand<label for="f29747" class="margin-toggle sidenote-number"></label><input type="checkbox" id="f29747" class="margin-toggle"/><span class="sidenote">No one seems to be sure why, however. The <a href="http://www.macworld.com/article/1163200/troubleshoot_iphone4s_battery.html">most extensive troubleshooting that has been made public</a> seems to leave a lot of unanswered questions.</span>. In the process of fixing this problem for myself, I discovered an alternative to <a href="http://lifehacker.com/5859854/how-to-set-up-gmail-google-calendar-and-google-contacts-on-ios">the commonly-used practice of using an extra Exchange account for syncing Gmail contacts</a>. This new setup has dramatically increased my battery life even beyond what it was before I started having the battery drain issue.</p><p><strong>Note:</strong> I use Gmail, and I like all my contacts to be available from there. These instructions are thus somewhat Gmail-centric, but you should be able to improve your battery life by following the general principles shown. If you have tips for other email/contact setups, please let us all know in the comments.</p><p>First, solve the battery drain issue. The following steps solved the problem for me<label for="793258" class="margin-toggle sidenote-number"></label><input type="checkbox" id="793258" class="margin-toggle"/><span class="sidenote">I based this off of <a href="https://discussions.apple.com/thread/2481216?start=0&amp;tstart=0">this thread at Apple support</a>—they seem to work even though they were posted as a solution to a similar problem that was before iOS 5</span>:</p><ol><li>Remove all the messaging accounts on your phone, including iCloud. Remove all Calendars, Contacts, Notes and Bookmarks from the phone (so you don’t have duplicates when you re-add the accounts later).</li><li>Power down your phone (the normal way, by holding down the power button and sliding to power off).</li><li>Let it cool off, and start it up again.</li></ol><p>You now have a blank slate: no email, calendars, or contacts. A blank slate means a chance to clean up and streamline.</p><ol><li>Re-add your iCloud account. Wait long enough for contacts and calendars to sync, check to make sure.</li><li>Re-add your Gmail account <em>as a Gmail account</em>. This means it will only pull in mail (and calendar), not contacts.</li><li>Clean up your Gmail contacts by opening your contacts in Gmail (i.e., open the website on your computer), clicking the <span class="noun">More</span> button at the top, and clicking <span class="noun">Find and merge duplicates...</span></li><li>Purchase the <a href="http://itunes.apple.com/us/app/contacts-sync-for-google-gmail/id451691288?mt=12">Contacts Sync For Google GMail</a> app. Yes it’s $4.99. It’s worth it.</li><li>Run the app, making sure to read the User Guide to make sure it will be syncing contacts the way you want it to. (I used 2-way, so all my contacts live in both my iCloud and my Gmail accounts.)</li><li>Finally, go to the Settings app, and go to the <span class="noun">Mail, Contacts, Calendars</span> section. Click on <span class="noun">Fetch New Data</span>. Make sure <span class="noun">Push</span> is turned <strong>off</strong>, and select the <span class="noun">Hourly</span> fetch schedule.</li></ol><p>Now you have all your contacts synced by an app that knows how to do its job better than iOS does (seriously, check out the reviews), and you have an email connection that is lightweight and uses minimal battery life.</p><p>For what it’s worth, I also have an Exchange account for work that syncs mail, contacts, calendars and reminders—also on the hourly fetch schedule.</p><p><strong>Wait, won’t there be a big delay for receiving emails this way?</strong> No, not really. The fact is that whenever you open an email inbox in the Mail app, your iPhone instantly re-checks the account for new mail anyway. The Fetch setting only limits the background checking that the phone does when you’re not looking, so setting it to hourly just means the red “new email” number on the Mail icon won’t update itself more than once an hour<label for="222743" class="margin-toggle sidenote-number"></label><input type="checkbox" id="222743" class="margin-toggle"/><span class="sidenote">Seriously, how often do you really need to check your email? More than once an hour and I’d say you have serious productivity issues.</span>. You can always get an up-to-the-minute check by just opening the Mail app.</p>]]></summary></entry><entry><author><name>Joel Dueck</name></author><published>2012-04-23T00:00:00-05:00</published><updated>2012-04-23T00:00:00-05:00</updated><title>How to Easily Use OpenType Fonts in LaTeX</title><link rel="alternate" href="https://thenotepad.org/posts/how-to-easily-use-opentype-fonts-in.html"/><id>https://thenotepad.org/posts/how-to-easily-use-opentype-fonts-in.html</id><summary type="html"><![CDATA[<p>I became interested in <span class="latex">L<span class="latex-sup">a</span>T<span class="latex-sub">e</span>X</span> out of a desire to be able to produce high-quality PDFs for self-published books. Someday I hope to be able to produce books of comparable quality to <a href="http://www.tsengbooks.com/">these humanities books</a> typeset in TeX. This idea became even more feasible when I discovered the text content could be written in Markdown and converted to <span class="latex">L<span class="latex-sup">a</span>T<span class="latex-sub">e</span>X</span> with <a href="http://johnmacfarlane.net/pandoc/index.html"><code>pandoc</code></a> (More information in <a href="http://www.charlietanksley.net/philtex/primarily-pandoc/">this article</a>).</p><p>Typographically, the example books I linked to above are more the exception than the rule: the vast majority of <span class="latex">L<span class="latex-sup">a</span>T<span class="latex-sub">e</span>X</span> documents use the same boring default font, <a href="http://en.wikipedia.org/wiki/Computer_modern_font">Computer Modern</a>, that was originally packaged with the software in the 1980s. Using Computer Modern in a self-published book would be almost as bad as using Times New Roman or Arial.</p><p>If you try to figure out whether and how you might be able to use your computer’s normal fonts with <span class="latex">L<span class="latex-sup">a</span>T<span class="latex-sub">e</span>X</span>, you will soon come across a lot of <a href="http://www.ece.ucdavis.edu/~jowens/code/otfinst/">extremely complicated and incomplete documentation</a> about how to convert TrueType or OpenType fonts into a format <span class="latex">L<span class="latex-sup">a</span>T<span class="latex-sub">e</span>X</span> can use.</p><p>The happy truth is that these instructions are now obsolete: <strong>you now have easy access to OpenType fonts on Windows <em>and</em> Mac platforms</strong>, thanks to a new version of <span class="latex">L<span class="latex-sup">a</span>T<span class="latex-sub">e</span>X</span> called <a href="http://tug.org/xetex/">XeTeX</a>. XeTeX includes a package called <code>fontspec</code> that gives full access to all system fonts, as well as advanced features for OpenType fonts, such as ligatures and small caps. XeTeX is available for Mac, but what most people don’t say is that this font-accessing goodness can also be used on Windows since XeTeX is included with Windows distributions such as <a href="http://www.tug.org/texlive/">TeX Live</a> and <a href="http://miktex.org/">MikTeX</a>.</p><p>That being understood, here’s how to use your system fonts in your TeX documents (<a href="http://tex.stackexchange.com/questions/46/how-do-i-use-an-opentype-font-with-my-latex-document">source</a>):</p><blockquote><ol><li>Use the <code>xelatex</code> command in place of <code>pdflatex</code></li><li>Add <code>\usepackage{xltxtra}</code> at the beginning of your preamble (enables some XeTeX goodies, in particular it also loads fontspec, which is needed for font selection).</li><li>Add <code>\setmainfont{Name of OTF font}</code> in the preamble.</li><li>No step 4.</li></ol></blockquote><p><strong>Note:</strong> If you are using the aforementioned pandoc to generate your TeX documents, you do not need to do step 2—pandoc already includes the fontspec package in its default template. Also, you can set the main font by adding the option <code>--variable=mainfont:"font name"</code> when calling the <code>pandoc</code> command.</p>]]></summary></entry><entry><author><name>Joel Dueck</name></author><published>2012-04-19T00:00:00-05:00</published><updated>2012-04-19T00:00:00-05:00</updated><title>Publish multiple Markdown files to HTML in Windows</title><link rel="alternate" href="https://thenotepad.org/posts/publish-multiple-markdown-files-to-html.html"/><id>https://thenotepad.org/posts/publish-multiple-markdown-files-to-html.html</id><summary type="html"><![CDATA[<p>I wrote this script as a means of setting up a dead-simple “knowledge base” in HTML format.</p><p>The idea is to write documentation as a collection of plain-text files in <a href="http://daringfireball.net/projects/markdown/">Markdown</a> format and have a no-fuss way to publish them as HTML, re-publishing changes as necessary.</p><p>In order for this script to work, you need to be on Windows, and you need to <a href="http://johnmacfarlane.net/pandoc/installing.html">install a program called <code>pandoc</code></a>.</p><p>How to use it:</p><ol><li>Save a copy of this script file in any folder containing a bunch of Markdown-formatted text files. Include a <code>stylesheet.css</code> file in this folder as well if you want the HTML files to have CSS styling.</li><li>Run the script (double-click it)—it will silently create updated HTML files for every text file in the folder. Only text files whose HTML counterparts are out of date or nonexistent will be processed.</li></ol><p>You can either copy and paste the code below into Notepad and save it as a <code>.vbs</code> file, or you can <a href="https://docs.google.com/open?id=0B9SDJ22NRBkrcEgtcWsyMi1pTFU">download the latest version</a> in a zip file. The code in the download will be more extensively commented, and may also contain enhancements developed since this post was written.</p><p>Here’s the basic code (provided under the terms of the Artistic License 2.0—<a href="http://www.perlfoundation.org/artistic_license_2_0">http://www.perlfoundation.org/artistic_license_2_0</a>):</p><pre class="code">Set objShell = CreateObject("WScript.Shell")
Set objFSO = CreateObject("Scripting.FileSystemObject")

strThisFolder = objFSO.GetParentFolderName(Wscript.ScriptFullName)
Set objStartFolder = objFSO.GetFolder(strThisFolder)
strConverterCommand = "pandoc -f markdown -t html -c stylesheet.css -o "

Set objFilesToUpdate = CreateObject("Scripting.Dictionary")

Set colFiles = objStartFolder.Files
For Each objFile in colFiles
    If objFSO.GetExtensionName(objFile.Name) = "txt" Then

        ' Check if HTML version of this text file exists in this folder
        strHTMLName = strThisFolder &amp; "\" &amp; Replace(objFile.Name, ".txt", ".html")
        If objFSO.FileExists(strHTMLName) Then

            ' If it exists, compare the timestamps
            Set objHTMLFile = objFSO.GetFile(strHTMLName)
            If objFile.DateLastModified &gt; objHTMLFile.DateLastModified Then
                'If the text file is newer, add this text file to the list
                objFilesToUpdate.Add objFile.Name, strHTMLName
            End if

        Else
            ' If the file does not exist yet, add this text file to the list
            objFilesToUpdate.Add objFile.Name, strHTMLName
        End if
    End if
Next

' Update all the text files in the list.
colFilesToUpdate = objFilesToUpdate.Keys
For Each strSourceFile in colFilesToUpdate

    objShell.Run strConverterCommand &amp; objFilesToUpdate.Item(strSourceFile) &amp; " " &amp; strSourceFile, 3, True
Next</pre><p>Possible Future Improvements:</p><ul><li>The script isn’t very helpful about telling you how long the process is going to take. I looked at several options for providing a progress bar or some kind of status output, but ultimately VBScript is just really sucky at this.</li><li>Pandoc is a very powerful converter. One could easily tweak the script to add options for producing LaTeX or even PDF files.</li></ul>]]></summary></entry><entry><author><name>Joel Dueck</name></author><published>2012-03-12T00:00:00-05:00</published><updated>2012-03-12T00:00:00-05:00</updated><title>Formatting and Typesetting your Book in MS Word</title><link rel="alternate" href="https://thenotepad.org/posts/formatting-and-typesetting-your-book-in.html"/><id>https://thenotepad.org/posts/formatting-and-typesetting-your-book-in.html</id><summary type="html"><![CDATA[<p>You can actually get some good-quality typesetting from Microsoft Word if you just change a few options.</p><p>It starts with your page size. If you are self-publishing with a service like Lulu or CreateSpace, you select the size of your book, and this will give you a set of constraints (margins, etc.) to start with. Your page size and maximum margins will generally determine roughly how wide your text block can be.</p><p>Next, you want to find a matching set of values for your final font size, line height, and line width. The method I’m going to give you here is based on one possible set of proportions between font size, line height, and line width. See <a href="http://www.pearsonified.com/2011/12/golden-ratio-typography.php">this article about golden ratio typography</a> for more information.</p><ol><li>Take the width of your text block in inches and multiply by 72. This tells you how many “points” there are in one line of text.</li><li>Take the square root of this number and divide by 1.618 (the golden ratio). This gives you an optimal font size, in points, for your main text.</li><li>After rounding this font size to within half a point, multiply it by 1.618 again. This will give you your optimal line height in points.</li></ol><p>You may need to reiterate a few times until you get a matching set of numbers that fit well on your page and do not need too much rounding.</p><h2>Configure Word’s typesetting</h2><p>A couple of points about paragraph formatting:</p><ul><li>Make sure your main text is set to “justified”, and not “flush left.” While it is currently better to <a href="http://www.webtypography.net/Rhythm_and_Proportion/Horizontal_Motion/2.1.3/">set text flush-left on the web</a>, books look better justified and are nearly always set that way.</li><li>Don’t have spaces between paragraphs in your main body text.</li><li>Paragraphs should have a first-line indent of the width of about 2 or 3 characters, but only where two or more paragraphs are joined together: the first paragraph of any group of paragraphs should have no first-line indent. (This could be a pain to manage; I tend to handle it by making all paragraphs indented by default, then going back and manually removing the indent from first paragraphs at some later stage in the editing.)</li></ul><p>Make sure the following settings are enabled under the “Compatibility” options. To get to these options, click on the circular “Office Button” in the upper left corner, and then click <span class="noun">Word Options</span> at the very bottom of the menu. Then click <span class="noun">Advanced</span>, scroll down to the bottom of that section, and click the <span class="noun">+</span> next to <span class="noun">Layout Options</span>. On older versions, click the <span class="noun">Tools</span> menu, then <span class="noun">Options</span> (or <span class="noun">Edit</span> → <span class="noun">Preferences</span> on a Mac) then click the <span class="noun">Compatibility</span> tab.</p><ul><li>Put a check next to “Do full justification like WordPerfect 6.x for Windows.” This allows justified text to contract as well as expand, making the automatic adjustments look a lot better.</li><li>“Don’t add extra space for raised/lowered characters.”</li><li>“Don’t expand character spaces on the line ending SHIFT+RETURN.” This ensures that lines you end with a soft return will still be properly justified.</li><li>“Suppress ‘Space Before’ after a hard page or column break.”</li></ul><p>Configure Word’s hyphenation settings. On the toolbar, click the <span class="noun">Page Layout</span> tab, then <span class="noun">Hyphenation</span> drop-down button → <span class="noun">Hyphenation Options</span>. (On older versions, click <span class="noun">Tools</span> menu → <span class="noun">Language</span> → <span class="noun">Hyphenation</span>.)</p><ul><li>Put a check next to “Automatically hyphenate document.”</li><li>Set “Hyphenation zone” to about half an inch.</li><li>Set “Limit consecutive hyphens” to 3.</li></ul><p>Finally, enable ligatures. If your font is of good quality and has alternates for character combinations like fi and ffi, this will tell Word to use them automatically. This can only be done in MS Word 2010 or later.</p><ul><li>Open the <span class="noun">Font</span> settings window. You can do this by selecting some text, right-clicking and selecting <span class="noun">Font</span> from the menu, but I recommend setting this up in whatever “style” you use for your body text (e.g., “Normal”): <span class="noun">Home</span> tab, right click the style, select <span class="noun">Modifiy</span>, then <span class="noun">Format</span> button → <span class="noun">Font</span>.</li><li>Click the <span class="noun">Advanced</span> tab, then next to the <span class="noun">Ligatures</span> option, select <span class="noun">Standard Only</span>.</li></ul><h3>Sources</h3><p>These tips are compiled from many sources, and in many cases updated for clarity or accuracy with newer versions of Word.</p><ul><li><a href="http://www.orzeszek.org/blog/2009/05/17/how-to-enable-opentype-ligatures-in-word-2010/">How to Enable OpenType ligatures in Word 2010</a></li><li><a href="http://www.selfpublishing.com/design/downloads/articles/typesetting.pdf">Typesetting in Microsoft Word</a> by Jack Lyon</li><li><a href="http://www.pearsonified.com/2011/12/golden-ratio-typography.php">Golden Ratio typography</a> by Chris Pearson</li></ul>]]></summary></entry><entry><author><name>Joel Dueck</name></author><published>2012-03-08T00:00:00-06:00</published><updated>2012-03-08T00:00:00-06:00</updated><title>WriteMonkey: Tips and Tricks for Writers</title><link rel="alternate" href="https://thenotepad.org/posts/writemonkey-tips-and-tricks-for-writers.html"/><id>https://thenotepad.org/posts/writemonkey-tips-and-tricks-for-writers.html</id><summary type="html"><![CDATA[<p>I use WriteMonkey for almost all my writing. It’s the best Windows-based text editor I have found for writing prose (as opposed to programming code).</p><p>WriteMonkey is extremely <a href="http://daringfireball.net/projects/markdown/">Markdown</a>-friendly—useful if, for example, like me you <a href="how-to-use-markdown-in-blogspot-posts.html">write all your blog posts in Markdown format</a>.</p><p>Not all of WriteMonkey’s features are well-explained or documented, so I’m writing them up here.</p><h2>Configure Markdown features</h2><ul><li>Markdown highlighting will not work unless you have Markdown set as your “Markup Standard”—set this in the <code>Print &amp; Export</code> section of your Preferences screen.</li><li>Set the font size/weight/style used on headers: in the Preferences screen’s <code>Colors &amp; Fonts</code> tab, click the button labeled <code>...</code> in the upper right section (why they didn’t label it more clearly is beyond my understanding).</li><li><p>Make your exports look great. <a href="https://docs.google.com/open?id=0B9SDJ22NRBkrTTVhYkcwMVVSTGVMQkc0QWtCcXdsUQ">Download the template in this zip file</a> and place it in WriteMonkey’s <code>templates</code> folder. It’s a version of <a href="http://kevinburke.bitbucket.org/markdowncss">this Markdown stylesheet</a> with the following changes:</p><ul><li>Removed <code>padding: 0; margin: 0</code> rule for the <code>ul</code> and <code>ol</code> elements - this preserves indentation in multi-level lists.</li><li>The <code>max-width</code> was widened to look better on bigger screens.</li></ul></li></ul><h2>Some undocumented features I found by accident</h2><ul><li>You can toggle whether WM will use normal quotes or “smart quotes” with <code>CTRL+SHIFT+'</code> (apostrophe).</li><li>Out of the box: type <code>/now</code> to insert the timestamp. You can format this timestamp in the Preferences screen.</li></ul><h2>Use WriteMonkey to write your book</h2><p>WriteMonkey has a number of great features for writers:</p><ul><li>It lets you set and monitor progress goals for your writing based on either word count or time or both.</li><li>Hit <code>F5</code> to toggle between your main text and the “repository,” which works as kind of a scratch pad for the current file.</li><li>You can use the Jump screen to set navigate around your text’s headings, bookmarks, and todo items.</li></ul><p>The upcoming version (2.3.5.0 as of this writing), however, will have some great project management functionality. (See <a href="http://writemonkey.com/new.php">here</a> for more info)</p><ul><li>Folders will be treated as projects, and all the files within it will be part of the project. You’ll be able to switch quickly between text files in the same folder using a new Files view in the Jumps window.</li><li>You’ll be able to quickly merge all of a project’s files into a single text file.</li><li>You’ll be able to mark a file with “tags” using a comment line (starting with <code>\\</code>) at the top of the file, and filter the project file list by tags.</li><li><p>Special tags affect how the file is treated in the project window</p><ul><li>Tagging a file with a color name will cause that file to show up with a colored star in the jump screen. Multple colors mean multiples stars, e.g. <code>// red red red</code> will add three red stars.</li><li>Adding the “draft” tag will move the file to the “repository section”—the file will be presented with lighter color and excluded from total word count.</li><li>Tag with a percentage, e.g. <code>// 50%</code> to add a grey progress bar</li><li>Tag with a date in order to add a deadline; the border of the file will turn red when it becomes past-due</li></ul></li></ul><p>Let us know of any additional tips in the comments!</p>]]></summary></entry><entry><author><name>Joel Dueck</name></author><published>2012-02-17T00:00:00-06:00</published><updated>2012-02-17T00:00:00-06:00</updated><title>Siri: Slow, unreliable, and maybe not a priority at Apple</title><link rel="alternate" href="https://thenotepad.org/posts/siri-slow-unreliable-and-maybe-not.html"/><id>https://thenotepad.org/posts/siri-slow-unreliable-and-maybe-not.html</id><summary type="html"><![CDATA[<p><a href="http://www.apple.com/iphone/features/siri.html">Siri</a> had a lot of promise when it was released as a feature of the new iPhone 4S. It wowed everyone at the <a href="http://www.apple.com/apple-events/october-2011/">WWDC keynote in October 2011</a>.</p><p>I’ve had an iPhone 4S since November 2011, and I would describe Siri as gimmicky, flaky, and useful only within a narrow subset of the things it was promised for.</p><p>The biggest killers of my enthusiasm for using Siri are <em>laggy interaction</em> and <em>flaky availability</em>. Interaction misses plus plain old network lag combine to make Siri slow, slow, slow.</p><p><strong>There are five <em>possible</em> outcomes to each Siri interaction:</strong></p><ol><li>Siri misunderstands what you said due to you speaking incorrectly, or</li><li>Siri misunderstands what you said because of a voice recognition error, or</li><li>Siri understands what you said but misunderstands what you <em>meant</em>, or</li><li>Siri is unable to connect to its servers, or</li><li>Siri connects and responds correctly</li></ol><p>Four out of these five outcomes result in a failed interaction. While you can get better at speaking correctly, there are few to no workarounds for the other three error conditions.</p><p>Since Siri goes out over the internet in order to analyze each spoken interaction, it can often take a good 5–10 seconds to offer a response to what you’ve just said<label for="d8bdd2" class="margin-toggle sidenote-number"></label><input type="checkbox" id="d8bdd2" class="margin-toggle"/><span class="sidenote">Connection failures are especially common when you are on the outer edge of a known wifi network, such as when in the driveway or parking lot, or walking to/from your house. The iPhone seems to think it is connected via wifi for some time after you have left range, causing Siri to attempt using a nearly non-existent connection.</span>. In addition, at least every other day Siri’s servers seem to go dark for a period of time, resulting in “really sorry, but I can’t take any requests right now, please try again in a little while.”</p><p>Add this delay, and a random but sizeable chance of connection failure, in between each incorrect response, and you soon get used to doing most things the old way rather than gamble on an unreliable Siri.</p><p>Someone’s bound to respond that Siri is still officially beta software. I am aware of that, and don’t expect it to be perfect<label for="fa7ebb" class="margin-toggle sidenote-number"></label><input type="checkbox" id="fa7ebb" class="margin-toggle"/><span class="sidenote">Although I do expect beta software to be at least feature-complete, which I don’t believe Siri is.</span>.</p><p>But it’s also worth noting that Apple, like most software companies, has introduced many apps and features that they then failed to improve upon or even abandoned<label for="0d057d" class="margin-toggle sidenote-number"></label><input type="checkbox" id="0d057d" class="margin-toggle"/><span class="sidenote">See the Calendar, Weather, Music and Stock apps, iTunes Genius, Ping, and of course Mobile Me.</span>. My gut feeling is that Siri is in danger of ending up as the next Mobile Me, especially given that it has received almost no improvement or attention since its release so far.</p>]]></summary></entry><entry><author><name>Joel Dueck</name></author><published>2012-02-03T00:00:00-06:00</published><updated>2012-02-03T00:00:00-06:00</updated><title>How to Sync Calendars on Two (or more) iPhones or iPads</title><link rel="alternate" href="https://thenotepad.org/posts/how-to-sync-calendars-on-two-or-more.html"/><id>https://thenotepad.org/posts/how-to-sync-calendars-on-two-or-more.html</id><summary type="html"><![CDATA[<p>My wife and I each use an iPhone, but it wasn’t until recently that I got around to syncing our calendars. Now that we actually have a synced calendar system that we can both view and update from our phones, we’ve begun actually using it for planning and apponintments. In this how-to, I’ll show you how to do the same thing for yourself.</p><p><label for="ae97bf" class="margin-toggle">&#8853;</label><input type="checkbox" id="ae97bf" class="margin-toggle"/><span class="marginnote">If you happen to be using the same Apple ID/iCloud account on two phones, I would assume you don’t need this article since everything is already syncing across all devices within your single account.</span> These instructions assume that each iPhone user has their own, separate Apple ID and iCloud.</p><h2>1. Use iCloud for Your Calendar Account</h2><p>I’m not saying you <em>have</em> to use iCloud. I’m saying it’s by far the simplest and easiest way.</p><p>Make sure each user has iCloud set up on his or her device. If you have iOS 5 or newer on your phone or iPad, you likely have signed up for iCloud: to make sure, grab your device and go to <code>Settings</code> → <code>iCloud</code> and check that it shows something next to <code>Account</code>. Also check that <code>Calendars</code> is set to <strong>On</strong>.</p><p>If iCloud is not set up on your device, read these <a href="http://www.apple.com/icloud/setup/">simple iCloud setup instrctions</a> from Apple.</p><h3>Other Calendar Accounts</h3><p><strong>Gmail accounts</strong> come with a pretty useable calendar system, so a lot of people use those; but I found the instructions and process for syncing GMail calendars between multiple Google accounts/iPhones very clumsy, complicated, and unintuitive, even for a geek like myself. If you have tips on that, let us know in the comments.</p><p><strong>Exchange accounts</strong> also include calendar functionality. I have one of these at my job, and it syncs to my phone also, but I don’t really need to share it with my wife so I haven’t tried. I expect the only way to do this would be to add my exchange account to her phone with my own password, and turn off the mail part of the account in the iPhone’s settings. Again, let us know in the comments if you’ve experimented with this.</p><h2>2. Share Your iCloud Calendar(s)</h2><p>This is an easy process, but not entirely obvious because you have to use a laptop/desktop computer, and not your iOS device, to start the process.</p><ol><li>First of all, pick which iCloud account is going to “own” the shared calendar(s). It really makes no difference because both parties will have full access.</li><li>Open your web browser on your desktop or laptop computer and go to <a href="http//icloud.com">icloud.com</a>.</li><li>Sign in using the account of the “owner” and click on <code>Calendar</code>.</li><li><p>Click on the small circle to the right of the calendar you wish to share. Under <code>Private Calendar</code>, enter the email address for the user of the “other” iPhone/iPad. It can be any email address for that person (it doesn’t have to be the one they use to sign in to iCloud) but it should be one that they have set up on their iPhone/iPad.</p><figure><img src="/posts/img/20120203icloudsharing1.jpg" alt="iCloud sharing" style="width: 160.0px;"/><figcaption>iCloud sharing</figcaption></figure></li><li>After entering the email address, click <code>Share</code>.</li></ol><p>Now the other user can grab his or her device, open the email, and click the “Join Calendar” button.</p><p>Voila, you now have a calendar shared between two devices. Any events or appointments you create or change on the shared calendar on one device will automatically show up on the other device pretty quickly, and without any additional steps.</p><h3>Some additional notes:</h3><ul><li>You can of course share multiple calendars with this process, and you can even share them with different multiple people. My wife and I share three calendars, because this allows us to easily colour-code different kinds of events simply by putting them on different calendars. (There are some calendar apps that let you colour-cde different events within the same calendar, but not the one we happen to use.)</li><li><p>When creating/changing an event that you want shared, you do have to make sure it is in fact created on one of the shared calendars. That should seem obvious, but it can be an easy step to miss. You can make it easier for yourself by setting your <em>default</em> calendar on your iOS device to the shared calendar you use most often: click <code>Settings</code>, then <code>Mail, Contacts, Calendars</code>, and then <em>scroll down</em> to the Calendars section and click on the <code>Default Calendars</code> setting to change it. Otherwise (if you’d rather not default to sharing all your events) just be aware that your iOS device does have multiple calendars and remember to pick the right one when setting up an appointment.</p><ul><li>If you use Calvetica Classic as your calendar app, you can have it ask you which calendar to use every time you set up an event, which is nice.</li></ul></li></ul><h2>3. Get a Better Calendar App</h2><p>The calendar app that comes with iOS is plain, and has many shortcomings: the interface for creating new appointments is clumsy, the colour-coding is not visible in month view, and there’s no week view at all, to name a few. For notes and recommendations on iOS calendar apps, read my post on <a href="recommended-calendar-apps-for-iphone.html">iOS Calendar App Recommendations</a>.</p>]]></summary></entry><entry><author><name>Joel Dueck</name></author><published>2012-02-03T00:00:00-06:00</published><updated>2012-02-03T00:00:00-06:00</updated><title>Recommended Calendar Apps for iPhone</title><link rel="alternate" href="https://thenotepad.org/posts/recommended-calendar-apps-for-iphone.html"/><id>https://thenotepad.org/posts/recommended-calendar-apps-for-iphone.html</id><summary type="html"><![CDATA[<p>The calendar app that comes with iOS is plain, and has many shortcomings: the interface for creating new appointments is clumsy, the colour-coding is not visible in month view, and there’s no week view at all, to name a few.</p><p>Here are some notes on popular calendar apps I’ve tried and can (mostly) recommend.</p><ul><li><p><a href="http://itunes.apple.com/us/app/calvetica-classic/id451926697?mt=8">Calvetica Classic</a> is what I currently use and recommend for iPhone. As far as I can tell, it’s identical to <a href="http://mysterioustrousers.com/tempus/home">Tempus</a> (made by the same developer) but for some reason costs less. (Tempus may be the one that gets more maintenance attention from the developers in the future, however). Calvetica Classic’s interface is designed to be quick and easy to use, and to look attractive. It also happens to be reasonably prompt about automatic syncing—which, surprisingly, not all apps are (see below).</p><p>The reason for the “Classic” version is that the makers of Calvetica made a New-Coke-style error when they redesigned and rewrote the app for the <a href="http://itunes.apple.com/us/app/fast-calendar-tasks-calvetica/id385862462?mt=8">new version 4.0</a>. The regressions in the interface and buggy experience of the new version apparently left a lot of users clamouring for the old version, and from what I can tell, the developers responded by offering both Calvetica Classic <em>and</em> Tempus. I haven’t used the new version, but the reviews on the App Store currently show that it still needs a good bit of bug fixing, especially on the iPad.</p></li><li>The other really good option out there is <a href="http://lifehacker.com/5833969/the-best-calendar-app-for-iphone">Week Calendar</a>. I haven’t tried it personally, but this one has been <a href="http://lifehacker.com/5833969/the-best-calendar-app-for-iphone">recommended by Lifehacker</a>, and has hundreds of great reviews (many more than any version of Calvetica), so it must work well. The only reason I didn’t go for it was that Calvetica is faster for adding events<label for="8b3cd8" class="margin-toggle">&#8853;</label><input type="checkbox" id="8b3cd8" class="margin-toggle"/><span class="marginnote">Note that if you have an iPhone 4S, you can set up new events very easily on your default calendar with Siri, no matter what app you use.</span>, and Calvetica just looks more cool and elegant.</li><li><a href="http://getappsavvy.com/agenda/">Agenda</a> was <a href="http://daringfireball.net/linked/2012/01/18/agenda">recommended recently on Daring Fireball</a> and was actually the first calendar app I used after getting our phones’ sync configured. It’s not as quick to use as Calvetica, but it looks gorgeous, and swiping between month/week/day view is almost too good to give up. The app otherwise great except for one major thing: <strong>it’s terrible at automatic calendar syncing</strong>, especially when an event on a shared calendar is being deleted. In my experiments Agenda would not automatically sync until I had either shut down the app and restarted it, or until I had opened the default Calendar app (which triggers its own sync). You can also use the “shake phone to sync” feature of Agenda, but honestly, all three of these things are ridiculous.</li></ul>]]></summary></entry><entry><author><name>Joel Dueck</name></author><published>2012-01-09T00:00:00-06:00</published><updated>2012-01-09T00:00:00-06:00</updated><title>Personal finance software: chucking Mint for YNAB</title><link rel="alternate" href="https://thenotepad.org/posts/personal-finance-software-chucking-mint.html"/><id>https://thenotepad.org/posts/personal-finance-software-chucking-mint.html</id><summary type="html"><![CDATA[<p>A cousin recently put me on to <a href="http://www.youneedabudget.com/">You Need A Budget</a>—a personal finance software package. I just spent some time this weekend setting it up with my wife. Maybe we’re still in the ‘honeymoon phase’ of budgeting, but it feels really good to be on top of our finances and to have a <em>flexible</em> plan for our spending.</p><p>YNAB feels refreshingly like a “Quicken Rebooted” would feel. After a couple of years trying “finances in the cloud” a-la-<a href="https://www.mint.com/">Mint</a>, returning to using a traditional program that just runs on your own computer feels like the right thing to do. I once again have control of my own financial data, and will never have to worry about potential security breaches at unregulated third-party services like Mint.</p><p>YNAB insists that you manage your transactions the Old Way: by entering them yourself. The fact that this feels very <em>right</em> was/is quite a surprise to me, but when it “clicked,” it felt like it had been a long time coming. When I signed up for Mint, the automatic behind-the-scenes importing of all my transactions seemed like a brilliant way to streamline things, but it turned out to have some fatal downsides. Mint’s connection with my bank was always spotty, and their automatic categorization of my spending was never more than about 60-70% accurate. This meant I had to go in and regularly sift through all my spending, making sure each transaction was properly categorized—a process even more unpleasant and tedious than just entering them myself. It wasn’t long before I stopped using it altogether. So when I read this on YNAB’s website, it jived <em>a lot</em>:</p><blockquote>We do not directly connect with your bank, log in with your username and password, and download transactions for you. That kills awareness and promotes a “set it and forget it” mentality that lets you not revisit your budget for months, leaving you right back where you started. We’ll import downloaded transactions (OFX, QFX, QIF) to make sure you’ve captured every transaction, but bank importation should not be the primary means of entering data into YNAB. (Use your phone and record it as the transaction happens, or make entering receipts a 5-minute daily ritual. Your money will thank you for it. Promise.)</blockquote><p>But the biggest difference between YNAB and the Mint approach is that while Mint is geared towards passive capture of past spending, YNAB’s workflow puts planning future spending at the center. I won’t dive into that here, but you should know that this approach is what will make even using finance software worth your while. If you are familiar with the increasingly-popular <a href="http://en.wikipedia.org/wiki/Envelope_system">envelope system</a> of budgeting, or with financial planning evangelists like Dave Ramsey, YNAB will fit right in with those paradigms and help you implement them.</p><h2>Coming down from the cloud</h2><p>YNAB’s non-cloud approach means you won’t have completely seamless access to your main financial data store from any browser or from your iPhone. When you think about it, that actually might not be a problem. Do you really need that kind of access? Financial planning isn’t one of those things that inherently benefits from being decentralized.</p><p>YNAB tries to strike a middle course by supplying iPhone and Android apps that let you record transactions on the go for easy syncing later. I haven’t yet tried these apps out; I’m not yet sure whether it’s even worth the added complexity for me personally. I can just as easily keep receipts or type transactions into a note app on my phone.</p><p>Ideally, a YNAB mobile app would allow automatic background syncing between two phones, so that my wife and I would have quick, seamless access to where our budgets are at, but YNAB’s app isn’t there yet. But in my view, it all goes back to a focus on <em>planning</em> rather than <em>capture</em>. If my wife and I actually have a plan in place for our monthly spending, we pretty much know going into the day where our money is going to go, and up-to-the-minute syncing becomes much less important. Again, I wonder if this is one of those situations where automatic syncing—an inherent “feature” of the cloud approach—would actually be counterproductive in this field, by allowing you to take the easy road and <em>react</em> to spending events, rather than relying on proactive planning.</p><p><em>NB: I’m not an affiliate of YNAB in any way, nor am I being compensated in any way for this overview.</em></p>]]></summary></entry><entry><author><name>Joel Dueck</name></author><published>2012-01-04T00:00:00-06:00</published><updated>2012-01-04T00:00:00-06:00</updated><title>Encryption and DropBox: Comparing TrueCrypt and BoxCryptor</title><link rel="alternate" href="https://thenotepad.org/posts/encryption-and-dropbox-comparing.html"/><id>https://thenotepad.org/posts/encryption-and-dropbox-comparing.html</id><summary type="html"><![CDATA[<p>If you’re a <a href="http://dropbox.com">DropBox</a> user, you may have heard about the security weakpoints associated with their cloud storage service (or any such service):</p><ol><li>DropBox has had <a href="http://techcrunch.com/2011/06/20/dropbox-security-bug-made-passwords-optional-for-four-hours/">security issues</a> that left users’ information exposed to hackers for hours at a time. Could it happen again? Certainly.</li><li>DropBox staff <a href="http://www.wired.com/threatlevel/2011/05/dropbox-ftc/">have the ability to access your files</a> without your knowledge. They have acknowledged that essentially the only thing between their staff and your data are internal company policies. This is much weaker than zero-knowledge systems like SpiderOak, where it is not even technically possible for staff to access users’ files without the user’s key.</li></ol><p>Even knowing these weaknesses, I use DropBox anyway. Having access to <em>some</em> (not all, obviously) potentially sensitive files on multiple computers/phones is helpful enough for me to find some way to mitigate the security risks.</p><p>It’s important to note that if you’re putting sensitive files on DropBox purely as a backup solution, you should just stop. Find some other way to back those files up. But if, like me, you find it extremely helpful to have access to certain moderately sensitive files from multiple devices, you should find a way to add a layer or two of security to those files before storing them on a cloud service like DropBox.</p><p>There are two good ways that I have found to do this. Both are free, and neither involve sending any of your data or keys to an additional third party—all the magic happens on your computer or device. However, there are trade-offs associated with each.</p><h2>The TrueCrypt Option</h2><p>The most commonly offered solution is to place your sensitive files in a <a href="http://www.truecrypt.org">TrueCrypt</a> volume and save that volume file into your DropBox.</p><h3>Pros:</h3><ul><li>TrueCrypt is open source, making it the most trustworthy and future-proof option</li><li>For extremely sensitive info, TrueCrypt allows you to maintain <a href="http://www.truecrypt.org/docs/?s=plausible-deniability">plausible deniability</a>.</li></ul><h3>Cons:</h3><ul><li>There is currently no way to use or access TrueCrypt volumes on your phone. This is true both for iPhones and Android phones.</li><li>TrueCrypt volumes need to be given a fixed size at the time of creation, forcing you to guess how big it’ll need to be in the future and usually resulting in wasted space.</li><li>You need to be careful not to have the volume “mounted” on more than one computer at a time to avoid corrupting it. Because there’s nothing to prevent you from doing this, you can easily end up corrupting the volume or creating a lot of large “conflict copies” of the volume by accident if you forget this.</li><li>Because DropBox can’t back up changes to any of your encrypted files until you actually unmount the whole volume, you have to remember to unmount it periodically, which can be cumbersome.</li></ul><h2>The BoxCryptor option</h2><p><a href="http://www.boxcryptor.com/">BoxCryptor</a> is a newer solution that works by encrypting individual files on your computer, before they are sent to DropBox. Like TrueCrypt, the software runs on both Windows and Mac OS.</p><h3>Pros:</h3><ul><li>BoxCryptor has an Android and an iPhone version of their software, making it possible to access encrypted DropBox files from your phone.</li><li>The software has limited compatibility with the open-source EncFS encrypted file system, making it at least somewhat future-proof</li><li>File-level encryption makes it much less clumsy to use, and allows DropBox to sync encrypted files just as seamlessly as normal files, and without additional likelihood of conflicts where multiple computers are involved.</li></ul><h3>Cons:</h3><ul><li>The iPhone app is $8 for non-commercial use. This seems stupidly high, considering the Windows and Mac versions are free and they have no back-end infrastructure to maintain.</li><li>No form of plausible deniability is available in either the desktop or mobile versions of the software.</li><li>BoxCryptor is not open-source, so ultimately your trust in the software comes down to your faith in <a href="http://blog.robert.freudenreich.eu/">Robert Freudenreich</a>’s ability to correctly implement the security algorithms, to keep maintaining the software, and not to spy on his users. I’m not saying he’s untrustworthy, just that non-open software comes with risks and weaknesses. The security community at large does not have a way of thoroughly and independently evaluating the software, and that represents a security weakness, for one. Furthermore, if Robert or his company lose interest in the software (which can happen for any of a dozen reasons) you will need to take notice and migrate to another solution before you lose all ability to support the now-defunct software.</li></ul>]]></summary></entry><entry><author><name>Joel Dueck</name></author><published>2011-11-08T00:00:00-06:00</published><updated>2011-11-08T00:00:00-06:00</updated><title>The Best Data Collection App (And Format) for iPhone</title><link rel="alternate" href="https://thenotepad.org/posts/best-data-collection-app-and-format-for.html"/><id>https://thenotepad.org/posts/best-data-collection-app-and-format-for.html</id><summary type="html"><![CDATA[<p>I’ve long been intrigued by <a href="http://feltron.com">Nick Felton’s Annual Reports</a>. Felton has become the poster child for a new kind of a <a href="http://quantifiedself.com/">subculture</a> growing up around this idea of “personal metrics.” Measuring and reporting esoteric and insane amounts of data about your personal habits can be a great way to Meet People And Make Friends.</p><p>Creating these reports will involve coming up with your own solutions to an interesting set of problems: how to capture all that data, how to store it in an analytics-friendly format, how to actually analyze it, and how to design the information displays. In this post I’m dealing mainly with the first two parts of that list: capturing data and storing it, with some hints about analytics afterwards.</p><p>In data collection, your smartphone is your friend. You want to make sure collecting data is easy and frictionless, so that you get it all. Your phone is always with you, so you can jot things down and not worry about having to get it later. And as much as I love pen and paper, if you go that route you’re going to end up collecting the same info down twice when it comes time to get it into your computer for analytics.</p><p>There are a lot of apps out there for collecting and reporting various kinds of data—running times/length, weight loss/gain, sex, sleep and eating habits—and these can be great if you’re only interested in tracking one or two aspects of your life. But as soon as you begin to raise your sights a little and think about comprehensive Felton-scale data collection, you realize what a pain it’s going to be to have a herd of seventeen apps to manage. Another problem with most of these apps is that they don’t provide any access to the actual data.</p><h2>Daytum</h2><p>For awhile, Felton was working on a project called <a href="http://daytum.com">Daytum</a> that would help people create their personal reports similar to his. Daytum has always had a lot of promise, but there are a few major problems with it that need to change before it can be really useful:</p><ol><li>Felton was hired by Facebook recently, and doesn’t seem to be actively maintaining the service anymore</li><li>The web interface is clumsy for entering anything more than simple quantities</li><li>The <a href="http://itunes.apple.com/us/app/daytum/id352646537?mt=8">iPhone app</a>—which would ordinarily be the ideal channel for collecting data—is buggy, infrequently updated, and (worst of all) has been known to randomly erase data</li></ol><h2>The Format is Text</h2><p>I found what I was looking for in Ben Lipkowitz’s <a href="http://fennetic.net/sleep/">lifelog project</a>. He developed a simple text format that allows you to quickly capture personal events and data as they happen. A self-explanatory sample is below:</p><pre class="code">date 2011 01 08
0000 0851 sleep
0851 0902 domestics
0902 0904 walking langton-labs
0904 0906 setup kitty
0906 0907 science guinea-pig
0908 0920 food cookie-cereal 2c soy-milk 0.6c peanut-butter-ice-cream 1c
0920 1000 net thermal-clothing, food donut-hole 2pc oatmeal-cookie-dough 3pc
1000 1052 net thermal-clothing
1052 1100 riding kaplans
1100 1145 shoppin, act tour-kaplans
1145 1155 riding langton-labs
1155 1200 chat rachel-?
1200 1210 riding rei
1210 1445 shoppin, domestics test-clothes
1445 1451 stupid rei-membership-form</pre><p>The syntax is pretty self-explanatory. Each interval is given an activity (e.g., <code>net</code> or <code>drive</code>) followed by any number of tags that add detail (e.g. <code>drive commute-home</code>). Multiple activities and their tags are separated by commas.</p><p>The advantages of capturing data in this way are obvious:</p><ul><li>Both the <em>time length</em> and <em>frequency</em> of activities is captured</li><li>It’s easy to add custom data to different kinds of activities (such as the quantities given in the <code>food</code> activity above)</li><li>You can easily enter and read the data without any special software</li><li>The data will still be easy to read ten or fifty years from now</li></ul><p><strong>How to actually use the data:</strong> Creating any visual displays of all this data is going to involve brushing off your script-writing chops. The good news is if you have any programming ability whatsoever, you should be able to cobble something together quite easily for whatever you want to do. Check out the <a href="http://fennetic.net/sleep/">lifelog project</a> for examples of scripts for parsing and displaying the data. Ben currently produces graphs showing time intervals colored by activity, but you could just as easily build a script in your favourite language to build reports for things like average commute times, top five conversation topics, or total times you had to look for things and how many of those times you found them, etc. If you have your script output the results in a <a href="http://en.wikipedia.org/wiki/Comma-separated_values"><code>CSV</code> format</a>, you can open those reports directly in Excel and create charts from there.</p><p>This format doesn’t work well for capturing broader categories of events that span over multiple time intervals. For example, there’s no clear way to record that everything you did this afternoon was part of Brother Mike’s Wedding, for example. There are a couple of ways to extend this, such as adding <code>mark</code>, <code>start</code> or <code>end</code> keywords to mark the beginning and ending of these types of things, or simply recording that info elsewhere.</p><p>I don’t recommend trying to record your moment-to-moment moods for any reason whatsoever. That way lies self-referential madness.</p><h2>The App is Nebulous Notes</h2><figure><img src="/posts/img/photonov082c111447am.png" alt=" " style="width: 133.5px;"/><figcaption> </figcaption></figure><figure><img src="/posts/img/photonov082c111548am.png" alt=" " style="width: 133.5px;"/><figcaption> </figcaption></figure><p><a href="http://itunes.apple.com/us/app/nebulous-notes-for-dropbox/id375006422?mt=8#">Nebulous Notes</a> has a couple of great features that make it great for this kind of data collection:</p><ul><li><strong>Shortcut keys:</strong> You can set up shortcut keys to quickly insert date and timestamps in right format, as well as skip forward and backwards by word or character (see screenshots above)</li><li><strong>Dropbox support:</strong> Store your text file on your Dropbox account and it will be auto-saved to the cloud every time you edit it, and you can easily pull it into your laptop for analytics.</li></ul><p>I recently switched to the iPhone, so if you have an Android or Blackberry you’ll need to find your own favorite app for that platform. (Personally I can’t imagine attempting anything like this on my laggy old Blackberry.) Let me know in the comments if you find anything!</p>]]></summary></entry><entry><author><name>Joel Dueck</name></author><published>2011-09-14T00:00:00-05:00</published><updated>2011-09-14T00:00:00-05:00</updated><title>The 33 Best Science Fiction Novels Ever</title><link rel="alternate" href="https://thenotepad.org/posts/33-best-science-fiction-books.html"/><id>https://thenotepad.org/posts/33-best-science-fiction-books.html</id><summary type="html"><![CDATA[<p>Another “best of” list for your Kindle, brought to you this time by <a href="http://www.reddit.com/r/AskReddit/comments/k70dh/whats_the_best_scifi_novel_you_have_ever_read/">this Ask Reddit post</a>.</p><p>The links given in this list are to Kindle editions of the books, free wherever possible, unless there have been severe quality complaints with the ebook versions. If you want to see book covers and a summary of comments by those who have read them, see this <a href="http://blamcast.net/articles/best-science-fiction-books">summary of the reddit thread by John Forsythe</a>.</p><ol><li><em><a href="https://amzn.com/B001F0WXY0/?tag=thloya-20">Dune</a></em> by Frank Herbert—1965</li><li><em><a href="https://amzn.com/B0043M4ZH0/?tag=thloya-20">The Hitchhiker’s Guide To The Galaxy</a></em> by Douglas Adams—1979 Good light bathroom reading. Perhaps the schtick will wear off as quickly for you as it did for me, but lots of people never tire of it.</li><li><em><a href="https://amzn.com/B003G4W49C/?tag=thloya-20">Ender’s Game</a></em> by Orson Scott Card—1985 My personal favourite of the ones on this list that I have read.</li><li><em><a href="https://amzn.com/B000FC1PWA/?tag=thloya-20">Foundation Trilogy</a></em> by Isaac Asimov—1942 More of a saga broken up into smaller novels with one majestic overarching connection. I really enjoyed this one.</li><li><em><a href="https://amzn.com/B004G60EHS/?tag=thloya-20">Hyperion</a></em> by Dan Simmons—1989 “On the eve of Armageddon, with the entire galaxy at war, seven pilgrims set forth on a final voyage to Hyperion seeking the answers to the unsolved riddles of their lives.”</li><li><em><a href="https://amzn.com/B000O76ON6/?tag=thloya-20">Neuromancer</a></em> by William Gibson—1984 “Case was the hottest computer cowboy cruising the information superhighway—jacking his consciousness into cyberspace, soaring through tactile lattices of data and logic, rustling encoded secrets for anyone with the money to buy his skills. Then he double-crossed the wrong people, who caught up with him in a big way—and burned the talent out of his brain, micron by micron. Banished from cyberspace, trapped in the meat of his physical body, Case courted death in the high-tech underworld. Until a shadowy conspiracy offered him a second chance—and a cure—for a price…”</li><li><em><a href="https://amzn.com/B000FBJCJE/?tag=thloya-20">Snow Crash</a></em> by Neil Stephenson—1992 “In California of the near future, when the U.S. is only a ‘Burbclave’ (city-state), the Mafia is just another franchise chain, and there are no laws to speak of, Hiro Protagonist follows clues from the Bible, ancient Sumer and high technology to help thwart an attempt to take control of civilization—such as it is.”</li><li><em><a href="https://amzn.com/B00AHGSVKS/?tag=thloya-20">Childhood’s End</a></em> by Arthur C. Clark—1953 “The Overlords appeared suddenly over every city—intellectually, technologically, and militarily superior to humankind. Benevolent, they made few demands: unify earth, eliminate poverty, and end war. With little rebellion, humankind agreed, and a golden age began. But at what cost? With the advent of peace, man ceases to strive for creative greatness, and a malaise settles over the human race. To those who resist, it becomes evident that the Overlords have an agenda of their own.”</li><li><em><a href="https://amzn.com/B005BVM9YI/?tag=thloya-20">The Forever War</a></em> by Joe Haldeman—1974 <em>“Short, but fantastically well executed. It might be so good, in part, because it’s short.”</em>—“Humans first bumped heads with the Taurans when we began using collapsars to travel the stars. Although the collapsars provide nearly instantaneous travel across vast distances, the relativistic speeds associated with the process means that time passes slower for those aboard ship. For William Mandella, a physics student drafted as a soldier, that means more than 27 years will have passed between his first encounter with the Taurans and his homecoming, though he himself will have aged only a year. When Mandella finds that he can’t adjust to Earth after being gone so long from home, he reenlists, only to find himself shuttled endlessly from battle to battle as the centuries pass.”</li><li><em><a href="https://amzn.com/B01513ZIL6/?tag=thloya-20">Ringworld</a></em> by Larry Niven—1970</li><li><em><a href="https://amzn.com/B000SEGTI0/?tag=thloya-20">Do Androids Dream of Electric Sheep?</a></em> by Philip K. Dick—1968 This is the novel on which the movie <em>Blade Runner</em> was based. “By 2021, the World War had killed millions, driving entire species into extinction and sending mankind off-planet. Those who remained coveted any living creature, and for people who couldn’t afford one, companies built incredibly realistic simulacrae: horses, birds, cats, sheep…they even built humans. Emigrées to Mars received androids so sophisticated it was impossible to tell them from true men or women. Fearful of the havoc these artificial humans could wreak, the government banned them from Earth. But when androids didn’t want to be identified, they just blended in.”</li><li><em><a href="https://amzn.com/B000TO0TDK/?tag=thloya-20">A Stranger in a Strange Land</a></em> by Robert A. Heinlein—1961 “The story of Valentine Michael Smith, born during, and the only survivor of, the first manned mission to Mars. Michael is raised by Martians, and he arrives on Earth as a true innocent: he has never seen a woman and has no knowledge of Earth’s cultures or religions. But he brings turmoil with him, as he is the legal heir to an enormous financial empire, not to mention de facto owner of the planet Mars. With the irascible popular author Jubal Harshaw to protect him, Michael explores human morality and the meanings of love.”</li><li><em><a href="https://amzn.com/B004EYTK2C/?tag=thloya-20">Starship Troopers</a></em> by Robert A. Heinlein—1987 “Juan Rico signed up with the Federal Service on a lark, but despite the hardships and rigorous training, he finds himself determined to make it as a cap trooper. In boot camp he will learn how to become a soldier, but when he graduates and war comes (as it always does for soldiers), he will learn why he is a soldier.”</li><li>The <em>Culture</em> Series by Iain M. Banks—1987: <a href="https://amzn.com/B0013TX6FI/?tag=thloya-20">Consider Phlebas</a>, <a href="https://amzn.com/B0046A9NLC/?tag=thloya-20">Surface Detail</a>, <a href="https://amzn.com/B0015DWLTE/?tag=thloya-20">Use of Weapons</a>, <a href="https://amzn.com/B000VMHI98/?tag=thloya-20">Matter</a> and others</li><li><em>A Canticle For Leibowitz</em> by Walter M. Miller, Jr.—1960 (Not currently available for Kindle) Strangely arresting and thought-provoking look through the lens of a post-apocalyptic world.</li><li><em><a href="https://amzn.com/B00AHIP8ZM/?tag=thloya-20">Rendezvous With Rama</a></em> by Arthur C. Clarke—1973</li><li><em><a href="https://amzn.com/B000FC1AFC/?tag=thloya-20">Pandora’s Star</a></em> by Peter F. Hamilton—2004 “Hamilton creates a dense, thoroughly defined twenty-fourth-century world, in which humanity has colonized the stars, thanks to the discovery of wormhole travel, and established a successful commonwealth. The species has even encountered aliens and space-faring artifacts. One remaining mystery is the barrier around stars known as the Dyson Pair. Human curiosity still being what it is, a spaceship capable of faster-than-light travel (thanks to those wormholes again) goes to investigate. When what’s behind the barrier is discovered, the thrill-ride really starts. Aliens formerly trapped inside it, fighting over limited resources, are freed to invade human space.”</li><li><em><a href="https://amzn.com/B004YDL2CY/?tag=thloya-20">The Mote In God’s Eye</a></em> by Larry Niven and Jerry Pournelle—1974 “In the year 3016, the Second Empire of Man spans hundreds of star systems, thanks to the faster-than-light Alderson Drive. No other intelligent beings have ever been encountered, not until a light sail probe enters a human system carrying a dead alien. The probe is traced to the Mote, an isolated star in a thick dust cloud, and an expedition is dispatched. In the Mote the humans find an ancient civilization—at least one million years old—that has always been bottled up in their cloistered solar system for lack of a star drive. The Moties are welcoming and kind, yet rather evasive about certain aspects of their society. It seems the Moties have a dark problem, one they’ve been unable to solve in over a million years.”</li><li><em><a href="https://amzn.com/B0054LNIQS/?tag=thloya-20">The Stars My Destination</a></em> by Alfred Bester—1956 “Marooned in outer space after an attack on his ship, Nomad, Gulliver Foyle lives to obsessively pursue the crew of a rescue vessel that had intended to leave him to die.”</li><li><em><a href="https://amzn.com/B000FBFMZ2/?tag=thloya-20">Altered Carbon</a></em> by Richard K. Morgan—2002 “In the 25th century, it’s difficult to die a final death. Humans are issued a cortical stack, implanted into their bodies, into which consciousness is “digitized” and from which—unless the stack is hopelessly damaged—their consciousness can be downloaded (“resleeved”) with its memory intact, into a new body. While the Vatican is trying to make resleeving (at least of Catholics) illegal, centuries-old aristocrat Laurens Bancroft brings Takeshi Kovacs (an Envoy, a specially trained soldier used to being resleeved and trained to soak up clues from new environments) to Earth, where Kovacs is resleeved into a cop’s body to investigate Bancroft’s first mysterious, stack-damaging death.”</li><li><em><a href="https://amzn.com/B000QCS914/?tag=thloya-20">Red Mars</a></em> by Kim Stanley Robinson—1993 The first in a trilogy. “An action-packed and thoughtful tale of the exploration and settlement of Mars—riven by both personal and ideological conflicts—in the early 21st century.”</li><li><em><a href="https://amzn.com/B01A6E8EQ6/?tag=thloya-20">2001: A Space Odyssey</a></em> by Arthur C. Clarke—1968 “When an enigmatic monolith is found buried on the moon, scientists are amazed to discover that it’s at least 3 million years old. Even more amazing, after it’s unearthed the artifact releases a powerful signal aimed at Saturn. What sort of alarm has been triggered? To find out, a manned spacecraft, the Discovery, is sent to investigate. Its crew is highly trained—the best—and they are assisted by a self-aware computer, the ultra-capable HAL 9000. But HAL’s programming has been patterned after the human mind a little too well. He is capable of guilt, neurosis, even murder, and he controls every single one of Discovery’s components. The crew must overthrow this digital psychotic if they hope to make their rendezvous with the entities that are responsible not just for the monolith, but maybe even for human civilization.”</li><li><em>Contact</em> by Carl Sagan—1985 (Not currently available for Kindle) “After years of scanning the galaxy for signs of somebody or something else, this team believes they’ve found a message from an intelligent source—and they travel deep into space to meet it.”</li><li><em><a href="https://amzn.com/B003XREM5G/?tag=thloya-20">The Sirens Of Titan</a></em> by Kurt Vonnegut, Jr.—1959 “Plain and simple, there would probably be no Hitchhiker’s Guide to the Galaxy as we know it without The Sirens of Titan.”</li><li><em><a href="https://amzn.com/B000FC1PW0/?tag=thloya-20">I, Robot</a></em> by Isaac Asimov—1950 “In <em>I, Robot</em>, Asimov chronicles the development of the robot through a series of interlinked stories: from its primitive origins in the present to its ultimate perfection in the not-so-distant future—a future in which humanity itself may be rendered obsolete.”</li><li><em><a href="https://amzn.com/B00YBA7PGW/?tag=thloya-20">The Left Hand Of Darkness</a></em> by Ursula K. Le Guin—1969 “Genly Ai is an emissary from the human galaxy to Winter, a lost, stray world. His mission is to bring the planet back into the fold of an evolving galactic civilization, but to do so he must bridge the gulf between his own culture and prejudices and those that he encounters. On a planet where people are of no gender—or both—this is a broad gulf indeed.”</li><li><em><a href="https://amzn.com/B001QL5MAA/?tag=thloya-20">Revelation Space</a></em> by Alastair Reynolds—2000 “Sylveste is the only man ever to return alive and sane from a Shroud, an enclave in space protected by awesome gravity-warping defenses. Now an intuition he doesn’t understand makes him explore the dead world Resurgam, whose birdlike natives long ago tripped some booby trap that made their own sun erupt in a deadly flare. Meanwhile, the vast, decaying lightship Nostalgia for Infinity is coming for Sylveste, whose dead father (in AI simulation) could perhaps help the Captain, frozen near absolute zero yet still suffering monstrous transformation by nanotech plague. Most of Infinity’s tiny crew have hidden agendas—Khouri the reluctant contract assassin believes she must kill Sylveste to save humanity—and there are two bodiless stowaways, one no longer human and one never human. Shocking truths emerge from bluff, betrayal, and ingenious lies.”</li><li><em><a href="https://amzn.com/B000SEIK2S/?tag=thloya-20">Old Man’s War</a></em> by John Scalzi—2005 “With his wife dead and buried, and life nearly over at 75, John Perry takes the only logical course of action left him: he joins the army. Now better known as the Colonial Defense Force (CDF), Perry’s service-of-choice has extended its reach into interstellar space to pave the way for human colonization of other planets while fending off marauding aliens. The CDF has a trick up its sleeve that makes enlistment especially enticing for seniors: the promise of restoring youth.”</li><li><em><a href="https://amzn.com/B0015DPXKI/?tag=thloya-20">Anathem</a></em> by Neal Stephenson—2008 “Fraa Erasmas is a young avout living in the Concent of Saunt Edhar, a sanctuary for mathematicians, scientists, and philosophers, protected from the corrupting influences of the outside ‘saecular’ world by ancient stone, honored traditions, and complex rituals. Over the centuries, cities and governments have risen and fallen beyond the concent’s walls. Now, in celebration of the week-long, once-in-a-decade rite of Apert, the fraas and suurs prepare to venture beyond the concent’s gates—at the same time opening them wide to welcome the curious ‘extras’ in. During his first Apert as a fraa, Erasmas eagerly anticipates reconnecting with the landmarks and family he hasn’t seen since he was ‘collected.’ But before the week is out, both the existence he abandoned and the one he embraced will stand poised on the brink of cataclysmic change.”</li><li><em><a href="https://amzn.com/B00NUMILJ2/?tag=thloya-20">Armor</a></em> by John Steakley—1984 “Felix is an Earth soldier, encased in special body armor designed to withstand Earth’s most implacable enemy-a bioengineered, insectoid alien horde. But Felix is also equipped with internal mechanisms that enable him, and his fellow soldiers, to survive battle situations that would destroy a man’s mind.”</li><li><em><a href="https://amzn.com/B000FC1BNI/?tag=thloya-20">Oryx And Crake</a></em> by Margaret Atwood—2003 “Snowman (a man once known as Jimmy) sleeps in a tree and just might be the only human left on our devastated planet. He is not entirely alone, however, as he considers himself the shepherd of a group of experimental, human-like creatures called the Children of Crake. As he scavenges and tends to his insect bites, Snowman recalls in flashbacks how the world fell apart.”</li><li><em><a href="https://amzn.com/B0064CPN7I/?tag=thloya-20">Fahrenheit 451</a></em> by Ray Bradbury—1953 “In Fahrenheit Ray Bradbury’s classic, frightening vision of the future, firemen don’t put out fires—they start them in order to burn books. Bradbury’s vividly painted society holds up the appearance of happiness as the highest goal—a place where trivial information is good, and knowledge and ideas are bad. Guy Montag is a book-burning fireman undergoing a crisis of faith. His wife spends all day with her television “family,” imploring Montag to work harder so that they can afford a fourth TV wall. Their dull, empty life sharply contrasts with that of his next-door neighbor Clarisse, a young girl thrilled by the ideas in books, and more interested in what she can see in the world around her than in the mindless chatter of the tube. When Clarisse disappears mysteriously, Montag is moved to make some changes, and starts hiding books in his home. Eventually, his wife turns him in, and he must answer the call to burn his secret cache of books. After fleeing to avoid arrest, Montag winds up joining an outlaw band of scholars who keep the contents of books in their heads, waiting for the time society will once again need the wisdom of literature.”</li><li><em><a href="https://amzn.com/B000FBJAGO/?tag=thloya-20">A Fire Upon The Deep</a></em> by Vernor Vinge—1992 “Vinge presents a galaxy divided into Zones—regions where different physical constraints allow very different technological and mental possibilities. Earth remains in the ‘Slowness’ zone, where nothing can travel faster than light and minds are fairly limited. The action of the book is in the ‘Beyond,’ where translight travel and other marvels exist, and humans are one of many intelligent species. One human colony has been experimenting with ancient technology in order to find a path to the ‘Transcend,’ where intelligence and power are so great as to seem godlike. Instead they release the Blight, an evil power, from a billion-year captivity. As the Blight begins to spread, a few humans flee with a secret that might destroy it, but they are stranded in a primitive low-tech world barely in the Beyond. While the Blight destroys whole races and star systems, a team of two humans and two aliens races to rescue the others, pursued by the Blight’s agents and other enemies.”</li></ol>]]></summary></entry><entry><author><name>Joel Dueck</name></author><published>2011-09-13T00:00:00-05:00</published><updated>2011-09-13T00:00:00-05:00</updated><title>Cleaner titles for podcast posts in Tumblr</title><link rel="alternate" href="https://thenotepad.org/posts/cleaner-titles-for-podcast-posts-in.html"/><id>https://thenotepad.org/posts/cleaner-titles-for-podcast-posts-in.html</id><summary type="html"><![CDATA[<p>After reading my post <a href="http://notely.blogspot.com/2011/07/tips-for-better-podcast-publishing.html"><em>How to publish a better podcast using Textpattern, Tumblr, or anything else</em></a>, Lars Jannsen of <a href="http://gamesandmacs.de/">gamesandmacs.de</a>, a new German website/podcast, wrote me a question:</p><blockquote>When I use an audio post to publish my latest podcast episode as .mp3 (since I want my listeners to get the Flash audio player on Tumblr) and put the link to the .mp3 file in the description of that audio post it also shows up in the iTunes description of the episode when I use FeedBurner to get my podcast on iTunes. In order to get ‘cleaner’ show notes, I’d like to exclude the link from the iTunes info field. Looks a bit weird if there’s stuff like <code>(‘Download MP3 file’)</code> in the show notes.</blockquote><p>I noticed the same thing on my tumblr-based podcast. This titling originates with how Tumblr serves up its feeds to FeedBurner. Tumblr has no descreet “Title” field for audio posts; instead Tumblr takes, from the <em>description</em> field, the first however-many complete words there are before the 63-character mark (or thereabouts, including spaces and punctuation), slaps an ellipses (…) on the end, and uses that as the title. This title is the one that gets passed to Feedburner and the one that your listeners eventually see in iTunes. This is what causes ugly things like seeing “Download Mp3 file” as the episode’s title in iTunes.</p><p>Fortunately there’s a simple workaround. The MP3 download link doesn’t need to be at the very beginning of your description, it just needs to be the first <em>link</em> in the description. So, just make sure it occurs after the first several words (or after the 63-character mark, to be precise).</p><p>In my posts, I’ve been using variations on the following template in my description:</p><blockquote><p><strong>Episode 1234: Blue-Collar Reading Habits</strong>, recorded on Aug 23, 2011, is now available for download etc etc</p><p>You can <code>download the mp3 audio [mp3 link]</code> (1:26:46, 59.8 MB) or <code>subscribe to the podcast [feedburner link]</code>.</p></blockquote><p>This ensures that the episode’s actual title is the first thing in the title that ends up in iTunes. The “overflow,” if there is any, contains relevant info like the record date, etc.</p><p>In the above example, the title would show up in iTunes as “Episode 1234: Blue-Collar Reading Habits, recorded on Aug 23…”.</p><p><em>Update</em>, Lars responded:</p><blockquote>By the time I got your e-mail I also figured that iTunes takes the first 63 character to create the episode’s title and the rest flows into the description field. However, I’m still wondering if there’s a way to have a shorter title (without having to put lots of spaces in there…) and the body of the audio post (without the actual MP3 link as description in iTunes). I might be a bit perfectionist in this case, but I’d really like to find a solution to that without having to manually edit the XML feed every time I update my Tumblr blog with a new episode. Maybe there’s a way to “tweak” FeedBurner to take the “Title” field you can specify for an MP3 file you link on Tumblr.</blockquote><p>I currently don’t know of any tweaks that are possible; neither Tumblr nor Feedburner seem to expose the kind of functionality that would allow for this tweaking. Any suggestions are welcome!</p>]]></summary></entry><entry><author><name>Joel Dueck</name></author><published>2011-08-31T00:00:00-05:00</published><updated>2011-08-31T00:00:00-05:00</updated><title>How to find free e-books for your Kindle</title><link rel="alternate" href="https://thenotepad.org/posts/how-to-find-free-e-books-for-your.html"/><id>https://thenotepad.org/posts/how-to-find-free-e-books-for-your.html</id><summary type="html"><![CDATA[<p>Google already indexes the locations of many ebooks, you just need to know how to find them.</p><p>Just enter your search using the form <code>intitle:index.of Moby Dick epub mobi</code>—replace <em>Moby Dick</em> with your desired title or keyword. This search will turn up file listings with direct downloads for (hopefully) ebooks. You may, in fact, get many more books than just the one you were searching for.</p><p>If clicking on a search result gives you some kind of “access denied” message, just go back to the Google search result and click where it says <span class="noun">Cached</span> to access the copy Google cached before the file listing was made private. Usually the download links from these cached listings still work.</p><p>Kindles don’t support the ePub format, so if that’s all you can find, you’ll need to convert it to <code>.mobi</code> format using <a href="http://calibre-ebook.com/">Calibre</a>.</p>]]></summary></entry><entry><author><name>Joel Dueck</name></author><published>2011-08-18T00:00:00-05:00</published><updated>2011-08-18T00:00:00-05:00</updated><title>How to use Markdown in Blogspot posts</title><link rel="alternate" href="https://thenotepad.org/posts/how-to-use-markdown-in-blogspot-posts.html"/><id>https://thenotepad.org/posts/how-to-use-markdown-in-blogspot-posts.html</id><summary type="html"><![CDATA[<p>If your blog is hosted on running Blogspot and you want to use <a href="http://daringfireball.net/projects/markdown/basics">Markdown</a> for your posts, here’s how to do it and future-proof your writing in the process.</p><ol><li>Write your posts in a text editing program <em>on your computer</em> and save them <em>on your computer</em>. (I use a <code>yyyy-mm-dd post title.txt</code> format)</li><li>Then copy and paste the text into the <a href="http://daringfireball.net/projects/markdown/dingus">online Markdown processor</a> and click <code>Convert</code> to generate HTML. (Set “Filter” to “both” for extra typographic goodness.)</li><li>Finally, copy and paste the HTML into a new post in Blogspot.</li></ol><p>This has two advantages. First, it future-proofs your blog. No matter what happens, if Blogger ever gets shut down or becomes undesirable to use for any reason, in ten years you’ll still have a very useable copy of all your writing. Second, a text-editing program is much less likely to crash than your browser. This approach eliminates the risk of a browser crash causing you to lose large amounts of work.</p><h3>Getting Blogspot to play nice with your Markdown-generated HTML</h3><p>This is the area people seem to have trouble with, but it’s really quite simple.</p><ol><li>In Blogspot, go to <code>Settings</code> tab, then the <code>Formatting</code> section. Set “Convert Line Breaks” to <code>No</code>.</li><li><p>In your New Posts,</p><ul><li>Make sure you are using the “Edit HTML” tab</li><li><p>Under “Post Options” (at the bottom) make sure</p><ul><li>“Edit HTML Line Breaks” is set to <code>Use &lt;br /&gt; tags</code></li><li>“Compose Settings” is set to <code>Interpret typed HTML</code></li></ul></li></ul></li></ol><p>It’s that simple really. Now you can paste in your Markdown-generated HTML without getting extra linebreaks or other wierdnesses.</p>]]></summary></entry><entry><author><name>Joel Dueck</name></author><published>2011-08-18T00:00:00-05:00</published><updated>2011-08-18T00:00:00-05:00</updated><title>Solution for persisting ‘Windows created a temporary paging file on your computer’ error</title><link rel="alternate" href="https://thenotepad.org/posts/solution-for-persisting-windows-created.html"/><id>https://thenotepad.org/posts/solution-for-persisting-windows-created.html</id><summary type="html"><![CDATA[<p>Solution for persisting “Windows created a temporary paging file on your computer” error</p><p>My Windows 7 laptop began displaying a notification/error every time I logged in:</p><blockquote><code>Windows created a temporary paging file on your computer because of a problem that  occured with your paging file configuration when you started your computer. The total paging  file size for all disk drives may be somewhat larger than the size you specified</code></blockquote><p>After clicking OK, it would open the virtual memory settings without any explanation of what you were supposed to check or do there.</p><p>This evidently happens because <code>pagefile.sys</code>, the file that Windows uses for virtual memory, has become corrupted in some way.</p><p><a href="http://answers.microsoft.com/en-us/windows/forum/windows_7-performance/windows-7-virtual-memory-keeps-resetting-on/e7ba857a-ba74-4978-9ea7-0c929f75a19d">This Microsoft Answers article</a> recommends running a system file check. Here’s <a href="http://support.microsoft.com/kb/936212/en-us">how to run an SFC</a>. This did not solve the problem for me, but it is something you should try first.</p><p>Here’s how I cleared it up:</p><ol><li>Log in under a local Administrator account. (Do this after each restart in these instructions as well.)</li><li>If it’s not already open, open the virtual memory settings by rich-clicking on Computer, → <code>Properties</code> → <code>Advanced System Settings</code> → click the <code>Advanced</code> tab → Under Performance, click <code>Settings</code>, go to <code>Advanced</code> tab, finally under Virtual Memory section click the <code>Change</code> button.</li><li>Uncheck the <code>Autmatically manage paging file size for all drives</code> checkbox.</li><li>Set a “Custom size” for the paging file on the C drive: 0MB initial, 0MB maximum.</li><li>Click OK, close all dialog boxes, and restart your computer.</li><li><p>After logging in again, delete the file <code>C:\pagefile.sys</code></p><ol><li>To do this, you may need to change your folder settings so you can see it first. Open a window of your C: drive and click <code>Organize</code> at the top, then <code>Folder and Search Options</code></li><li>Click the <code>View</code> tab, and make sure <code>Show hidden files, folders and drives</code> is turned on, and that <code>Hide protected system files</code> is <strong>not</strong> checked.</li><li>Click OK and go back to your C: drive, find <code>pagefile.sys</code> and delete it.</li></ol></li><li>Now go back to the virtual memory settings (see step 2 above) and set the paging file for the C: drive to <code>System managed size</code>, and then make sure the <code>Automatically manage paging file size for all drives</code> checkbox is <strong>checked</strong>.</li><li>Click OK, close all dialog boxes, and restart your computer.</li></ol><p><strong>A summary of what this does:</strong> By temporarily turning off virtual memory, you allow yourself to delete the (now-corrupt) paging file. Then when you re-enable virtual memory, Windows automatically builds a new paging file from scratch, and <em>voilà</em>, problem solved.</p><p>I was helped by <a href="http://www.geekstogo.com/forum/topic/41071-paging-file-is-gone%3B-correspondng-error-at-startup/">this thread at geekstogo.com</a> although I did not find it necessary to do any editing of the Registry or any of that jazz. Try the simplest solution first, I always say.</p>]]></summary></entry><entry><author><name>Joel Dueck</name></author><published>2011-07-01T00:00:00-05:00</published><updated>2011-07-01T00:00:00-05:00</updated><title>Free Kindle Book: Back On Murder</title><link rel="alternate" href="https://thenotepad.org/posts/free-kindle-book-back-on-murder.html"/><id>https://thenotepad.org/posts/free-kindle-book-back-on-murder.html</id><summary type="html"><![CDATA[<p>J. Mark Bertrand, having just released <em><a href="https://amzn.com/B0054Z7L58/?tag=thloya-20">Pattern of Wounds</a></em> , the second in a series of mystery novels, is giving away the Kindle edition of <em><a href="https://amzn.com/B008BTH59Q/?tag=thloya-20">Back on Murder</a></em> (the first book in the series) for free for a limited time.</p><p>I have not read either yet, but I have downloaded the free ebook and will be reading it as soon as I can! I’m always on the lookout for new reading material and thought I’d pass this on.</p><p>J. Mark Bertrand is also known as the writer of <a href="http://www.bibledesignblog.com/">Bible Design Blog</a>, which centers around reviews and features of very high-quality Bibles and book-making in general. It’s actually a rather interesting subject even if you are not religious. See his announcement about his novels <a href="http://www.bibledesignblog.com/2011/07/new-book-release-free-kindle-download.html">here</a>.</p>]]></summary></entry><entry><author><name>Joel Dueck</name></author><published>2011-07-01T00:00:00-05:00</published><updated>2011-07-01T00:00:00-05:00</updated><title>How to publish a better podcast using Tumblr, Textpattern, or anything else</title><link rel="alternate" href="https://thenotepad.org/posts/tips-for-better-podcast-publishing.html"/><id>https://thenotepad.org/posts/tips-for-better-podcast-publishing.html</id><summary type="html"><![CDATA[<p>This isn’t about <a href="http://hivelogic.com/articles/podcasting-equipment-software-guide-2011/">equipment</a> or <a href="http://ftrain.com/LearningToSpeak.html">recording technique</a>, but just the cranky details of <em>publishing</em> a podcast that I have found by trial and error. This article assumes you have some basic computer/web/HTML know-how.</p><p>I publish a couple of podcasts: <a href="http://jdueck.net/radio">Howell Creek Radio</a> uses Textpattern, and <a href="http://anythingandeverythinggood.tumblr.com">Anything Good</a> uses Tumblr. So in some of the steps I have given some examples that are specific to those CMSs, in order to help you along; but the important thing is that these steps can be easily adapted to any CMS such as Blogger, WordPress, etc.</p><h2>Create a separate tag or category for your podcast posts on your blog.</h2><p>This is optional; I recommend it because it allows the website for your podcast to be more flexible. For example, if you use Tumblr, you can create a <code>podcast</code> tag, and then continue posting a mix of videos, photos, quotes, etc. alongside your podcast episodes. This way your podcast subscribers will get a clean feed containing only audio downloads, while your website readers will be able to see all your other posts as well.</p><p>Even if your website is pretty much exclusively a vehicle for your podcast, you may want to publish other kinds of things posts now and then for administrative purposes, and this will give you the freedom to keep those posts separate.</p><h2>Make sure you have cover art where you need it</h2><p>You need to create and use cover art in <strong>two places</strong>: first you create cover art for your podcast as a whole, and then you also embed cover art in every individual podcast recording. <strong>If you use nothing else from this article, please:</strong> add cover art to your mp3 files. Without it, your episodes show up with blank covers in iPods and most mp3 players! Your podcast episodes will look dorky without it! It’s not enough to add cover art to your itunes feed, you need to embed the cover art in every finished mp3 file. This is easy to do, yet many beginners forget to do it.</p><p><strong>Set up your podcast feed with cover art:</strong> Create a 600×600px cover art image for your podcast and upload it to your site, or somewhere publicly accessible. (In some places Apple says 300px is OK but their <a href="http://www.apple.com/itunes/whatson/podcasts/specs.html">technical spec</a> says 600.) I recommend using JPEG&amp;lt;, not PNG—the latter is allowed but will look blocky when viewed at reduced sizes in iTunes.</p><ol><li><p>Get a <a href="http://feedburner.com">FeedBurner</a> account and set up your podcast feed:</p><ol><li>Tumblr: Set the “original feed” on FeedBurner to the RSS feed for the specific tag you created for your podcast. To get this feed, add <code>tagged/YOURTAG/rss</code> to your tumblr’s address. (Example: <code>http://mytumblr.tumblr.comn/tagged/podcast/rss</code>)</li><li>Textpattern: Set the “original feed” on FeedBurner to Textpattern’s atom feed for that category (e.g., <code>http://foopaux.com/atom/?category=podcast</code>).</li><li>Blogger: Set the “original feed” on FeedBurner to <code>http://www.YOURBLOG.blogspot.com/feeds/posts/default/-/PODCASTTAG</code> (per <a href="http://www.google.com/support/blogger/bin/answer.py?hl=en&amp;answer=97933">these instructions from Google</a>).</li></ol></li><li>Under FeedBurner’s <code>Optimize</code> tab, add the <code>SmartCast</code> service to make your feed podcast-friendly. Set the cover art to the URL of your covert art image and add as much description, keywords and categories as you can muster.</li></ol><p><strong>Embed cover art for individual episodes:</strong> You’ll find that iTunes does <em>not</em> automatically use your cover art for downloaded episodes when they are playing in your iPod. The cover art you created in the steps above is only used in the iTunes <em>store listing</em> for your podcast (if you get one). In order for your cover art to actually display in people’s iPods when your episodes are playing, you need to embed the cover art into each episode’s MP3 file. Luckily, this is easy to do using only the iTunes (the simplest way I know how):</p><ol><li>Prior to uploading, open add the episode’s MP3 to your iTunes library.</li><li>Right-click the episode in iTunes, click Get Info.</li><li>Go to the Artwork tab, manually add your cover art to the file, and click OK. (Tip: in Windows you can actually copy/paste the artwork JPG file from Explorer directly into this tab.)</li><li>The cover art is now embedded, you can now upload your MP3 file.</li></ol><h2>Create a “subscribe” link on your website.</h2><p>Lots of folks use iTunes, so it’s nice to provide an iTunes instant-subscribe link for them and a standard RSS link for everyone else. To create an iTunes link, just prefix the URL of your FeedBurner feed with <code>itpc://</code> instead of <code>http://</code>. So, for example, you could place this prominently on your website:</p><blockquote><code>Subscribe in &lt;a href="itpc://feeds.feedburner.com/MyPodcast"&gt;iTunes&lt;/a&gt; or &lt;a href="http://feeds.feedburner.com/MyPodcast"&gt;RSS&lt;/a&gt;</code></blockquote><h2>Record and upload your podcast episodes</h2><p>I use <a href="http://audacity.sourceforge.net/">Audacity</a> to record, then upload the MP3 to my website using FTP. If you don’t have any hosted space, you can use a free <a href="http://dropbox.com">Dropbox</a> account and host your files in a public folder. The bonus with this approach is that uploading is automatic.</p><h2>Format your podcast posts properly</h2><p>A properly-formatted post ensures that your subscribers will get their episodes automatically with no hiccups.</p><ol><li>Don’t forget to set the post’s category (or tag) to the podcast category you created earlier.</li><li>Each podcast post should contain a manual, direct download link to the MP3 file for that episode. This is non-optional, and it should be the first link in the post. This will allow FeedBurner to correctly detect and include your audio in the podcast feed. For the text of the link, I recommend something like “Download MP3 audio (14.76 mb, 19:32)” (<strong>Update, Sep 13, 2011:</strong> this link doesn’t have to be at the very front of your post, it just has to be the first <em>link</em> in the post. Also, when using Tumblr, to ensure cleaner descriptions see <a href="http://notely.blogspot.com/2011/09/cleaner-titles-for-podcast-posts-in.html">this follow-up post</a>.)</li><li><p>One nice thing to do if you will be syndicating onto another service, such as Facebook notes etc., is to create a special CSS class called <code>for-syndicate</code> and set it to <code>display: none</code>. Then add a little “helper” boilerplate on the bottom of each post, in a paragraph set to that class:</p><blockquote><code>&lt;p class="for-syndicate"&gt;This is a podcast post: &lt;a href="http://site.com/episode.mp3"&gt;click here&lt;/a&gt; to download the MP3 audio, or visit &lt;a href="http://site.com/podcast"&gt;site.com&lt;/a&gt; to listen online and subscribe in iTunes.&lt;/p&gt;</code></blockquote><p>The <code>for-syndicate</code> class will render the paragraph invisible on your website, but it will be visible when imported into Facebook or when the feed is viewed in a newsreader, since these other sites do not import your CSS styles. (If you like, this quasi-hidden paragraph can also serve as the required MP3 link.)</p></li></ol><h2>Letting people listen from your website</h2><p>People will listen to your podcast in one of two ways: by subscribing in iTunes or some similar program (which we’ve already covered) or by going to your web page and listening on their computer. Although they can click to listen to the MP3 file using the link you provided, it’s nice to embed some kind of player that will stream the audio and let them listen right there.</p><p>There are lots of ways to do this:</p><ol><li>In Textpattern, install the <a href="http://textpattern.org/plugins/603/jnm_audio">jnm:audio</a> textpattern plugin and include a <code>&lt;txp:jnm_audio&gt;</code> tag in each podcast post.</li><li>In Tumblr, create your podcast post as an “audio post” and Tumblr will automatically embed an audio player. (Don’t forget to also include the download link in the text portion of the post though.)</li><li>Other platforms (WordPress, etc): Let me know how you do it in the comments!</li></ol><p>These methods use Flash programs for the audio players, which don’t run on iPhone or iPad browsers. I’ve been tinkering with ways to use HTML5 audio players when the browser supports them, but HTML5 audio support is still flaky for the time being. Check back again in a year or so and maybe I’ll have something for you.</p><h2>Get listed in the iTunes Store</h2><p>After you’ve gotten your production groove down and can demonstrate that your episodes come out at least somewhat regularly, it’s worth trying to get your podcast added into the iTunes store. Read Apple’s <a href="http://www.apple.com/itunes/whatson/podcasts/creatorfaq.html">FAQ for Podcast Makers</a>.</p>]]></summary></entry><entry><author><name>Joel Dueck</name></author><published>2011-06-16T00:00:00-05:00</published><updated>2011-06-16T00:00:00-05:00</updated><title>The 50 Books Every Child Should Read</title><link rel="alternate" href="https://thenotepad.org/posts/50-books-every-child-should-read.html"/><id>https://thenotepad.org/posts/50-books-every-child-should-read.html</id><summary type="html"><![CDATA[<p>The Independent recently asked three of Britain’s leading children’s authors and two of their in-house book experts to each pick 10 books, suitable for Year 7 students. Their original list is <a href="http://www.independent.co.uk/arts-entertainment/books/news/the-50-books-every-child-should-read-2250138.html">here</a>.</p><p>Unfortunately, in typical traditional-media fashion, they neglected to add any links to any of the books mentioned, losing an obvious opportunity to use the web to both their readers’ and their own advantage. So I have gone through the list and added links to the Kindle editions of every book for which one is available.</p><p>I linked to a free edition wherever possible. If a book was not available on the Kindle store, I marked it with an <span style="color: red">*</span> asterisk. If you know of a Kindle version of a book I could not find, or of a free or better-formatted edition than the one I have linked, let me know via email or comments!</p><h2>Philip Pullman</h2><ul><li><a href="https://amzn.com/B003B657NK/?tag=thloya-20"><em>Through the Looking Glass</em></a> by Lewis Carroll. Indispensable. The great classic beginning of English children’s literature.</li><li><a href="https://amzn.com/B000JQULUE/?tag=thloya-20"><em>Pinocchio</em></a> <span style="color: red">(free)</span> by Carlo Collodi. What effortless invention looks like.</li><li><a href="https://amzn.com/B0045Y15UQ/?tag=thloya-20"><em>Emil and the Detectives</em></a> by Erich Kastner. A great political story: democracy in action.</li><li><em><a href="https://amzn.com/B00R7TESJ6/?tag=thloya-20">Swallows and Amazons</a></em> by Arthur Ransome. As clear and pure as Mozart.</li><li><a href="https://amzn.com/B003KK5DOK/?tag=thloya-20"><em>Black Hearts in Battersea</em></a> by Joan Aiken. If Ransome was Mozart, Aiken was Rossini. Unforced effervescence.</li><li><em><a href="https://amzn.com/B00DPZN3AQ/?tag=thloya-20">The Owl Service</a></em> by Alan Garner. Showed how children’s literature could sound dark and troubling chords.</li><li><a href="https://amzn.com/B004IK8Q90/?tag=thloya-20"><em>The Phantom Tollbooth</em></a> by Norton Juster. Superb wit and vigorous invention.</li><li><em><a href="https://amzn.com/B00MLMS9SA/?tag=thloya-20">Moominsummer Madness</a></em> by Tove Jansson. Any of the Moomin books would supply the same strange light Nordic magic.</li><li><em><a href="https://amzn.com/0370009428/?tag=thloya-20">A Hundred Million Francs</a><span style="color: red">*</span></em> by Paul Berna. A particular favourite of mine, as much for Richard Kennedy’s delicate illustrations (in the English edition) as for the story.</li><li><a href="https://amzn.com/0316358428/?tag=thloya-20"><em>The Castafiore Emerald</em></a><span style="color: red">*</span> by Hergé. Three generations of this family have loved Tintin. Perfect timing, perfect narrative tact and command, blissfully funny.</li></ul><h2>Michael Morpurgo</h2><ul><li><a href="https://amzn.com/B003GGSTQ2/?tag=thloya-20"><em>The Star of Kazan</em></a> by Eva Ibbotson. The heroine is blessed with such wonderful friends who help her through the twists and turns of this incredible journey.</li><li><a href="https://amzn.com/B000JQUKKU/?tag=thloya-20"><em>A Christmas Carol</em></a> <span style="color: red">(free)</span> by Charles Dickens. The first few pages were so engaging, Marley’s ghostly face on the knocker of Scrooge’s door still gives me the shivers.</li><li><a href="https://amzn.com/B003GK21NK/?tag=thloya-20"><em>Just William</em></a> books by Richmal Crompton. These are a must for every child.</li><li><a href="https://amzn.com/B000JQV2K2/?tag=thloya-20"><em>The Happy Prince</em></a> <span style="color: red">(free)</span> by Oscar Wilde. This was the first story, I think, that ever made me cry and it still has the power to make me cry.</li><li><a href="https://amzn.com/B002ZCZ67S/?tag=thloya-20"><em>The Just So Stories</em></a> by Rudyard Kipling. The story my mother used to read me most often, because I asked for it again and again. I loved the sheer fun of it, the music and the rhythm of the words. It was subversive too. Still my favourite story.</li><li><a href="https://amzn.com/B000JML7EC/?tag=thloya-20"><em>Treasure Island</em></a> <span style="color: red">(free)</span> by R.L. Stevenson This was the first real book I read for myself. I lived this book as I read it.</li><li><a href="https://amzn.com/B000FC0SH8/?tag=thloya-20"><em>The Old Man and the Sea</em></a> by Ernest Hemingway. A classic tale of man versus nature. I wish I’d written this.</li><li><a href="https://amzn.com/B00SBSWA10/?tag=thloya-20"><em>The Man Who Planted Trees</em></a> by Jean Giono. A book for children from 8 to 80. I love the humanity of this story and how one man’s efforts can change the future for so many.</li><li><a href="https://amzn.com/0140345434/?tag=thloya-20"><em>The Singing Tree</em></a><span style="color: red">*</span> by Kate Seredy. The story of two children who go to find their father who has been listed missing in the trenches of the First World War.</li><li><a href="https://amzn.com/B002RKSZT4/?tag=thloya-20"><em>The Secret Garden</em></a> <span style="color: red">(free)</span> by Frances Hodgson-Burnett. I love this story of a girl’s life being changed by nature.</li></ul><h2>Katy Guest, literary editor for The Independent on Sunday</h2><ul><li><a href="https://amzn.com/B0058RE06K/?tag=thloya-20"><em>Refugee Boy</em></a> by Benjamin Zephaniah. Story of a young Ethiopian boy, whose parents abandon him in London to save his life.</li><li><a href="https://amzn.com/B00MLM9KQU/?tag=thloya-20"><em>Finn Family Moomintroll</em></a> (and the other Moomin books) by Tove Jansson. A fantasy series for small children that introduces bigger ones to ideas of adventure, dealing with fear, understanding character and tolerating difference.</li><li><em><a href="https://amzn.com/B005CRQ4OW/?tag=thloya-20">Diary of a Wimpy Kid</a></em> by Jeff Kinney. It’s rude, it’s funny and it will chime with every 11-year-old who’s ever started a new school.</li><li><em><a href="https://amzn.com/031231616X/?tag=thloya-20">I Capture the Castle</a></em> by Dodie Smith. Written for a teenage audience but fun at any age.</li><li><em><a href="https://amzn.com/B0026REBFK/?tag=thloya-20">The Lord of the Rings</a></em> by J.R.R. Tolkein. Be warned, these tales of hobbits, elves and Middle Earth are dangerously addictive.</li><li><em><a href="https://amzn.com/B0048ELCL0/?tag=thloya-20">The Tygrine Cat</a><span style="color: red">*</span></em> (and <em>The Tygrine Cat on the Run</em>) by Inbali Iserles. If your parents keep going on at you to read <em>Tarka the Otter, The Sheep-Pig</em> and other animal fantasies, do—they’re great books—also try Iserles’ stories about a cat seeking his destiny.</li><li><em><a href="https://amzn.com/B00OR7XF9U/?tag=thloya-20">Carry On, Jeeves</a></em> by P.G. Wodehouse. A grown-up book ? but not that grown-up.</li><li><em><a href="https://amzn.com/B001QWDRZ6/?tag=thloya-20">When Hitler Stole Pink Rabbit</a></em> by Judith Kerr. Judith Kerr’s semi-autobiographical story of a family fleeing the Nazis in 1933.</li><li><em><a href="https://amzn.com/B000UVBT3G/?tag=thloya-20">Moving Pictures</a></em> by Terry Pratchett. Elaborate mythological imagery and a background based in real science. If you like this, the Discworld series offers plenty more.</li><li><em><a href="https://amzn.com/B001V7U6GY/?tag=thloya-20">The Story of Tracy Beaker</a></em> by Jacqueline Wilson. The pinnacle of the wonderful Jacqueline Wilson’s brilliant and enormous output.</li></ul><h2>John Walsh, author and Independent columnist</h2><ul><li><em><a href="https://amzn.com/B000JQU1VS/?tag=thloya-20">The Adventures of Sherlock Holmes</a></em> <span style="color: red">(free)</span> by Sir Arthur Conan Doyle. Irresistible puzzle-solving tales of the chilly Victorian master-sleuth and his dim medical sidekick.</li><li><em><a href="https://amzn.com/B000FC1MCS/?tag=thloya-20">The Curious Incident of the Dog in the Night-Time</a></em> by Mark Haddon. Age-transcending tale, both funny and sad.</li><li><em><a href="https://amzn.com/B005SGW806/?tag=thloya-20">Mistress Masham’s Repose</a></em> by T.H. White. Magical story of 10-year-old Maria, living in a derelict stately home, shy, lonely and under threat from both her governess and her rascally guardian.</li><li><em><a href="https://amzn.com/B000JQUMPI/?tag=thloya-20">Little Women</a></em> <span style="color: red">(free)</span> by Louisa May Alcott. Inexplicably evergreen, trend and taste-defying 1868 classic.</li><li><em><a href="https://amzn.com/1851459650/?tag=thloya-20">How to be Topp</a><span style="color: red">*</span></em> by Geoffrey Willams and Ronald Searle. Side-splitting satire on skool, oiks, teechers, fules, bulies, swots.</li><li><em><a href="https://amzn.com/B000TU16GS/?tag=thloya-20">Stormbreaker</a></em> by Anthony Horowitz. First of the action-packed adventures with 14-year-old Alex Rider.</li><li><em><a href="https://amzn.com/B00I11F24Y/?tag=thloya-20">Private Peaceful</a></em> by Michael Morpurgo. “Dulce et Decorum Est” for pre-teens.</li><li><em><a href="https://amzn.com/B002KP6DXQ/?tag=thloya-20">Artemis Fowl</a></em> by Eoin Colfer. Lively, amoral, wildly imaginative debut (six more followed) about the money-grabbing master-criminal Artemis, 12. The author called it “<em>Die Hard</em> with fairies.”</li><li><em><a href="https://amzn.com/0099572850/?tag=thloya-20">The Silver Sword</a><span style="color: red">*</span></em> by Ian Serraillier. Inspiring wartime story of the Balicki family in Warsaw.</li><li><em><a href="https://amzn.com/B004G8P0UW/?tag=thloya-20">Animal Farm</a></em> <span style="color: red">(free)</span> by George Orwell. Smart 11-year-olds won’t need any pre-knowledge of Marx, Lenin, Trotsky and 1917 to appreciate this brilliantly-told fable.</li></ul><h2>Michael Rosen</h2><ul><li><em><a href="https://amzn.com/B000FC1KGG/?tag=thloya-20">Skellig</a></em> by David Almond. Brings magical realism to working-class North-east England.</li><li><em><a href="https://amzn.com/0747589798/?tag=thloya-20">Red Cherry Red</a><span style="color: red">*</span></em> by Jackie Kay. A book of poems that reaches deep into our hidden thoughts but also talks in a joyous voice exploring the everyday.</li><li><em><a href="https://amzn.com/B00358VI28/?tag=thloya-20">Talking Turkeys</a></em> by Benjamin Zephaniah. A book of poems that demands to be read aloud, performed and thought about.</li><li><em><a href="https://amzn.com/1852133732/?tag=thloya-20">Greek myths</a><span style="color: red">*</span></em> by Geraldine McCaughrean. Superheroes battle with demons, gods intervene in our pleasures and fears—a bit like the spectres in our minds going through daily life, really—beautifully retold here.</li><li><em><a href="https://amzn.com/0670803030/?tag=thloya-20">People Might Hear You (Viking Kestrel picture books)</a> <span style="color: red">*</span></em> by Robin Klein. A profound, suspenseful story about sects, freedom and the rights of all young people—especially girls.</li><li><em><a href="https://amzn.com/B002RKSPE4/?tag=thloya-20">Noughts and Crosses</a></em> <span style="color: red">(free)</span> by Malorie Blackman. A book that dared to go where no one thought you could with young audiences because it raises tough stuff to do with race.</li><li><em>Einstein’s Underpants and How They Saved the World</em> by Anthony McGowan. A crazy adventure set amongst the kids you don’t want to know but who this book makes you really, really care about.</li><li><em><a href="https://amzn.com/B004GTLSG6/?tag=thloya-20">After the First Death</a></em> by Robert Cormier. Cormier is never afraid of handling how the personal meets the political all within the framework of a thriller.</li><li><em><a href="https://amzn.com/B0013TPUNO/?tag=thloya-20">The London Eye Mystery</a></em> by Siobhan Dowd. A book that allows difference to be part of the plot and not a point in itself.</li><li><em>Beano Annual.</em> A cornucopia of nutty, bad, silly ideas, tricks, situations and plots</li></ul><p><em><span style="color: red">*</span>—not known to be available as an ebook.</em></p>]]></summary></entry><entry><author><name>Joel Dueck</name></author><published>2011-06-15T00:00:00-05:00</published><updated>2011-06-15T00:00:00-05:00</updated><title>How to get more use out of your Kindle</title><link rel="alternate" href="https://thenotepad.org/posts/how-to-get-more-use-out-of-your-kindle.html"/><id>https://thenotepad.org/posts/how-to-get-more-use-out-of-your-kindle.html</id><summary type="html"><![CDATA[<p>So you’ve had your <a href="https://amzn.com/B002Y27P3M/?tag=thloya-20">Kindle</a> for a few months now, and it’s been sitting in your pack, unused for the last few weeks. What happened? Here’s how can you get more use out of this gadget you used to be so excited about.</p><p><strong>Ask it to do less.</strong> With its apps and its web browser, the Kindle is technically capable of many things, but great for only one thing: <em>reading</em>. Reading, you may recall, is a wonderful pleasure that may have gotten pushed out of your life awhile back. Use your Kindle for reading more. Resist the temptation to use it for things that will tend to marginalize reading again: games, email, and so forth.</p><p><strong>Use the magic wirelessness to your advantage.</strong> There is really no good reason to be in the habit of plugging your Kindle into anything (other than to charge it up once or twice a month).</p><p>Here’s how I manage my ebook collection wirelessly:</p><ol><li>To put an ebook on my Kindle, I email it to my <code>free.kindle.com</code> address (a snap since Gmail accepts drag-and-drop attachments). Presto, book appears on my Kindle.</li><li>When I’m done with a book, I either delete it from my Kindle or put it in a “Finished” folder in my Kindle.</li><li>Gmail keeps a copy of the file in the email attachment in case I ever need it. (I also stick them in a folder on my computer.)</li></ol><p>Using this method, there are no wires, no syncing, and there’s no need for special software like Calibri unless I need to convert an ebook to a Kindle-compatible format.</p><p><strong>Make finding new reading material as automatic as possible.</strong> Time spent looking for new stuff to read is time you could have spent reading. Find ways to have the world send <em>you</em> new things, rather than digging for them yourself. This one is something I am continually looking for improvements on. Some options:</p><ul><li><a href="http://delivereads.com/">Delivereads</a>–This is a new one, and it’s just the kind of thing I’m looking for: free, high-quality stories delivered automatically to your Kindle, roughly once a week. This one is almost a no-brainer.</li><li><a href="http://instapaper.com">Instapaper</a>–Even though Instapaper is <a href="http://notely.blogspot.com/2011/05/instapaper-auto-send-to-kindle-not.html">having some problems with automatic deliveries</a> at the moment (which will probably be fixed before too long), if you do any browsing on the Internet in the course of a normal day, Instapaper makes a great way to collect long articles for later reading. Just try and use it as a stash for things you already run across; don’t start crawling the web just to look for Kindle material–you’re trying to get away from that, remember?</li><li>Newspaper subscriptions: Try a subscription to the <a href="https://amzn.com/B000GFK7L6/?tag=thloya-20">New York Times</a> or the <a href="https://amzn.com/B000FDJ0FS/?tag=thloya-20">Wall Street Journal</a>. Currently the reviews are very mixed; as of today you can see that not everyone finds these subscriptions worth the cost compared to the print editions. It will depend on the publication and whether you have the time to read all the issues.</li></ul><p><strong>Treat Twitter like a newspaper.</strong> One good use I have found for the web browser is to use it to log into <code>m.twitter.com</code>. This is an excellent way to catch up on Twitter. You can now check it once or twice a day at home as part of your morning or evening routine, and forget about it for the rest of the day. (Unless you happen to be stuck in a queue or waiting room with nothing but your smartphone.)</p><p><strong>Start or join a book club.</strong> The ideal book club will center around a specific kind of book, and send you a new book every month automatically. This is just an idea of mine–I haven’t yet run across a book club like this–but it makes so much sense it’s hard to believe they don’t already exist.</p>]]></summary></entry><entry><author><name>Joel Dueck</name></author><published>2011-05-23T00:00:00-05:00</published><updated>2011-05-23T00:00:00-05:00</updated><title>Instapaper Auto-send to Kindle not working</title><link rel="alternate" href="https://thenotepad.org/posts/instapaper-auto-send-to-kindle-not.html"/><id>https://thenotepad.org/posts/instapaper-auto-send-to-kindle-not.html</id><summary type="html"><![CDATA[<p>This is a current, unresolved problem: <a href="http://instapaper.com/">Instapaper</a> does not automatically send new articles to my <a href="https://amzn.com/B002Y27P3M/?tag=thloya-20">Kindle</a> every day. This, despite the fact that my Instapaper account is correctly set up to auto-send new articles to my Kindle, and my Kindle account is properly set up to receive them.</p><figure><img src="/posts/img/kindle.jpg" alt="Manage Your Kindle on Instapaper's web site" style="width: 164.5px;"/><figcaption><i>Manage Your Kindle</i> on Instapaper’s web site</figcaption></figure><p>Here’s the scenario:</p><ol><li>There are new unread articles in my Instapaper account that are more than a day old.</li><li>My Instapaper account is configured to email new articles to my Kindle every day (see above). I have a Kindle 3 wifi-only.</li><li>I never receive any emails from Instapaper unless I click the <code>Send Now</code> button. Then, the new Instapaper issue is sent and arrives on my Kindle exactly as expected.</li></ol><p>The manual sends arrive just fine; <strong>ergo:</strong> the Kindle email address is properly configured, and the Kindle account is properly set up to receive the emails.</p><p>The status just above the <code>Send Now</code> button commonly reads “Your last compilation was sent 4 days ago” even when there are new unread articles sitting in the account.</p><p>I conclude that Instapaper simply is not sending the emails for some reason. Any guesses as to why?</p><div class="updateBox"><p><b><span class="smallcaps">Update, No. 1</span></b></p><p>Apparently this is a known issue; <a href="https://amzn.com/B001U5SPME/?tag=thloya-20">Wired</a> published <a href="http://www.wired.com/gadgetlab/2010/09/how-to-do-almost-everything-with-a-kindle-3/">an article</a> which says “Unfortunately, for reasons I’m not smart enough to understand, Instapaper can’t automate delivery to your <code>@free.kindle.com</code> address.” This tells us nothing about what causes the problem, only that it’s a known issue and, for whatever reason, nothing has been done about it.</p></div><div class="updateBox"><p><b><span class="smallcaps">Update, No. 2</span></b></p><p>Marco seems to have been working on the problem. On May 25, @Instapaper <a href="https://twitter.com/#!/instapaper/status/73584811683487746">tweeted</a>: “Sending tomorrow morning’s Kindle auto-deliveries early, now. I think I finally found the bug that prevented so many from being delivered.” Then <a href="https://twitter.com/#!/instapaper/status/73622208060198913">on May 26</a>: “@jeremyisweary Have you changed your Instapaper username since setting it up, possibly when I moved to requiring emails-as-usernames?” The problem has not yet been solved for me personally, or for others, as seen in the comments to this blog post. Will keep you posted.</p></div><div class="updateBox"><p><b><span class="smallcaps">Update, No. 3</span></b></p><p>I’ve been receiving my unread articles from Instapaper on my Kindle, and it seems <strong>the problem has been fixed.</strong> On October 5th 2011 (the day Steve Jobs died), @Instapaper <a href="https://twitter.com/#!/instapaper/status/121779764930428928">tweeted</a> that Marco believed he had fixed the problem. The same day, he <a href="https://twitter.com/#!/instapaper/status/121780105356906496">said</a>, “By a few hours from now, all deliveries should be made. If you’re one of those who haven’t been getting them, let me know whether you do.” I’ve been getting my deliveries ever since, and so have others.</p></div><p>If you’re still having problems, let us know in the comments!</p>]]></summary></entry><entry><author><name>Joel Dueck</name></author><published>2011-05-11T00:00:00-05:00</published><updated>2011-05-11T00:00:00-05:00</updated><title>Windows 7 updates keep installing, restarting and failing</title><link rel="alternate" href="https://thenotepad.org/posts/windows-7-updates-keep-installing.html"/><id>https://thenotepad.org/posts/windows-7-updates-keep-installing.html</id><summary type="html"><![CDATA[<p>Over the past week and a half, my Win 7 laptop has been trying to automatically install the same set of updates and failing over and over again. Sometimes the automatic install/restart cycle would happen in the middle of the night when the dumb thing was supposed to be sleeping. It would restart, say “Configuring Windows Updates”, then “Updates Failed, Reverting Changes” (or something like that).</p><p>The update history showed they mostly failed with error <code>80071A90</code>. The help file on that error recommended running Windows Update manually after starting Windows in safe mode with networking, but the Windows Update service will not run in safe mode.</p><p>I found the solution in <a href="http://answers.microsoft.com/en-us/windows/forum/windows_7-windows_update/unable-to-update-windows-7-pro-error-80071a90/0304f6a2-0174-e011-8dfc-68b599b31bf5">this Microsoft Answers article</a>:</p><blockquote><p>Assuming the updates-in-question include KB2515325, KB2492386, KB2506928, KB2512715 and/or KB982018, and all is well with your computer otherwise:</p><ol><li>Run a manual check for updates per <a href="http://windows.microsoft.com/en-us/windows7/How-can-I-tell-if-my-computer-is-up-to-date">http://windows.microsoft.com/en-us/windows7/How-can-I-tell-if-my-computer-is-up-to-date</a></li><li>Select (check) only <code>KB2515325</code>, <code>KB2492386</code>, <code>KB2506928</code> and/or <code>KB2512715</code>, and install them; follow all prompts.</li><li>Now run another manual check for updates, if necessary, and install <code>KB982018</code> by itself; again, follow all prompts.</li></ol></blockquote>]]></summary></entry><entry><author><name>Joel Dueck</name></author><published>2010-09-02T00:00:00-05:00</published><updated>2010-09-02T00:00:00-05:00</updated><title>Delicious Linkrolls Not Working</title><link rel="alternate" href="https://thenotepad.org/posts/delicious-linkrolls-not-working.html"/><id>https://thenotepad.org/posts/delicious-linkrolls-not-working.html</id><summary type="html"><![CDATA[<p>I wanted to create a linkroll on my website, an embedded list of my <a href="http://delicious.com">delicious.com</a> links. Problem was, the <a href="http://www.delicious.com/help/linkrolls">linkroll code they generated</a> resulted in…nothing. No links appeared on my website using their code.</p><p>I tried manually opening the URL in the script tag, which refers to a <code>feeds.www.delicious.com</code> address, and the browser told me it couldn’t find the site!</p><p>On a whim I tried removing the “www” from the address, and voila. The script worked. So when you add the code to your site, change <code>feeds.www.delicious.com</code> to <code>feeds.delicious.com</code>.</p><p>I have sent a support request to Delicious about this and will update the post when I hear back from them.</p><div class="updateBox"><p><b><span class="smallcaps">Update, June 2011</span></b></p><p>I don’t know if they’ve fixed it yet, but after <a href="http://techcrunch.com/2010/12/16/is-yahoo-shutting-down-del-icio-us/">recent developments</a> threw the future of delicious into doubt, many of us have switched to <a href="http://pinboard.in">Pinboard</a>. Their linkroll code also happens to work perfectly, you can find the javascript widget on their <a href="http://pinboard.in/resources/">resources page</a>.</p></div>]]></summary></entry><entry><author><name>Joel Dueck</name></author><published>2010-07-02T00:00:00-05:00</published><updated>2010-07-02T00:00:00-05:00</updated><title>Quickly apply “Inherit Zoom” to all bookmarks in a PDF file</title><link rel="alternate" href="https://thenotepad.org/posts/quickly-apply-inherit-zoom-to-all.html"/><id>https://thenotepad.org/posts/quickly-apply-inherit-zoom-to-all.html</id><summary type="html"><![CDATA[<p>I often compile PDF reports totaling 1,000 to 2,000 pages, and am always creating hierarchical bookmarks for these files. One of my beefs is that often, clicking a bookmark will change the magnification setting to “fit width” from whatever you had it set at. Ideally, clicking a bookmark should default to just leaving the zoom level at whatever the reader is currently set to use (“Inherit zoom”). I’ve found no way in Acrobat to set the default behaviour for newly-created bookmarks, and changing these links one at a time in Acrobat is extremely tedious.</p><p>Thankfully, there is <a href="http://maba.wordpress.com/2004/06/20/pdf-bookmark-hacks/">a solution</a> provided by Martin Backschat:</p><blockquote><p>To modify this annoyance you can directly modify the PDF document in your Text editor.</p><p>With UltraEdit, for example, I load the PDF document and open the “Search and Replace” box, enable “Regular Expressions” and replace all occurrences of <code>R/XYZ*]</code> with <code>R/XYZ]</code>, and then also all occurrences of <code>R/Fit*]</code> with <code>R/XYZ]</code>. Now save the document.</p><p>With the Perl scripting language, this hack is applied with</p><p><code>perl -pe 's#R/(XYZ.*?|Fit.*?)\]#R/XYZ\]#g#' in.pdf &gt;out.pdf</code></p><p>The next time you open the modified document with Acrobat you will get a message that the document is being repaired. Just safe it again with Acrobat and everything is fine.</p></blockquote><p>I don’t have UltraEdit but I was able to make this work using <a href="http://sourceforge.net/projects/notepad-plus/">Notepad++</a>. The exact search/replace text was slightly different for my PDF files (note the added space) but the principle is the same:</p><ol><li>In Notepad++, click the <code>TextFX</code> menu, then <code>TextFX Quick</code> → <code>Find/Replace</code> (the standard find/replace tool will not help you here). Make sure you check the “Regular Expr” check box on the right.</li><li>Use <code>R/XYZ(.*)]</code> as your search string and <code>R/XYZ]</code> as your replace string and replace all instances.</li><li>Do it again using <code>R/Fit(.*)]</code> as your search string and the same replace string as above.</li></ol>]]></summary></entry><entry><author><name>Joel Dueck</name></author><published>2010-06-16T00:00:00-05:00</published><updated>2010-06-16T00:00:00-05:00</updated><title>Vector Theme not available for current version of MediaWiki</title><link rel="alternate" href="https://thenotepad.org/posts/vector-theme-not-available-for-current.html"/><id>https://thenotepad.org/posts/vector-theme-not-available-for-current.html</id><summary type="html"><![CDATA[<p>You may have noticed <a href="http://en.wikipedia.org/wiki/Two_Harbors,_Minnesota">Wikipedia</a> has <a href="http://blog.wikimedia.org/2010/wikimedia-gets-ready-for-some-big-changes/">a new interface</a> these days. If you run your own <a href="http://www.mediawiki.org/wiki/MediaWiki">MediaWiki</a> website, the obvious question in your mind is, how can I get these improvements on my site too?</p><p>This information is surprisingly hard to find, but the short answer is: you can’t yet.</p><blockquote><p><strong><em>How can I use Wikipedia’s new skin (Vector) on my wiki?</em></strong></p><p>Vector is not available in MediaWiki versions prior to 1.16, and will be made default skin in 1.17.</p></blockquote><p>—buried in the <a href="http://www.mediawiki.org/wiki/FAQ#How_can_I_use_Wikipedia.27s_new_skin_.28Vector.29_on_my_wiki.3F">MediaWiki FAQ</a></p><p>As of the time of this writing (June 2010), 1.16 is still in beta, and 1.17 has no planned release date. Check the <a href="http://www.mediawiki.org/wiki/Version_lifecycle">MediaWiki version lifecycle</a> for current information.</p>]]></summary></entry><entry><author><name>Joel Dueck</name></author><published>2010-02-18T00:00:00-06:00</published><updated>2010-02-18T00:00:00-06:00</updated><title>Opening the Temporary Internet Files folder for Outlook attachments (OLK5A, for example)</title><link rel="alternate" href="https://thenotepad.org/posts/opening-temporary-internet-files-folder.html"/><id>https://thenotepad.org/posts/opening-temporary-internet-files-folder.html</id><summary type="html"><![CDATA[<p>One of our employees opened up a PowerPoint attachment from an email in Outlook. He then edited it extensively and saved it using the <span class="noun">File → Save As</span> menu command. Unfortunately he did not bother changing the folder he was saving it to, with the result that it was saved in whatever temporary folder Outlook uses for holding email file attachments. The problem is that this folder is hidden and very hard to find. Even typing in the path directly in Windows Explorer does not work. So when he closed out of PowerPoint he realized he was in danger of losing all the work he had done unless he could find and open that folder.</p><p>I found the solution <a href="http://www.groovypost.com/howto/microsoft/outlook/find-the-microsoft-outlook-temporary-olk-folder/">here</a> after some searching, but even that page only explains how to learn where this temporary folder is located; it does not make it clear how to actually open the file. I found how to do it though.</p><p>Open Registry Editor (Click <span class="noun">Start → Run</span>, type <code>regedit</code> and hit <code>Enter</code>). Browse to the following location in the registry structure, depending on the version of Outlook you use:</p><table><tr><th>Version</th><th>Registry Key</th></tr><tr><td>Outlook 97</td><td><code>HKEY_CURRENT_USER\Software\Microsoft\Office\8.0\Outlook\Security</code></td></tr><tr><td>Outlook 98</td><td><code>HKEY_CURRENT_USER\Software\Microsoft\Office\8.5\Outlook\Security</code></td></tr><tr><td>Outlook 2000</td><td><code>HKEY_CURRENT_USER\Software\Microsoft\Office\9.0\Outlook\Security</code></td></tr><tr><td>Outlook 2002/XP</td><td><code>HKEY_CURRENT_USER\Software\Microsoft\Office\10.0\Outlook\Security</code></td></tr><tr><td>Outlook 2003</td><td><code>HKEY_CURRENT_USER\Software\Microsoft\Office\11.0\Outlook\Security</code></td></tr><tr><td>Outlook 2007</td><td><code>HKEY_CURRENT_USER\Software\Microsoft\Office\12.0\Outlook\Security</code></td></tr></table><p>Double click the <code>OutlookSecureTempFolder</code> value, and copy that value to the clipboard (i.e., select all the text, right-click and hit Copy on the popup menu).</p><p>Then go to <span class="noun">Start → Run</span> and paste the value in, and hit enter. An Explorer window will open showing the folder, containing probably every attachment you’ve ever opened.</p>]]></summary></entry><entry><author><name>Joel Dueck</name></author><published>2010-02-17T00:00:00-06:00</published><updated>2010-02-17T00:00:00-06:00</updated><title>BBM Messenger Log Cleanup Script</title><link rel="alternate" href="https://thenotepad.org/posts/bbm-messenger-log-cleanup-script.html"/><id>https://thenotepad.org/posts/bbm-messenger-log-cleanup-script.html</id><summary type="html"><![CDATA[<p>As <a href="blackberry-messenger-logs-timestamp.html">mentioned previously</a>, the CSV files produced by Blackberry Messenger 5.0+ need some cleaning up before they can be properly used. I finally wrote a short script for doing just that.</p><p>You can download the VBScript here: <a href="https://docs.google.com/leaf?id=0B9SDJ22NRBkrNzdjYTIzYWMtNjcwNi00ZjlhLWE1ZDEtNWU0NTQ1ZmEwYjc5&amp;hl=en"><code>bbmcleaner-1.1.zip</code></a>. This code is released to the public domain.</p><p>Once you have the BBM log file on your computer (email it there from your phone, again, see the <a href="blackberry-messenger-logs-timestamp.html">last post</a> on this subject), just drag and drop it onto this <code>.vbs</code> file, and a “clean” version will be produced as a separate file in the same directory. The new file will have human-readable dates and the message will be properly escaped–in short, it will be something you can just open and use in Excel (e.g.).</p><h2>Change Log</h2><p>Version 1.1 (<em>Feb 20, 2010</em>)</p><ul><li>Added <code>GMTOffset</code> constant to allow timestamps to be properly adjusted for time zones.</li></ul>]]></summary></entry></feed>