Removing DRM from your audiobooks
Scribbled · PDF · ◊Pollen source
Like many, I was dismayed to find, after signing up for a year at audible.com, that their audiobooks are still in a proprietary DRM format. Ten and twenty years from now, after iTunes and audible are both gone, I still want to be able to listen to these audiobooks for which I’ve paid good money, so I set out to find a way to free the data.
Note that these instructions will not work unless you have a valid playback license for the original audiobooks. I’m talking about protecting your own media from planned obsolecence here, not filesharing.
There are probably completely free ways to do this, but the straightforward way is just to buy DRM Converter. No, I’m not getting a referral fee for mentioning them here (I wish). Yes, it’s not a free solution. But it works without a lot of rigmarole. Twenty-five bucks gets you un-DRMed audiobooks—for someone like me who has a lot of them, that’s worth it. The only other downside is that, for Audible files, at least, DRM Converter removes the encryption in real time. That is, it takes the program eight hours to un-DRM an eight hour audiobook. The good thing is that it can do more than one at a time.
Because I’m kooky, I like to create both MP3 and unprotected iTunes Audiobook (.m4b) versions of my audiobooks. I’ll show you how to do both here.
Method One: Converting AA to MP3
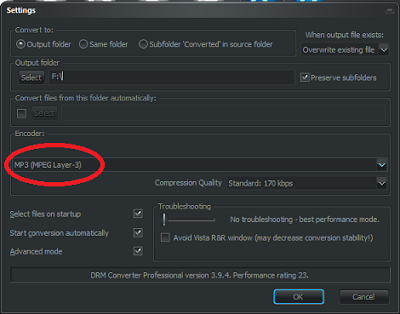
This is the easy one. Just set DRM converter to use the MP3 format.
When it has finished, there are a couple more steps to take to get the file into the proper place in iTunes. Add the file to your library (using File menu, → Add File to Library), and it will show up in your Music section, not in your audiobooks. Right click the file in iTunes, select Get Info and go to the Options tab.
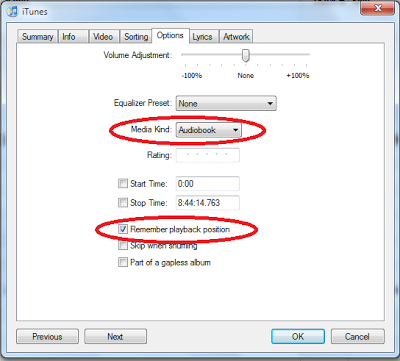
Select the Audiobook and Remember Playback Position options as shown above. Voila! The file will now appear in the Audiobooks section of iTunes.
You may also want to copy and paste the album artwork from the original Audible file (again, using the right-click menu → Get Info.
If you want to add chapter breaks, you’ll need to create a .m4b file instead. Here’s how:
Method Two: Converting AA to M4B with chapter breaks
This method involves the use of an additional program, Chapter and Verse, which is free. Download and install it before continuing!
The first step is to use convert the .aa file to an .m4a file using DRM Converter. Use the following settings:
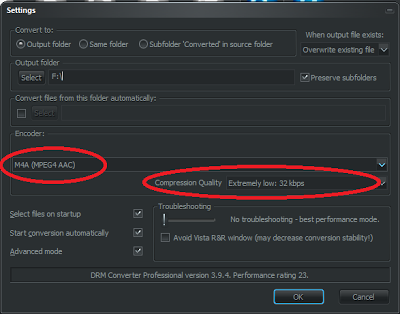
Most of my audible.com audiobooks are encoded at 32kbps anyways so there’s not much point in going higher.
After you have your .m4a file, open Chapter and Verse, and add that file to your project. (If you get an error at this point, see below)
If you’re picky about having chapter breaks in the actual spots between chapters in the audiobook, you’ll have the chance to poke through the audio and insert chapter breaks in the right spots. Myself, I just have it automatically insert chapter breaks at 30-minute intervals (most of mine are fiction so there’s not much call to go skipping back and forth between chapters):
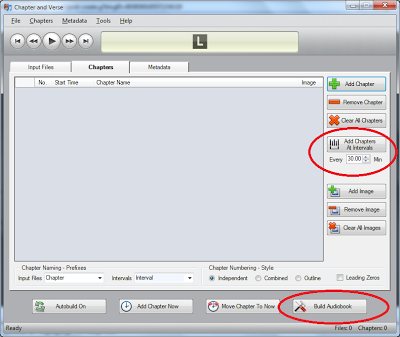
Once ready (don’t forget title/artist metadata and cover art!), click Build Audiobook as shown above, and the program will produce an M4B audiobook and offer to add it to your iTunes library for you. Once there, it will immediately be in the Audiobooks section of your library, no additional tweaking required.
“Not recognized as a valid audiofile”—If Chapter and Verse gives you this error when attempting to open your m4a file, it is probably because the sample rate is too high given the length of the audio.
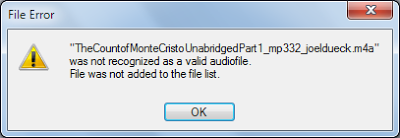
This is explained by the program’s author in detail here, but in our scenario, the problem comes because DRM Converter saves its m4a files at 44.1khz (not configurable). When the file reaches a certain length in minutes, it becomes too big for Chapter and Verse to handle at that sample rate.
To solve this problem, you can use iTunes to downsample the m4a file. in iTunes, go to Edit menu → Preferences and on the General tab, click Import Settings….
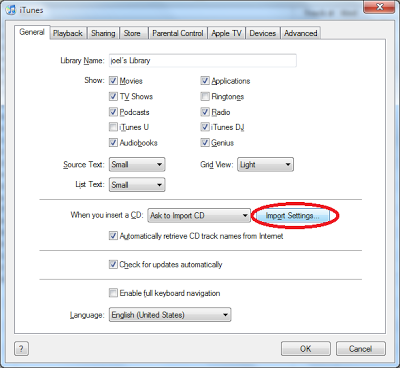
Set the import settings as follows: AAC encoder, 22.050kHz sample rate, 32kbps bit rate.
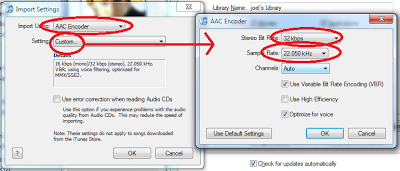
Click OK to close all the dialog boxes. Now go to the .m4a file in iTunes (or the .mp3 file you may have created earlier for that matter, it’s up to you), right-click it and click Create AAC version. iTunes will re-encode the file using your new settings and you should be able to open that new .m4a file in Chapter and Verse.
Responses
eLizDecember 18, 2009
Just popping into to say you are such a cool brother.